This post may contain affiliate links for your convenience. If you make a purchase through one of my links I will earn a small commission at no additional cost to you.
Last Updated on May 13, 2020 by Chris Butler
How to Connect Cursive Letters
Hello crafty friends!
Have you ever wondered why script letters are spread so far apart in Cricut Design Space? I’m not sure why Cricut doesn’t connect cursive letters for us, but today you’ll learn two ways you can get them to connect.
Or maybe you’ve tried moving your letters closer together just to have the insides fill in or letters disappear. So I’m going to show you how to fix both of those problems too.
Plus you’ll learn some troubleshooting tips and the answers to frequently asked questions when it comes to connecting letters in Design Space.
Let’s get started.
PIN ME!

Quick Links to Information in This Post
Connect Cursive Letters in Design Space Video
How to Connect Letters
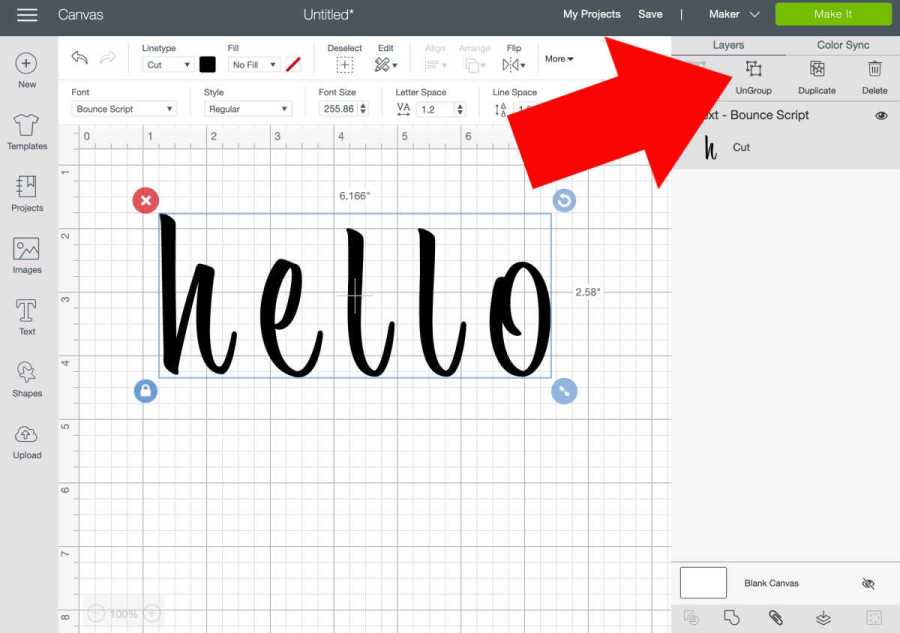
Ok I’m going to start by typing the word “hello” and changing it into a script font. If you haven’t worked with script fonts in Design Space before, you might expect the letters to look connected, like cursive writing normally is.
But that isn’t the case. Instead, the letters are spaced apart from each other.

There are two ways to fix the spacing so that they are connected: you can either move each letter individually, or you can use the Letter Spacing controls.
Let me show you how both of those methods work.
Move the Letters Individually
Design Space still has the letters grouped together in a single word, so you can’t just begin by moving one letter at a time.
First, you need to select the word, and then go to the top of the Layers menu and click “ungroup.” That separates the letters from each other, so you can move them around individually.
One at a time, move the letters closer together until they are touching like they would in a normal cursive text.

Once you get them all together where you want them, it’s very important that you remember to weld them. Otherwise, even though they appear to be one connected word, Cricut will still cut them out as individual letters. Use your cursor to select all of the letters at once, and then click “weld.” on the bottom right of the layers menu.

Now your letters are connected, and Cricut will use one continuous cut for the entire word. Perfect!
Connect Letters with the “Letter Space” Buttons
In the top menu of Design Space, you can see a control for “Letter Space.” Select the whole word and click the down arrow on the Letter Space control.

That will reduce the space between the letters of your word. You can just keep clicking the down arrow until the letters are as close together as you want them to be. This font ended up being a -0.3 letter space for the letters to touch. Each fond will be different though.

This method will probably keep the letters more evenly spaced than the first method, but you will have less control over the individual letters’ positions. Some fonts you will still need to ungroup and manually adjust a letter or two.
Also keep in mind that if you use this method, you still need to remember to click “weld” once again when you finish spacing the letters. That makes sure you have one continuous word instead of individual letters.
So now you know two ways to connect script letters in Design Space, and you know what to do if your letters fill in after you weld them. I hope these tips will help you.
Now let’s look at some common errors and frequently asked questions.
Connecting Letters in Desing Space FAQs and Trouble Shooting
1. Why do I have to Weld Letters / How to Weld Letters?
It’s important to weld your letters together when you are done spacing them. If you don’t Cricut will cut each individual letter, even though they look like they are connected. So If you don’t weld your script text will fall apart after it’s cut if you are using paper, or you’ll be able to see those cut lines in vinyl and it won’t be pretty.
It’s very simple to weld. First, select all of the letters. Then locate the “weld” button at the bottom of the Layers menu and click it. That will tell Cricut to use one continuous cut for your entire word, and to not cut each letter out individually.
Help! Cricut Weld Fills in Letters
Sometimes after you weld, you end up with another problem. In the video, you can see that one of my letter Ls filled in with a blob of color instead of a nice loop. This happens because the letters are too close together.

To fix it, simply click the undo button on the top left to reverse the weld. Space your letters farther apart and then try welding again. Click here to see the full tutorial on how to weld and unweld in Cricut.
Why Did a Letter Disappear after I Clicked Weld?
Letters disappearing after you click the weld button is another common glitch in Design Space. If that happens to you click the undo button. Then try re-spacing your letters and welding them again.
Click here to see my full tutorial on welding and unwelding in Design Space
How Do I Curve Cursive Text in Cricut?
To curve cursive text, you’ll need to use the second method of letter spacing.
Type out your word and DO NOT ungroup it. Once you ungroup and regroup the letters the curve option will disappear.

Select your word and on the top menu you will see the curve button. Click on that and a slider bar will appear. Side the circle to the left to curve your word up. And slide to the right to curve your word down.

Now you’ll use that line spacing tool on the top menu that I showed you above to move the letters closer together.

You’ll probably have to go back and forth between curving and spacing until you get the look you want. And in the end, you may even need to ungroup and move some letters manually. Just remember once you ungroup, you can no longer curve.
Now you know how to connect cursive font, why it’s important to weld, plus some troubleshooting tips for when things go wrong like letters disappearing. You even learned how to curve cursive text (say that 10x fast!)
It can be a lot to remember and sometimes intimidating when you’re not sure which step is next. That why I put together the guidebook called conquer your Cricut and make great things. It will give you everything you need right at your fingertips.
Now you won’t have to go back and find that youtube tutorial or that awesome blog post like the one you just read to remember all the steps. Click the image below to find out more.

Thanks for crafting with me today!

Chris Butler has helped thousands of crafters learn how to use their Cricut machine without feeling overwhelmed. She is a best selling author and an up and coming designer. For fun Chris enjoys designing SVG Files, hanging out with her family (preferably at the lake), traveling, and volunteering at her church. She is a wife and mom of two crazy fun kids.
I am having an issue with the cursive because I have chosen a cursive where the last letter flags around udnerneath.
How do I get that back? The text I use is either Painters or Krinks