This post may contain affiliate links for your convenience. If you make a purchase through one of my links I will earn a small commission at no additional cost to you.
Last Updated on December 19, 2023 by Chris Butler
Quick Links to Information in This Post
Paper Flowers Craft with Cricut
Hey crafty friends! Today I’m gonna show you how to make a paper flower wall Display with your Cricut. Plus I have three free paper flower SVG files for you so you can make your very own.
The paper flower SVG file also includes a ‘greenery’ SVG file so you can add leaves to your wall display.
You wanna know the best thing about paper flowers? I can’t kill them! They last forever and bring such a nice pop of color to a room.
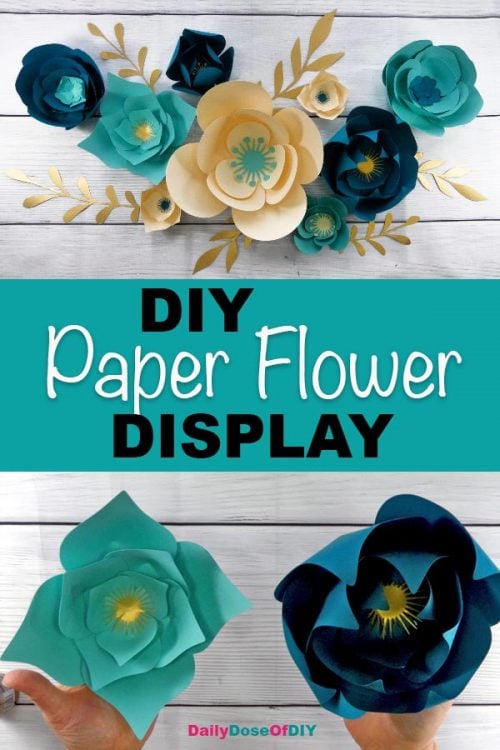
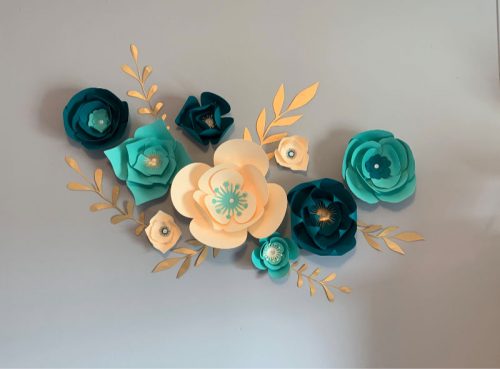
The display I made today is for my teen daughters room. She’s all about the teal right now.
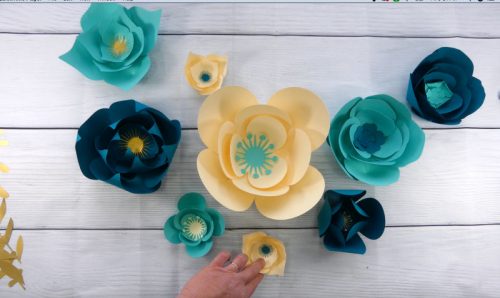
So I made light teal flowers, dark teal flowers and cream colored flowers for my neutral. I cut the ‘greenery’ in gold card stock since green doesn’t exactly go with teal.
So don’t be afraid to pick non-traditional colors for your paper flower display.
Let’s get started.
-Oh one more thing, scroll all the way to the end to enter the Think Spring Giveaway for your chance to win a NEW Cricut Maker!
PIN IT
Paper Flower Supplies Needed
- Cardstock -Three colors for the paper flowers and a color for the leaves
- Tacky Glue or Hot Glue Gun
- Poster Tack and or Thumb Tacks
- Paper Flower SVG -I’m including three free paper flower SVGs with this tutorial + the greenery
- A way to cut the Paper Flowers – I use a Cricut
I used this variety pack of teal cardstock for my teal flowers. For this paper flower display, I used the lightest color and the darkest color in that pack.
The cream-colored cardstock I already had on hand. Both are 65 lb cardstock which is what I recommend for making paper flowers.
You can use as many colors as you want for your display. But generally three colors are going to look best.
You’re also going to need some tacky glue or a hot glue gun to glue the flower petals together.
And of course you’ll need a cutting machine like the Cricut and a free paper flower SVG for you to cut. I am offering three paper flower SVG files for you to use. You can find them in my free resource library I make available to subscribers of my weekly newsletter. More details at the bottom of the post.
Video – Make a Paper Flower Wall Backdrop
Take a look at the video on how to create this stunning paper flower wall backdrop. Written instructions are down below.
How To Size the Paper Flowers
Paper flower displays look best when they have a variety of flowers and sizes. When you upload the Paper Flower SVG files into design space the size is set to a medium sized flower.
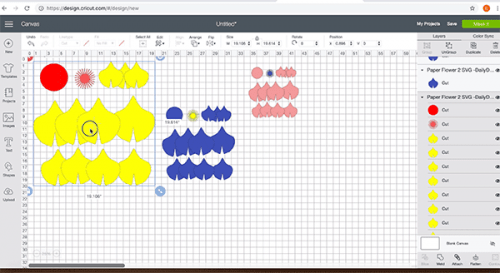
So the easiest way to make different sizes is to make two duplicates of flower you’ve uploaded. Make one of the duplicates smaller than the original and then change the color. Make the other duplicate larger than the original and then change its color.
Now you have three different sized paper flowers that you can cut in three colors.
If you do this for each of the three paper flower SVGs you’ll have nine flowers for your display in various sizes.
Do the same for the greenery. There are two different leaf branches in the SVG file. I duplicated the file twice and made one duplicate larger and the second one smaller.
Assembling the Paper Flowers
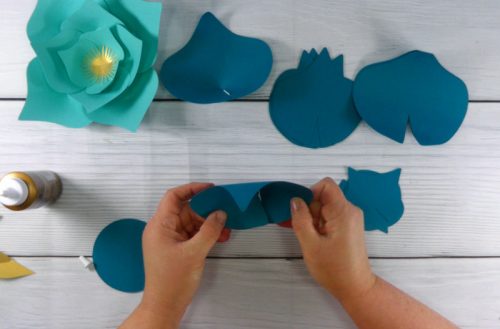
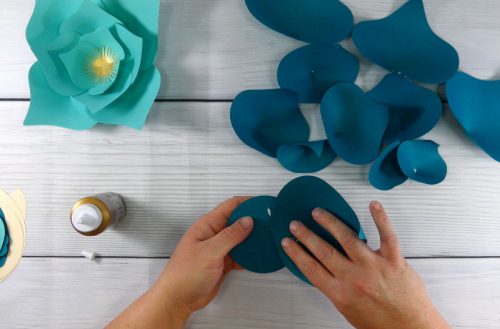
All three of the paper flower designs are put together the same way. Start with separating your flowers petals by size.
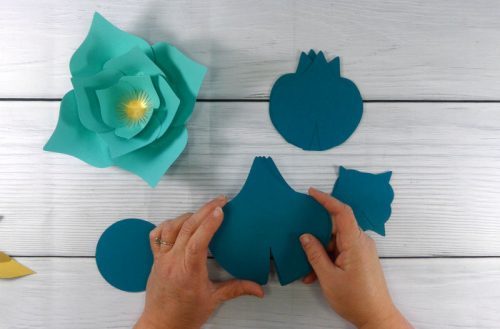
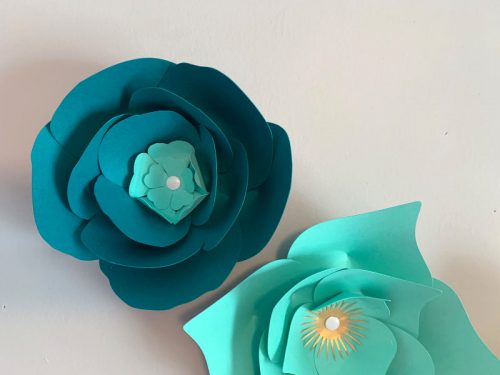
You will also have a circle that is cut out, this is the base for your flower petals. You can choose to curl your flower petals or leave them uncurled.
Here is a picture of the same flower done each way.
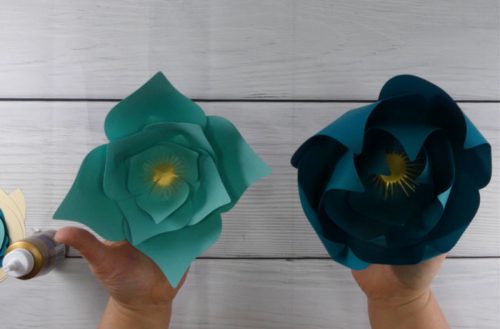
Some flowers I prefer un-curled petals, but I mix it up and do some of each when I’m making a paper flower display.
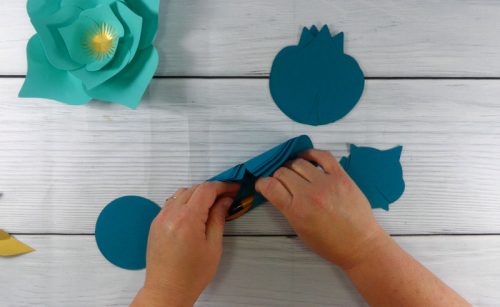
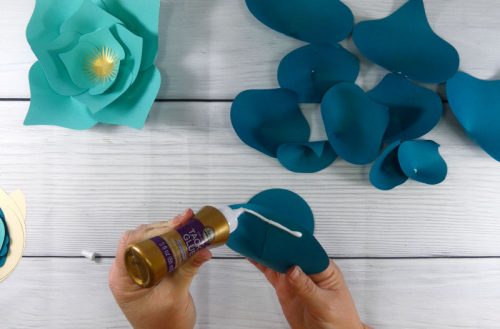
If you want to curl your petals take a stack of the petals and roll them around a pencil. This will give each petal a nice curl.
Next we are going to glue the petals. To do that put tacky glue or hot glue along one side of the upside down ‘V’. Then overlap the other side of the ‘V’ to glue the ‘V’ closed.
Hold the two sides together until the glue sticks. It shouldn’t take long if you are using tacky glue or hot glue.
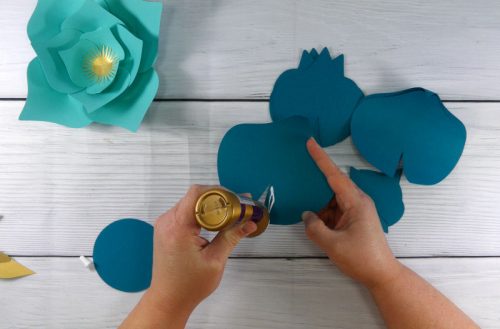
Repeat this process for every petal. After you get all of the petals glued we can glue them to our circle base and make the paper flower.
Flip one of the largest petals over and place a line of glue along the bottom. Then glue it to the outer part of the circle base.
Glue all of your largest petals around the outside of the circle. Two of the paper flower SVGs have four large petals that go along the outside and one of the paper flower SVG files will have five petals.
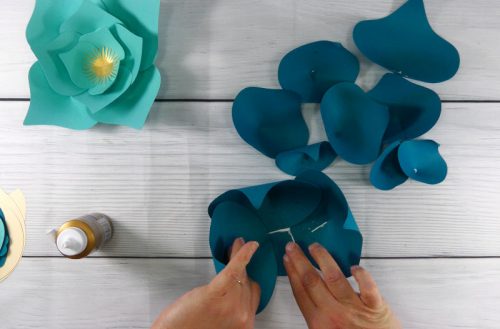
After the outer layer of petals are glued onto the base we can add the next size smaller petals.
Glue the next ring of petals evenly around the inside of the outer petals. Start the first one in between two of the outer petals.
The last ring will have three petals that you’ll glue evenly inside of the second ring.
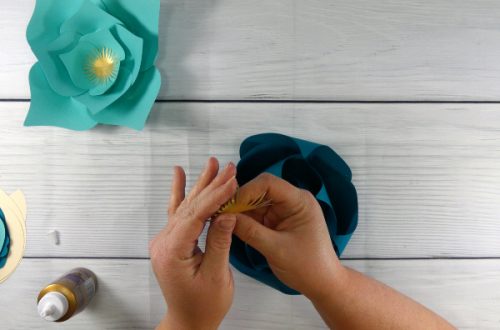
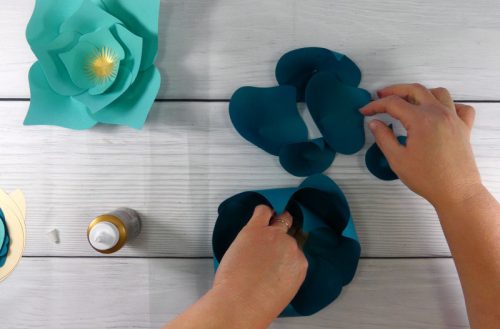
And finally, you’ll be ready for the center of the flower. I just use my fingers to curl up and fold the center. Then place a small dot of glue on the back and place it in the center of the flower.
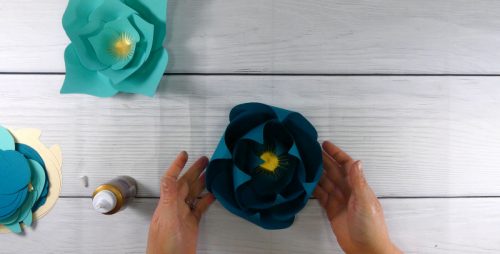
So that’s how you assemble the paper flowers. Do this for every flower you cut out for your paper flower display.
I made nine flowers for my display and it took me an hour or two to make them all. I’m not a super great judge of time as my kids interrupt me a lot! #momlife
How to Make a Paper Flower Backdrop
Now that all of the paper flowers are assembled it’s time to put it together for our wall backdrop. I like to start on the table and arrange the flowers until I’m happy with the look.
Then snap a picture so you can recreate your paper flower backdrop on the wall.
So to make the backdrop start with the largest flower you have and place it in the center. Then take the two next biggest flowers that are a different color and place them on one side of the large flower.

You can play around with the positioning, try exactly centered or slightly offset. I think offset looked the best for these flowers so that’s what I went with.

Then take the next two largest flowers and place them next to the first set of flowers. Again you can play with the angle here and see what looks best.
Next we are going to take the four remaining smallest flowers and fill in the gaps with those. I usually place these flowers on the top or bottom of the largest flower or off to the side and in between the medium flowers.
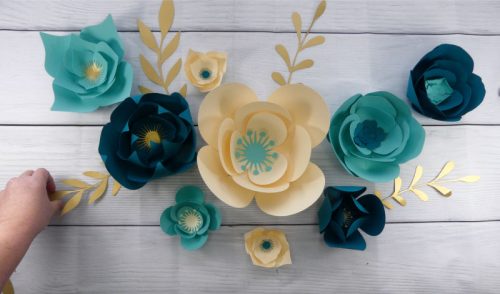
Finally we can add in the greenery branches to finish the paper flower wall display. I just tuck a branch behind a flower and try to spread them out evenly around the display.
When you’re happy with how it looks, snap a picture and we can start hanging the paper flowers on the wall.
How to Attach Paper Flowers to a Wall
So now we get to hang our paper flower backdrop on the wall. For the greenery, you’ll definitely want to use poster tack
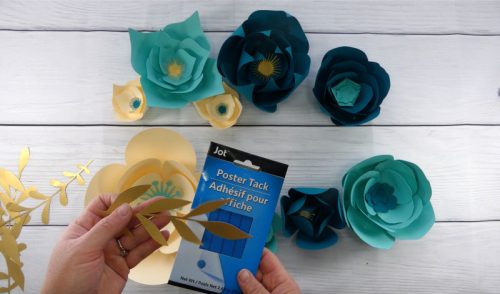
Poster tack will also work for some small flowers, but the larger paper flowers will most likely fall down. They are just to heavy for the poster tack to hold up.
So for the paper flowers, I use thumbtacks. This is the main reason why I like to arrange my backdrop on the table first. Though thumbtacks leave just a teeny tiny hole, if you get a bunch of those holes as you arrange flowers it will look bad!
The great thing about using thumb tacks is you can place them in the center of the flower and it still looks natural. But if you don’t want it in the center they are small enough you could hide the thumbtack behind one of the petals.
And of course the holes they leave behind are so small they’re barely noticeable. Often times painting over it is all you need to cover the holes back up.
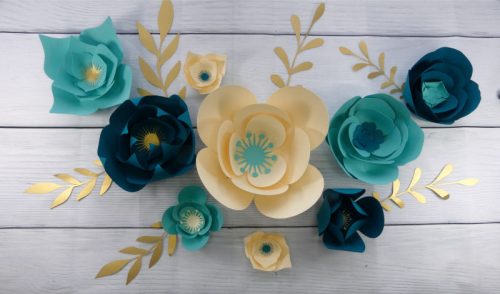
Again we want to start with the largest flower and center it where you want your flower backdrop to be. Then refer to your photo to hang up the rest of your paper flowers followed by the greenery.
Here is the finished result in my teens room. The paper flower wall backdrop is right above her vanity and really looks fabulous.
This picture doesn’t do it much justice because she’s a teen and her room is a DISASTER. As much as I would love to show the vanity in the pic also, well then you’d be able to see the disaster lol.
Get Your Free Paper Flower SVG
I have the three paper flower SVG files I used to make this display plus the greenery available for free in my resource library. I made the resource library for subscribers to my newsletter. It’s like a one-stop shop for all of my free SVG files.
When you sign up you’ll be emailed the link and the password to the library to get your free SVG file. Plus you’ll receive email updates from me every week or two letting you know about new files I’ve added along with other news.
To sign up fill out the simple form below and you’ll be all set.
All of our free SVGs and Designs are kept in a library for your convenience. Fill out the simple form and we’ll send you the link and password to access the SVG files right away.
Already have the password? Enter the Library HERE

Chris Butler has helped thousands of crafters learn how to use their Cricut machine without feeling overwhelmed. She is a best selling author and an up and coming designer. For fun Chris enjoys designing SVG Files, hanging out with her family (preferably at the lake), traveling, and volunteering at her church. She is a wife and mom of two crazy fun kids.
I love all the colors you used!
These are absolutely beautiful! Thanks for the instructions on these
These are so cute!!! Love the colors also!
Thank you for sharing this. I haven’t tried making flowers yet but with this it will be much easier to do.
I’m going to use yellows and greys to display it in our room above our bed! I’m sooo excited to try this tonight
I’m thinking of using maroon, olive green and cream colors to put on my staircase wall!
I love your colours.
My girls would love this display in their room. Most likely they will ask for pinks, purplesvand teal for their flower colors.
Love these colors of your flowers! I’m thinking of making this for my craft room or possibly using the flowers for a wreath for my mom. Thank You so much
You’re Welcome Diane =)
Ooh, would love to put these above my fireplace!
I love the non “traditional” colors you chose and the “greenery” to tie it all together!
Those colors are amazing (my wedding was navy and turquoise) so I will probably make this with these exact colors for my office! Thank you!
Thank you for the flower tutorial. I’m always looking for new ways to use my Cricut Explore 2.
These are beautiful! I can’t wait to try some paper flowers 🙂
I will need to Try theses one day!!
I can’t wait to make this for my daughter’s bedroom. Thanks for such an amazing post!
Very nice. I will put one over bed in each guest room. Since the rooms are neutral, I will use colors picked out of the bed covering for each room. It’ll look great.
Thank you for the pattern and tutorial!
Beautiful color combinations! Thank you for the pattern and tutorial.
I thinking about making my backdrop portable by applying it to one of the small whitewashed pallet sign blanks. That way I can hang it in my booth when I do vendor events. I’m considering dark blue, light blue, and cream flowers with gold grrenrry.
Oh that’s a fantastic ides Eileen!
The colors used in this project are fabulous! I intend to use this project in my daughter’s room among her newly painted walls and fun decor. Thank you!
Thanks Monica!
I love your ideas!
I love the colors you chose. I think I will copy your colors for the first ones I do. Going into my craft room for a touch of needed spring.
This is awesome. Thank you!
I love these flowers, cant wait to get started making my own!
This was an awesome help for my first paper flower project!!!
I have a old window hangging in my kitchen and I am going to make flowers and decorate the panes with them. Blacks and gray and blues will be my colors. Thanks for the detailed instructions.
Thank you for these adorable flower designs! Great way to spend this cold, wintery Sunday!
You’re welcome Karen =)
Reverse canvas purples
These are so cool! Thanks for the tutorial!
Not such a fan of flower wall decor, but I love the fact that you’re generous enough to share your ideas, imagination, and how-tos with all of us!
I’ve been looking for a good paper flower tutorial and I’ve found it! I want to do a flower wall above the crib in our soon to be here daughters room. Our colors are pale pink, cream, and light grey. These will be perfect for that 🙂
I’m can’t wait to run home and try
I love the colors you used and would probably just copy those. Why mess with perfection right?
Haha Thanks Amy!
I think I need to make this to put over my washer and dryer in the laundry room. They will definitely liven up the room.
Oh my gosh! I didn’t even know how much I NEEDED this! Hahahaha! I’m going to make mine in the same colors and place it above my blogging task board! Gotta make work fun right!!??
Absolutely!
How many sheets of paper are need for this project? I noticed today at Hobby Lobby their paper was 50% off! I had purchased about 6 sheets each of several colors, cause I couldn’t decide haha!
I’m going to make these in school colors for graduation party decorations!
Your flowers are gorgeous. I would make mine in teal and pink with cream. I love your gold leaves. I would love this arrangement in my crafting room hanging on an open wall space I have above my sewing machine. I appreciate you sharing arranging tips, that is where I have the hardest part. Thank you for sharing your cut files and assembly video.
I just found your blog. I haven’t made paper flowers yet, but I can’t wait to try them! I just bought a bunch of card stock, so it’s time to get busy!
I’m going to incorporate the flowers with s welcome sign and put it in my living room. Refs tans/browns am green. Can not wait 😍
Thank you so much for this! I’m going to make these for my baby shower photo back drop using champagne, blush, and lavender! So excited!!!
Thank you for the tutorial on making flowers! I am new to the cricut world and have seen some, but thought they look so complicated to make. You have given me the confidence to try and see if I can do it! Thank you!
Thank you for all the great ideas you give us. I would make flowers for my entry wall in the living room in neutral creamy colors. I would also make some for future Grandbabys nursery in either soft pink & cream or soft blue & cream.💙💖
purple and white for granddaughters room.
I would to make these for my craft room! I would use pink and black!
I’m going to attach these to a blank burlap canvas to decorate the walls in my guest room! I love the colors you use!
Not ready to take on such big flowers but would love to make smaller ones for mother’s Day projects. Would love in shades of yellow.
I love, love, love the colors you chose. I’m in love with turquoise, and this is going in my craft room above my “create” vinyl wall decal. Thank you so much for sharing your tips and tricks from start to finish.
These would look so cute in my daughters room! I love pinks and corals
I’m very indecisive about colors but I’m thinking something bright and cheery for spring. I think pink, purple and some cream. I might hang it in my bathroom to give the dull gray some pop of color. Thanks for the beautiful idea.
Beautiful work….in love with the color combination! I hadn’t thought of using Poster Tack to display flowers like this! Thank you for sharing
For a backdrop in my house most likely shades of red and above the couch in my family room. Excited to give it a try.
I recently started with small paper flowrers and really enjoyed making them! We just moved into a new home and my daughter wants to re do her room. Oddly enough, she wants teal as her main color wih a unicorn theme. These flowers would look beautiful in her room. Once we finish getting unpacked and settled, I plan on working on these flowers for her room!
I can’t wait to start making this for my guest room and hopefully to my new granddaughter’s room! Thank you so much for making this much easier for a crafter like me. <3
Love this!! I want to make them for my granddaughter in peach & teal.
So excited to try this!!
I plan on using purples, pinks, yellows, blues, and lavendars and putting them in MY bedroom a LONG garland of flowers and leaves. or two small swags. I’ll have to see what looks best
Thank you for sharing! I cannot wait to make my own!
My granddaughter saw the flowers and wants to make some for her bedroom wall. She hasn’t narrowed down the colors yet, she has 2 shades of blue, 3 shades of green, and 2 shades of pink, so far! I’m a teacher, so I have tons of colors of cardstock and regular weight paper for her to choose. Should I use cardstock or regular weight paper? She wants to start next weekend!
Cardstock will hold up longer, but regular weight paper would work too!
I like your colors, but maybe use a light grey instead of cream. I’d use it in my bedroom. Can’t wait to try this.
That sounds good! Her walls are light grey so we went with cream.
Thanks for the great tutorial! I want to different shades of purple to make these for a small wall in my bathroom. I think I’ll going to try make a bouquet as well to put in mason jars.
That’s a great idea! Purple is my favorite color.
lovely flowers, thanks for the tutorial 🙂
These are super cute. I’ve been looking for things I could make for my craft room walls and these would be super cute. Love the fact that I can do the colors of my room pink teal and grey. Love everything you do and love the fact that if I have a question u try to help.
I would love to do a paper backdrop in my guest room. I would love some suggestion on colors that would look good with yellow. I think yellow is such a bright and cheery color.
Hi Amy! Yellow looks good with lavender and pink and minty teals!
These are so beautiful. I was thinking of making these into a wreath instead and hang in the entry way inside. Maybe some beige’s, browns, yellow and cream. Good Job!
I didn’t have the courage to do these flowers but with your tutorial I’ll definitely give it a try, I have Birthday invitation coming up, I’d like to make the small flowers a part of the gift wrapping decoration.
I love the flower tutorial! I’ve always wanted to try and make these. I am planning to turn our old dining room into a craft room so I think I will put some of the flowers on the wall. I would probably use some blue colors.
Thank you for the help the tutorial. Very specific and easy to follow. I plan to do shades of pink for a 1st birthday backdrop.
Hello,
After reading your tutorial i actually want to try making some flowers. I haven’t done anything with card stock. I mostly make painted wood signs, T-Shirts , Coffee tumblers with vinyl, frosted glass blocks and reversed canvases. Time to try something new that i can incorporate into the things I already make,
Thank You for the inspiration and the how to!
I cant wait to try this and even a beginner like me can umderstand the concept. Thankyou so much
I have a whitewashed wood plaque that has been waiting for inspiration to hit me. I may make a display on the board instead of on the wall.
I can’t wait to make these! I plan on using teal, light gray, and dark gray to match my daughter’s room colors. These will look perfect over the head of my daughter’s bed. She’s so excited. Mother-Daughter bonding time crafting flowers!
I’m going to make some for my spring wood blocks!
I would make one for my family wall using burgundy, dark green and beige.
Love this tutorial! Love these colors! I have been wanting to make a floral backdrop for a long time now. Thank you so much for sharing!!
I love the size and dimension of these flowers! And very creative color choices!
I love these! The colors are awesome. I will use them on the bulletin board in our adult Sunday school class at church.
I really like the design of these flowers. I am thinking about pale pinks and grays for my wall design.
How many pieces of cardstock did you use to make the larger flowers and how many inches across would you guess the largest one was?
The largest flower was 4 pieces of cardstock and it’s probably 10-12″ wide.
Im going to make a.wreath in oink and purple
Love these! Just beautiful! I plan to try this in my daughter’s bedroom. I like purple, but she likes pink so I’d do a mixture! Thanks for sharing!
This is simply adorable!
I am really excited to try this! I am thinking that I am going to put it in my bedroom and arrange black picture frames of my nature photography, too. I have green walls, so I think I will do pale pinks, creams and purple. I am looking for a romantic feeling. Thank you so much for such a great tutorial!
I would love to mske This for my front door sign.
Think I’ll make some for my craft room when I redecorate it. Thanks for the cut files!!!
I love the flowers and great instructions ..you look a lot like Jennifer Maker I thought it was her new site with a different name..are you sisters/ twins ??
No we are not actually. But I do know her, well through blogging anyhow lol. Are you in her blogging FB group too? I love the fall stuff you posted on your blog =)
Can’t wait to try the flowers
This is such an easy question… Above my bed and it would definitely be sunflowers!! I always look for things to cheer me up and sunflowers with their big beautiful bright yellow and orange blooms always do it. You make the most gorgeous flowers too! Very meticulously done and with such detail. Love them! I have been drooling over the new Cricut Maker too so thank you so much for the chance! Very, very generous of you! 🙂
Oh if you like sunflowers you need to check out Jennifer Maker if you haven’t already. She has a great sunflower pattern and tutorial.
I have a new granddaughter, pretty sure this will be in the makings.
Absolutely love your work.
I enjoy making paper flowers. I’ve made a photo background for a father daughter dance with them. Can’t wait to make yours to add to my collection. Some day I’ll have my craft area/”happy place” setup again and plan to do a flower wall for it.
This is a great tutorial. I love your ideas and designs and the easy to follow directions. Thank you for sharing these flowers. Love your blog and love your creativity!
I have a guest room that needs decorating. I love the colors that you used.
Beautiful flowers!
Can’t wait to try this in my daughters room!
Going to attempt these flowers in turquoise and coral for my bedroom
I can’t wait to try this! I’m going to do black and white and use them as 3D wall art 🙂
Love the colors. It would look great on my dining room wall!
I would love to use these as a backdrop at my daughter’s birthday party!! Her favorite colors are pink and purple so that’s what i’ll use!
This is so pretty, it reminds me of flower and eucalyptus swags my aunt used to make.
My daughter would love this in her room. I would use pink’s abs purple’s!
I love these!! I want to make some to go above my bed in my apartment! I am thinking of doing white and gold!
These flowers are gorgeous!! I would love to put these in my office! Love the bold teals for spring!
Love this flowers! Planning to make some at work in spring colors
I would love to have shades of pink & purple flowers in my guest bedroom. Your flowers inspire me!
I would love to make these flowers for a very pretty Easter brunch celebration. I would use pinks and yellow for Spring colors.
Hope I am the one chosen for the cricut maker..
Thanks for sharing,
Monica Marschinke
This is pretty! I’m looking forward to attempting to make these next. I’d love to try a shadow box with flowers too! Thanks for the help!
This is fantastic! Thank you so much
Thank you for the easy to follow tutorial. My daughter is getting married next month and we are making these for decorations.
These are so beautiful! I would love to make these, same colors too, for my mother. Her Birthday is coming the end of April and just 2 weeks later is Mothers Day. I think it would really brighten up her room . She has recently been admitted to an Assisted Living facility with Dementia. I think she love these! Thanks for sharing!
Love this idea! I think a pastel pallet would be great for spring! Maybe I can use it for our spring luncheon at work!
I can’t wait to make these for my daughters rooms, I’ve been looking for some svgs like these but never found ones I liked!!
Just starting to decorate in my new studio….this arrangement might be just the right thing! I am thinking that the Pantone coral that is so popular now would work well with my sage green walls. Shades of ivory and deeper coral as secondary colours.
Looking for ideas for my son’s wedding…keep ’em coming!
Thanks for sharing! I am the lucky friend that gets to plan a gender reveal. I can’t wait to use your tutorial to help with the surprise!
This would be so cool in our school office in orange and black..our school colors!!
I love tho tutorial very detailed with step by step instructions! I’m definitely going to try to make these for my daughters room! I think light pink, teal, and gray will match her decor perfectly!
My craft room needs a pretty cork board, maybe bright & sunny yellow, pink, and orange.
Will love to make these for my daughters room. She loves blue and purple!
I absolutely love this tutorial ! Very detailed , step by step instructions! I would love to try this for my daughters room in light pink, teal, and gray! I think it would compliment her decor perfectly!
I would love to make a backstop for a wedding or bridal shower
I love the paper flowers. I can’t wait to try making them.
These would be perfect for my daughters bedroom in teal and pink!
I want a paper flower backdrop in my kitchen using yellow sunflowers. They’re my favorite flower.
I haven’t tried to make a paper flower yet. They look amazing and I can’t wait to try.
Love this so much ! Perfect for a baby’s room
These would be great on a wooden sign or a pallet plank.
I love the flowers! My daughter will be having a quinceañera soon and I would like to add these flowers to a DIY photo booth backdrop. Her colors are teal, rose gold, and gold.
I cant wait to make this! Ive been looking for an addition to a sign idea i have to welcome people into our home. I’m thinking im going to use mustard and burgandy colors for them and put it on our sun porch wall as you enter our house.
Hey!! Love how you expain the flowers!! I’d love to do a flower backdrop for my daughter’s room!! To be able to make the flowers their favorite colors than also have them help me would be the best! Hopefully I can win!!
I would put them in my office/craft room! Greens, blue and white
I Love the colors here! I’ll be making these with the granddaughters for sure!
I’m gonna use blushes and golds to create a backdrop for my sisters wedding shower this summer!
Love these flowers , would make an awesome display over my dining table using it favorite colors purples.
beautiful colors! and the directions are very easy, simple to follow!
I was wanting to decorate my daughters room with flowers but it’s just been intimidating making them. Your video made it look so simple! Thank you!
I love the colors you used, the pop of gold for the greenery makes it very classy! I’d like to try making an arrangement for my bedroom. Thanks for sharing!
I’ve been wanting to try these! Thank you for the tutorial!!
I want to make a shadowbox with these flowers in blue shades as a backdrop!!
Excited to try it!!
I would love to make a backdrop like this for a wedding or a bridal shower
Love the flowers. I would use pink colors and put it up in my crafty area
I would love to use these as phot backdrops for my glitter tumbler pictures! Definitely shades of teal since that’s my color scheme.
Will be making this backdrop for my granddaughter’s nursery using a dark pink, light pink and white for the flowers and gold for the greenery.
I want to make these for a friends nursery.
Such beautiful work! I
These are really pretty my kids would love making these with me!!
OOOOOOH! I can see this in both my granddaughter’s rooms, in soft shabby chic pastels! This is simply beautiful!
I never thought of using these for a wall backdrop gest idea!! I love the blue and I would probably do white or yellow too. I have not tried to make flowers yet…kind nervous to! 😁😁
I’m going to try flowers now. Thank you for the instructions (with pics to follow)
I really appreciate this tutorial as I am a newbie and need all the assistance I can get! I will use black, red and gold for mine and display it in my office. Thank you so much!
I think these flowers will look beautiful on the bulletin boards I create for the Retirement Community I work for…
I LOVE these! So creative and easy to make. I could totally use these for my graduation presentation! And it would look so cute with the blue petals and a gold center.
You are amazing and such an inspiration..
I just love paper flower decorations. I am hosting my grand daughter’s grad party in June. these would be perfect to complement the occasion. Thanks for the great contest.
All your crafts inspire me!
Such beautiful flowers!!
These are so pretty, I think I would use this at my reception next year!!
These are really pretty. I would make some red & white flowers for my living room, and maybe put a little gold leaf on the tips of the petals just to go with the rest of my decor.
I would put in my bathroom and use peach, teal and white
This is GORGEOUS!!
I have teal as my accent color in my family room and this would look amazing on our poor empty wall 😆 Thank you for the great idea and fabulous color choice!
Burgundy, navy, dark green for nephew’s wedding.
I would like e to try this in my bedroom above my bed.
I love these flowers!
Love this design! I would like to make them for my daughters room- she is really into yellow right now so will try and find some nice yellows!
I’m planning my graduation party and these would go perfect for part of the background!
Beautiful work as usual ❤❤❤❤
I will be making this for a baby shower as a backdrop I will be using yellow, pink, blue, purple color stock paper. Love the idea thank you DDODIY
I’m so excited to try this!
Thanks for the tutorial! I am going to use the svg’s to decorate for a friend’s gender reveal party.
The flowers are so pretty going to try this
Great Flower tutorial!
I would use pink, cream and grey and put them in my daughters room!
I would love to use the flower background in our bedroom in blues and burgundy. I think it would be gorgeous and also soothing and calming.
I would love to do this in my own craft room! I am very partial to the teal flowers. I would also probably add in some purple and gold!
I see these flowers on my front door on a wreath.
I would hang the backdrop above my headboard on my bed. I would use fun colors such as neons. Bright colors always put me in a happy mood!
I will use this for my future daughter in law’s bridal shower. The theme is garden party. This is perfect!
I would love to do multiple purple colors in my girls room. It would look so cute!
In my guest bedroom in blues and yellows. So pretty!!!
I like put it in my living room and use pink, gray and a little bit of teal!
Hi!!! I love this blog and I’m loving flowers this time of the year! I’d do canary yellow, pink lemonade pink, and heather grey and display it on a photo op for my daughters graduation party this summer!
Love this! I am getting married in May 2020 and plan on making a few of these for a background for guest photos! Im thinking coral, aqua blue, and yellow maybe?!
I can’t wait to try making flowers!
Want them to be pink and white want to put them in my craft/ office so I can look at them everyday while I work
So beautiful! If I can find a Cherry Blossom one, I want one behind my couch-in reds and pinks.
I am just dusting off my old Cricut and l am excited to try some new ideas.
Thank you
I am definitely going to try this for some cards.
Wow….I luv them !
I love anything I can use Teal in. I’m an Ovarian Cancer survivor and this helps give me some ideas how to incorporate my favorite colors. Main place they’ll be used…my office :@} Thank you for the wonderful idea
I would use pink and lavender colours for my flowers and put them on my wall.
Love this! I would love to win the machine so I can make them! I’ve been drooling over the maker since I came out 🤞🏼💝
I absolutely love all of your creative ideas! You a very detailed when showing step by step and I appreciate that more than you know. I attempted flowers last night following a Cricut how to. Some worked, some failed. However you details on the flower Instructions made it fail proof for me!! Keep the emails and blogs coming! Thank you!
I need one of these on my craft room wall. I live at the beach so I think I will make it in aqua, coral and lime green! Super cute. I love the curled petals!
Love this idea!
I would use yellow, pink and white, to decorate our entrance wall! Thank you!
I would love to do it in my daughters room. I would do liter pink, blue, green and yellow. Love your work!!!
Super cute. Not something I would actually put on a wall. I would “kill it” the first time I dusted it….but I’m super glad you so generously share your svg files and your time with others.
Just lovely, thank you for sharing. Can’t wait to try!
Love this! I’ve always wanted to make but was t sure how to do it. Thanks for taking time to show us how to do everything!!
So glad I found your helpful site! I plan on using this idea on a large wall of family pictures but not sure on the colors yet.
I would use the same colors you used and would place it in our new church’s ladies room. It’s still bare at the moment and could use some decoration.
Woohoo would be awesome to win another Cricut maker. Thank you for all you do. Sometimes with my business I just don’t feel I have all the time needed to do more cricut work. But I do love it!
These are great for shower
My Granddaughter would love this in her bedroom, she loves anything girly, pretty and princessey lol. Her favourite colours are different shades of pink with anything glittery so i would do the leaves in silver glitter with pink and white flowers.
Love the flowers and all your designs – thank you!
I currently have SNC650x and am seriously looking into adding a cricut to my room and I think I can get it all done then LOL.
God blessed you with such talent! Thanks for sharing it with the world!
I love the colors you’re using, they’d look great in a room in my house
Looks very fun!!!
Great tutorial. I’d like to add these to my craft room.
I love those flowers! I’m definitely going to make those and put them in the extra bathroom that I call wasted space since nobody uses it. Our kids are grown up so there isn’t any moisture in there at all. If I don’t put it in there I’ll put them in our bedroom above our bed. My color will be blue and cream. Thank you for this and I love your blog and all of your helpful information.
Blues and yellow centers and hang above the window in my craft room. They are so pretty.
I have been looking into making paper flowers as decor and for present/gift toppers, but haven’t decided what flowers I want or the colors. I was thinking purples, blues & pinks mainly, but maybe some yellows and greens? I don’t know. I haven’t really thought too much about it.
I want to do a flower backdrop for my toddlers room. Light pink and metallic.
Love the flowers, uncurled are nice. Will try to incorporate a flower or two on the cards I’m making
Love these, now to find the time to make them!
I want to make a flower wal for my toddler daughter’s room. Soft pink and something metallic. Thank you for the inspiration.
Love this site! So much to learn! Thank you!
The color scheme is very nice. I would use red white and a smoke grey.
Where to put these… I’m thinking maybe I need to make some extras and go along the cabinets in the kitchen or maybe a swag over the front door. Decisions decisions
This are super pretty! I think they would go great on a photo wall with colors to match a party’s theme.
I would love to create a garden of flowers in bright colors and create it on a wall in a good friend’s preschool for some very special kids
Love how the flowers turned out!
I love your blog and all of your helpful information and i use it all time for reference. I recently did a flower picture for my granddaughter on plexi glass and it turned out great.
I’m a purple lover but my 15dd loves black, grey, gold atm so will prob try that combo 😀
These are really pretty. I’m not sure what I’ll use them for but am thinking they will make cute added decorations for my nieces baby shower. Can’t wait to try them!
Love the flowers. Can’t wait to try them out.
Moving into a larger craft room 🙂 These flowers would be great now that i have more wall space. Love the teal and yellow colors. So many ideas from your website that I just need to decide what to start on first!
Love these! I will use these flowers with a Welcome sign.
Excited to try making these new flowers at my school! They bring me such great springtime vibes!!
I can’t wait to give these a try. I just went to Michael’s and bought the purple pack of card stock to make these for my daughter’s bedroom.
Very excited to have found you. I am going to use these flowers as a spring/easter backdrop for pictures of my girls. I want to use pastel colors like pink, purple, blue, yellow, and green. I think they are beautiful.
Love it! Can’t wait to give it a try.
These are beautiful!
These are gorgeous! I need to make these.
This is absolutely beautiful. You are a constant inspiration to me.
These are beautiful and can’t wait to try this project!
Thank you!
Love the colors you used but I think I would use some bright colors to make like a tropical flower. I would hang them in my craft room to brighten it up. Bright colors make me happy. Thank you for the great ideas!
I love this tutorial!! I’ve wanted to learn how to make these big flower displays for a while and can’t wait to try it out!
I will be using earthy colors and putting it in the living room to soften my Travel Decor look. Probably muted yellow or cream with light green or faded red.
This is so pretty!! I love these colors!! I want to do one to put over my daughter’s bed. I plan on using pink, white, black, and gold colors.
I would love to make one for my office with shades of purple and lavender.
I have adored these flowers when I saw everyone making them. I have been very hesitant to try and make them. That you for this video, now I think I can attempt them. I love the colors that you used they would look great in my little craft area in the basement to give it some pizzaz. Thank you!
I think I would put these in my dining room. Would love to do so now, but my house is in chaos as we are getting it prepped to sell. The colors I would choose off my current color pallet would be shades of blue and grey. Once upon a time it would have been in shades of teal and grey. Thank you for the opportunities. 🙂
Love the flower svg files! Thanks.
I’d put them on my craft wall. Im going to use Tiffany blue and white. I love this blog!!
I really love the colors you used, and I want to put them on a wooden slat canvas and give to my daughter, it goes with the decor of her bedroom in her apartment.
I love the paper flowers . I would like some above my bed. The colors I’d go with are cream, black , gold and a lite green. Thanks for the info for the flowers .
I would love to use the paper flowers in my craft room and even for a Photo Booth backdrop.
Love,love,love these flowers. I’m obsessed with making wall flowers. I always cut the petals by hand, but your svg files will save my fingers and hand. Thank you!
I’ve made flowers for my friends daughter’s room in purple, violet and shimmer white. I’ve also made a set for my daughter’s communion reception in light pink, cream and gold.
Thanks again for sharing!
I,d make flowers with gingham papers and decorate my doorway arch…
I would love to put some flowers along my daughters wall in her bedroom! She LOVES flowers! She also loves unicorns, so the colors would be pink, turquoise, and pink!
I am really enjoying your blog and your creative designs. I am just starting out learning about Cricut and would love to have one to use with my Calligraphy pieces.. You are so inspiring!
Always so creative I love getting your posts and emails!
I’m going to try to make the flowers. They look great. Love it.
I will make diffrent pink tones for my sisters baby shower for the backdrop to take pics
Your flowers are beautiful. Thank you for the instructions. I’ve seen other people post about making these but the lack of instructions makes me fearful to try them. Thank you!
My daughter would love this for her room. Teams and navy would match her room. But she would probably want red and black.
Love the colors! Thanks for making the tutorial.
I love the colors you chose! I’ve been intimidated to make flowers but you’ve made it look so easy! I think I’m going to make a backdrop behind my desk at work. It will dress up the beige cinder block wall. 😉
I would want to put this in my craft room. I would honestly probably use the same colors…. blues are my favorite. Thanks for all you do to help us. 🙂
I have never made paper flowers before, but I plan on trying this for over the head of my bed on the wall. I will use greys and turquoise.
Lovely!! Thank you for taking to time to show how it is done! I am looking forward to making my own flowers to decorate my craft space. Love the beautiful Maker!
I love these flowers!! Definitely going to make these soon!!!
I would love to create a flower back drop for my sunroom using summer colors orange, green , red, yellow.
I’m working on doing a 18 flower wall using these 3 flowers and 2 others in my 19 month old daughters bedroom. We’re finally moving in our brand new house this weekend after years of trying to buy and finally all 3 of my kids will have their own room. But of course I’ve got to jazz up my only baby girls room and I’ve been anxiously waiting to do these till closer to moving. I can’t wait to get them put up!!! EEEK!!! I’m using purple, teal, pink and 2 small Coral colored ones! That’s what colors I’ve done in her room too so had to do some of all lol. Thanks so much for sharing this and giving me the chance to win. I’ll never be able to afford a maker after buying our house so it’d be so amazing! My friends would love me getting this, they all get the best gifts at Christmas and birthdays lol.
Love this! We are currently redoing our bedroom decor and I think this would look great in it–blues and pale yellows are the colors. Can’t wait to make it!
I have always love the paper flower backdrops. They are the reason I became interested in purchasing a Cricut machine. I could never find a good tutorial on how to make them, thanks to your video I now have a better understanding. Especially as to how to hang them up. I would like to put a backdrop in my office space and in my daughter’s room. Like your daughter her room is always a disaster, but she has nothing on her walls. Her room is silver, gold, black and white and those are the colors I would love to mix and match on her wall. In my office space I would love to do a bunch of bright colors, such as orange, yellow, green, red, pink and a teal color.
Such beautiful flowers. I would use pink and grey 🙂
Very pretty flowers. Love the colors. Gonna have to try some in beach colors.
We have 4 daughters living at home. I think I will make these flowers in my daughter’s favorite colors to put on a plaque on their bedroom doors. Nt sure they will look with orange and red together (4 year old) but we’ll find out.
Thanks for the walk through.
I would use sea green, beige, and coral to match my beach themed craft room.
Amazing tutorial! Very easy to follow!!
I want to use pink and teal for table decorations at my friend’s bridal shower 🙂
Loved the colours you chose! Great designs!
I’m going to try this in black, white and orange for my son’s school colors at his graduation party. He might not appreciate the flowers, but at this point, it’s all about ME! I think I’m stressing more about this party than he is about graduating and getting it over with! LOL! ;0)
Hi Bonnie, have you seen my graduation centerpieces? They are on the homepage
I love the versatility of these flowers! You can do so much with them! Thanks for the tips!
Beautiful and so simple to add a touch o f spring to this cold and dreary winter.
I am going to make these with different shades of blue and cream to put on 6×6 canvas boards to hang in my hallway.
Love floral everything! This tutorial is great 😊
I love all shades of pink , so I would choose those colors for my paper flowers. I would most definitely put the flowers in my craft room. Thank you!
I would love to make paper and fabric flowers. I have two sons about to get married. No dates set yet.
Thank you so much!
I have a beebwanting to try paper flowers. thank you for posting such a detailed version
Thank you very much for your instructions. They are very easy to follow. I hope the flowers are that easy to make! I have always wanted to do flowers, but have never had the nerve to try. But I will now. Thank you so much.
I love how this turned out.. so much that I wanted to create it for my bridal shower. I signed up with my email to get the free svg files. Once I did this, it was not available in the free files. Is it possible to still get these svg files?
Help!
A bride who has a lot of work to do!
Congrats on your wedding! The files are still there, under SVG files —-> Paper flowers.
Beautiful!!My daughter is a maker, and loves my cricut! This is definitely on our project list after we grab some new cardstock!! Look out wallet, i’m coming for you!
Really beautiful flowers. I like it. I also found many paper flowers for DIY here: https://creative-vector-studio.com/product-category/paper-flowers/