This post may contain affiliate links for your convenience. If you make a purchase through one of my links I will earn a small commission at no additional cost to you.
Last Updated on August 12, 2023 by Chris Butler
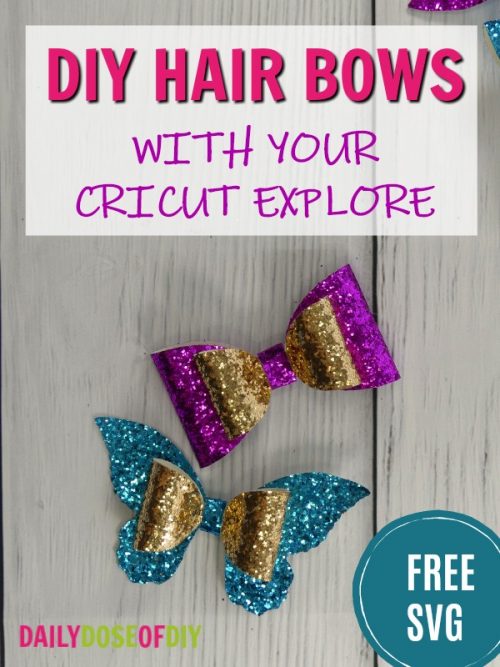
Hello crafty friends! Today I’m going to show you how to easily make a hair bow with your Cricut.
These are great to sell as a low-cost item at craft fairs (tip -make them in local school colors). Or just to make for every girl you know. Seriously they are that fun and every girl you know will want one -or five.
I’m including two free hair bow SVGs for you to make your very own too. One is a standard bow and the second is a butterfly bow. Because who doesn’t love butterflies?
You can find all the details about getting the SVGs at the bottom of this post.
And if you prefer video, there’s one of those too.
Let’s get to it:
Quick Links to Information in This Post
Hair Bow Supplies Needed
- Hot Glue Gun or E6000
- Hair Clips
- Bonded Glitter or Faux Leather
- A Cutting machine (I used my Cricut Explore Air)
- Deep Cut Blade
- Strong Grip Mat
- Free Hair Bow SVG Files (located in the resource library, more info at the bottom of this post)
So I bought these Glitter Sequins sheets with a canvas back from Amazon. They come in a great assortment of colors that are perfect for making hair bows.
The best part is I was able to cut them with my Cricut Explore. You will need a deep cut blade to cut these glitter sheets. And the purple strong grip mats.
Since I was already on Amazon I bought the hair clips too. Now these aren’t going to hold large amounts of hair back, but they are perfect for clipping a bow on a ponytail or just holding back bangs.
How to Make Hair Bows with your Cricut Video
Cutting Glitter Hair Bows With Your Cricut
So to get started upload the SVG files to Cricut Design Space. If you need help downloading and uploading SVGs please see this post.
The Butterfly Bow SVG is sized to be about 5.5″ at it widest point and the standard bow is 4″ after it’s made.
Of course you can adjust the size up or down as needed in design space with the directional arrows on the bottom right corner of the designs
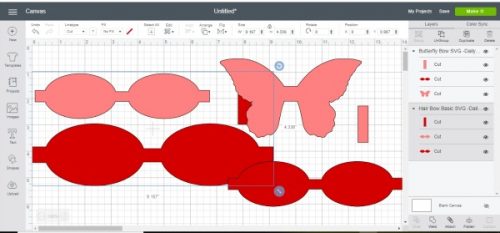
You don’t have to do any attaching or welding before you click the make it button either. Everything is ready to go.
Make sure you set your dial to custom settings. And I chose metallic leather from the custom settings as my material. And I also set the blade pressure to more.
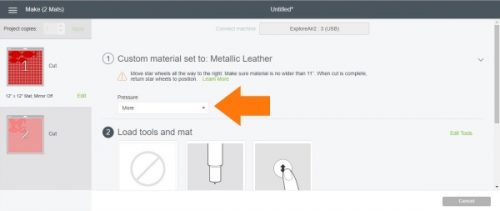
So deep cut blade, custom material set to metallic leather, and more pressure selected. Cricut will go over the cut lines three times with these settings.
That said, you may have to play around with the settings on yours, especially if you are using a different brand of glitter canvas.
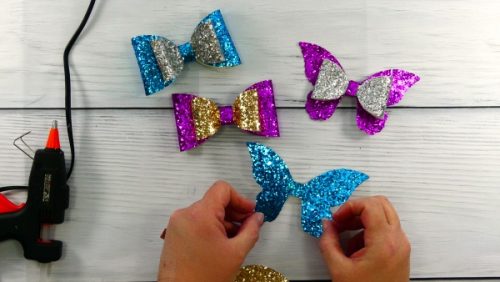
I cut 10 bows total and there were just a couple that I had to do an extra snip with scissors. Most of them cut just fine.
Putting Together the Glitter Hair Bows
After all of your pieces are cut gather them up along with a hot glue gun or E6000 adhesive.
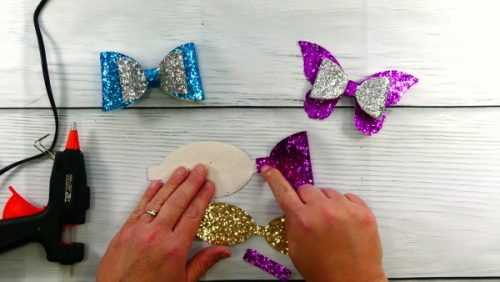
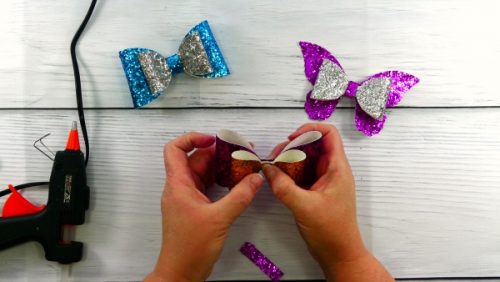
Let’s start with the standard bow. Flip the largest piece over so the canvas side is up. Place a small bit of glue in the center.
Next take the tab from one side and fold it over to the center and press down until the glue holds. After that side holds, place another bit of glue in the center and fold the other side over.
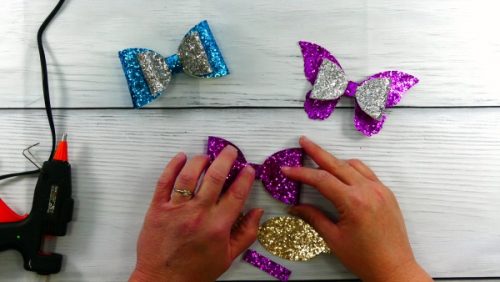
Repeat the same process for the smaller part of the bow.
After both parts of the bow are formed, place a dot of glue on the center of the big bow and glue the smaller bow to it.
And finally we are going to add the center strip.
Flip the bow over to the backside and add a bit of glue. Place one end of the strip in the glue and then wrap it around the front and back to the back. Glue down the second end of the strip to the back also.
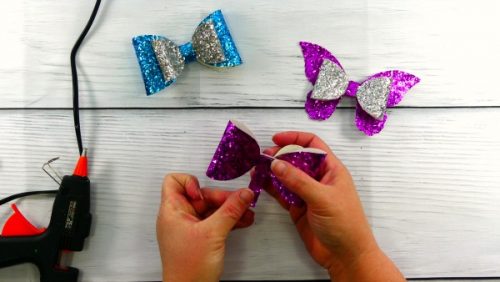
Now that the bow is put together we need to adhere it to the hair clip.
Place a good amount of glue along the top of the hair clip. And then place the backside of the bow onto the hairclip and hold firmly in place until the glue sets.
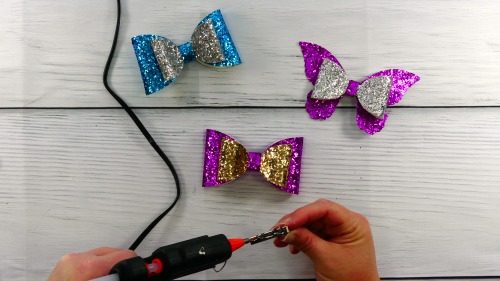
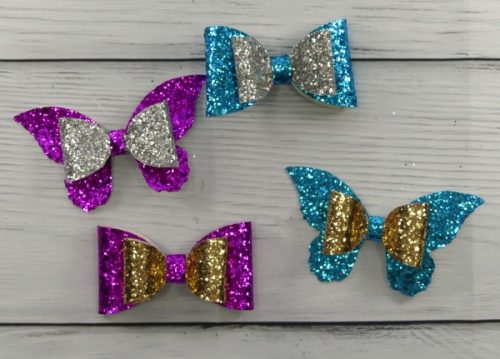
After the glue is set your hair bow is complete!
Making the Butterfly Hair Bow
The butterfly hair bow will follow the same process. The only difference is you don’t have to do anything special with the butterfly.
Set the butterfly to the side while you glue the bow piece. Just like with the other hairbow you are going to glue the two side tabs to the center.
Once that is done place a dot of glue on the center of the butterfly and place the bow part on it and hold until the glue sets.
Next glue the center strip on. And finally glue the butterfly to the hair clip.
All done! Aren’t they gorgeous?
Swipe the Free Hair Bow SVG Files
I keep all of my Free SVG files in the Resource library I made exclusively for subscribers to my newsletter.
To get instant access simply fill out the form below. The link and the password to the resource library will be emailed to you right away.
All of my free SVG files and Designs are kept in a library for your convenience. We will send you the link and password right away, and you’re free to use all the resources you want in the library.
Already have the password? (It’s at the bottom of every email) Enter the Library Here

Chris Butler has helped thousands of crafters learn how to use their Cricut machine without feeling overwhelmed. She is a best selling author and an up and coming designer. For fun Chris enjoys designing SVG Files, hanging out with her family (preferably at the lake), traveling, and volunteering at her church. She is a wife and mom of two crazy fun kids.
Hello I’m having trouble finding these svg files I subscribed and went through the email and password process but I cant find the bow svg am I just miss it?
Oh my goodness Amanda, I forgot to add the download link to the library. I’m so sorry, it’s there now though!
I didn’t the bow email.
I can’t find the link to upload the svg files
Hello I also can’t find the bow svg dowload
It’s in alphabetical order the name of it is ‘Hair Bows’ and it has a picture too! You’ll see it.
I signed up for everything and I still cant find the download for bows.
Scroll to ‘B’ in the SVG library. Theres a picture too
Im trying to sign up, but getting a message promise is underdefined
Hi Marie! I just tried it and it’s working for me on a desktop. I’m not sure if the form was just glitchy when you tried it? If you’re still having problems can you let me know what device you’re on? And also email me directly at [email protected] and I’ll make sure you get them.
Thanks!
Hi, could these be made with bonded fabric also?
Thanks
Hi Kem, Yes they can be!
Hi. I am not seeing the link for the svg file
Hi Jessica! The files are listed alphabetically in the resource library. So once you see the SVG files heading just scroll down to the H’s. It’s there!
Thanks!
where can i find the svg file? i got an email but no link or anything.
The first email is a button you push that says go to the resource library
I am not able to download the bow files
Have they been removed?
No, they are still there and worked for me a few minutes ago. What browser are you using?
Hi, I keep clicking on bow sag in library and nothing is happening. I’m new to all this so, HELP;)
Hi Sue! I just tried it and the download started immediatly. What browser are you using, and did you check your download folder to make sure it wasn’t there?
It let me download the file but once I go to open it says the content isn’t there and is unable to open. Help?!thanks!
Hi Kari! Are you uploading it to Design Space? Unless you have a design software program installed on your computer, you won’t be able to open the SVG, or it will look like jibberish. But it should upload fine.
Hi there. Just read the tutorial. Thanks for sharing. When using the glitter faux leather or shiny faux leather do you put it on the mat right side up or down?
For glitter I put it on the mat right side up. Also make sure to carefully clean your blade with some tin foil as the glitter really likes to stick to it and can mess up your next cut.
I have a brand new blade and housing, followed your directions and it isn’t cutting through the metallic leather material- the same as you used. Please advise. Thank you.
I have subscribed and can’t find your bow svg file.
They are in alphabetical order SVG Files –> Hair Bow SVG https://dailydoseofdiy.com/free-plans-printables/
At the beginning of the page it says get the free SVG at the bottom of the page. I go to the bottom of the page and it tells me to sign up which I have already done twice. Still can not find the download.
Hi Lynn! Go to the library here https://dailydoseofdiy.com/free-plans-printables/ and enter the password that was emailed to you. You’ll find all my SVG files there in alphabetical order.
I can’t find the butterfly bows in the library
Hi Wendy! I’ve added a picture to make it easier, they are under hair bows
Hi Chris, thanks so much for the svg for the bows. I have only made one so far and I love it. I will be making many more in the future. I can’t wait to get my glitter faux leather so I can make some with it. Thanks again.
You’re welcome =)
Hi Chris,
I realize that my brand new never used deep cut housing and blade are not fitting snuggly into clamp B.
It is so loose I can pull it up which is why it isn’t cutting.
Could I use the bonded fabric blade as I purchased the same glitter metallic leather you used ? Thank you.
Hey there! I have a question about glue. I’m using the same glitter fabric as you however, I can easily pull my bow off of the butterfly. Is there a certain type of glue stick that’s the best when it comes to bonding the glitter fabric together? I don’t want to sell a bow and it be easily broken by slight wear and tear. Thank you.
Hi,
Is it possible to do these bows on the joy? I currently only have the joy hopefully in the near future I’ll leap for a maker.
Hi! You can make them with the thinner materials yes. The thicker leather or bonded fabric will need a deep cut blade, and Joy doesn’t offer that yet.
I went through and signed up so that I could make the bow but I could not find the file. Is it not there anymore? Or does it get emailed to me at a later time? Thanks
It’s still there. They are in alphabetical order and have a picture to make it easier to find.
Hi! I have a question about materials and trouble shooting. I made a few of these on my Maker out of fabric, faux leather and a glitter “ribbon” that I got at Michael’s. (I say “ribbon” because that is what is on the roll, but it really seems more like canvas to me.) The first time I cut the glitter canvas, it went fine, except I only had the fine-point blade, and I had to come back in with my exacto knife to finish cutting through the backing. So I ordered the deep-point blade and tried again. It was a disaster! I used the same material, same mat, and same pattern. The only difference is the blade. Now the material keeps rippling as it cuts and it seems to be getting caught under the corners as it passes. I can not figure out what I’m doing wrong. I am using the “Metallic Leather” setting on my Maker and the strong grip mat, but it just keeps curling and bunching up. Do you have any ideas I could use to make this go more smoothly? Thanks so much!!