This post may contain affiliate links for your convenience. If you make a purchase through one of my links I will earn a small commission at no additional cost to you.
Last Updated on August 12, 2023 by Chris Butler
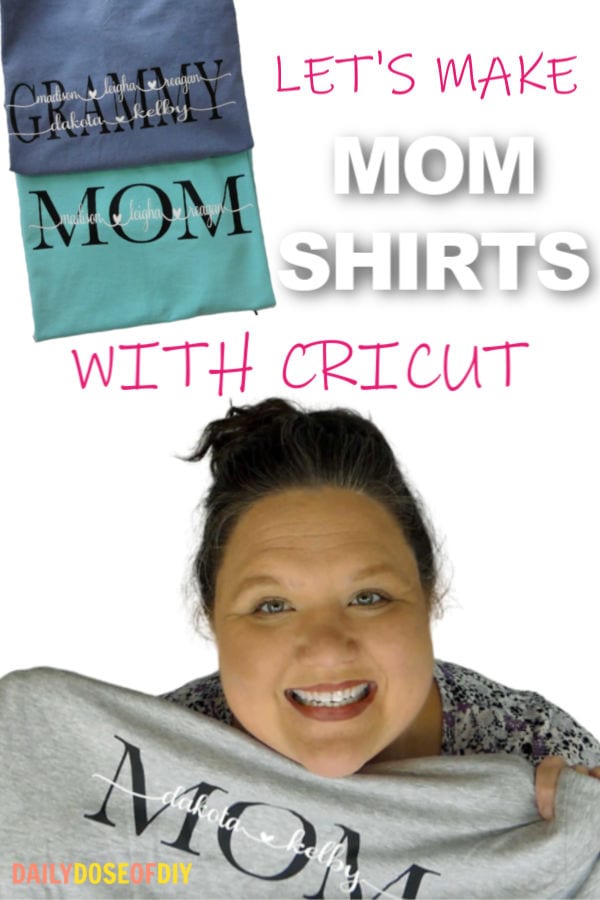
Hey there crafty friends! Today you’re going to learn how to make a MOM shirt with your Cricut.
Not only are these mom shirts super cute and trendy right now, they’re also pretty good sellers. And best of all they are super easy to design and make with your Cricut.
Let’s get to it.
Quick Links to Information in This Post
Prefer Video? Use the quick links above to jump down to the video at the bottom of the post.
Cricut Mom Shirts Supplies Needed
- Cricut Cutting Machine (I’m using my Cricut Explore)
- Heat Press or Cricut Easy Press
- HTV (Heat Transfer Vinyl) in two colors
- T-Shirt
- Weeding Tools
I use the Cricut Easy Press to make shirts. When using the Easy Press you’ll also want to make sure you have a heat press mat or a towel to protect your table.
If you’re not sure if the Cricut Easy Press is right for you, be sure to check out my review here.
Next, you’ll need to choose your HTV or Heat Transfer Vinyl. I like Siser EasyWeed the best, particularly the EasyWeed Stretch it fantastic for stretchy mom t-shirts.
There are loads of places to find blank t-shirts for crafting. My favorite place is Happy Crafters. You can’t beat their prices for quality shirts and the selection is fantabulous.
And last but not least if you don’t already have vinyl weeding tools be sure to grab a set before you start.
Best Cricut for Making Shirts
Any of the Cricut Explore series or the Cricut Maker will be able to cut the HTV vinyl for making shirts. These Cricut machines also use Cricut Design Space which we are going to be using to design your mom shirt.
If you need more information on which Cricut Cutting Machines is right for you -see this article on the best Cricut Machines.
How to Design Your MOM Shirt in Design Space
So to start click on text on the left menu and type MOM in capital letters in the text box. After the letters appear, click on the font drop down on the top menu.
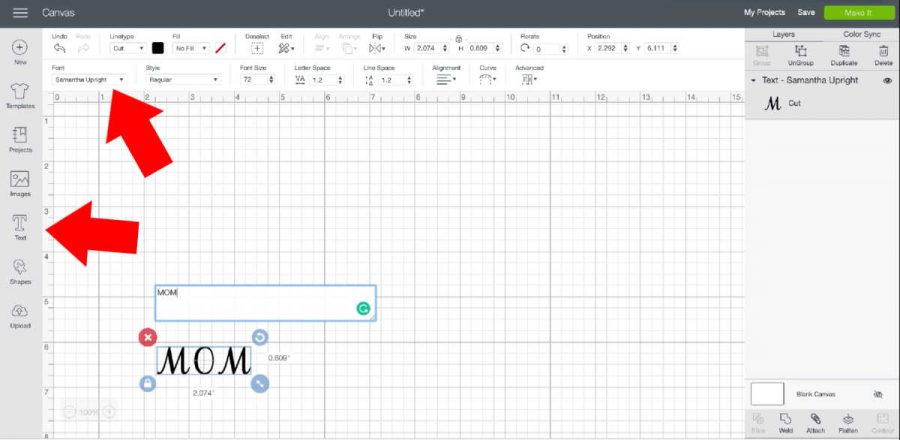
You can choose whatever font you like for MOM. Most common is a serif font. One everyone should have available in their fonts is Times New Roman.
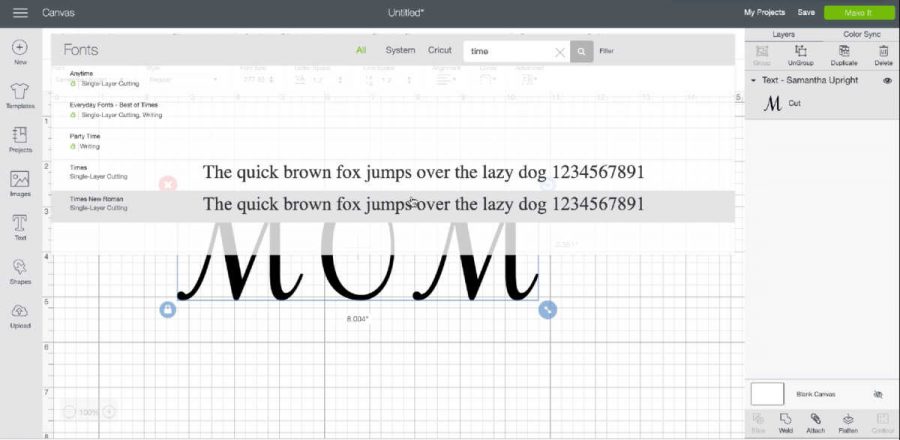
You can type the name of the font into the search box to find it faster. Once your font is selected the letters will change to that font.
I like to space my letters a little closer together. You can do this using the letter space function on the top menu.
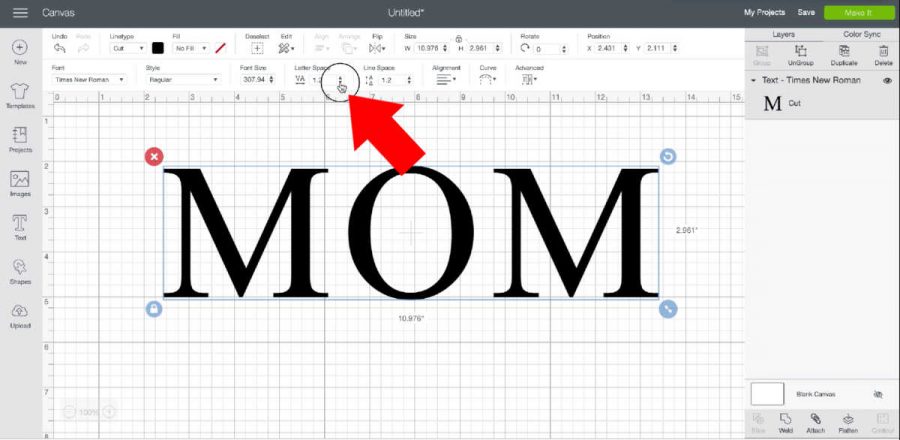
Just click the down arrow on letter spacing until you’re happy with the distance between the letters.
You’ll want the total width of MOM to be between 10 and 11 inches when you are done. And now we can move onto the kids names.
The font you’ll want to use for the hearts and end swirls is called ‘I Love Glitter’. You can grab it free for personal use on dafont.com
But if you plan on selling these shirts or any crafts you make with I Love Glitter be sure to get the commercial license. (fontbundles.net usually has a super great price)
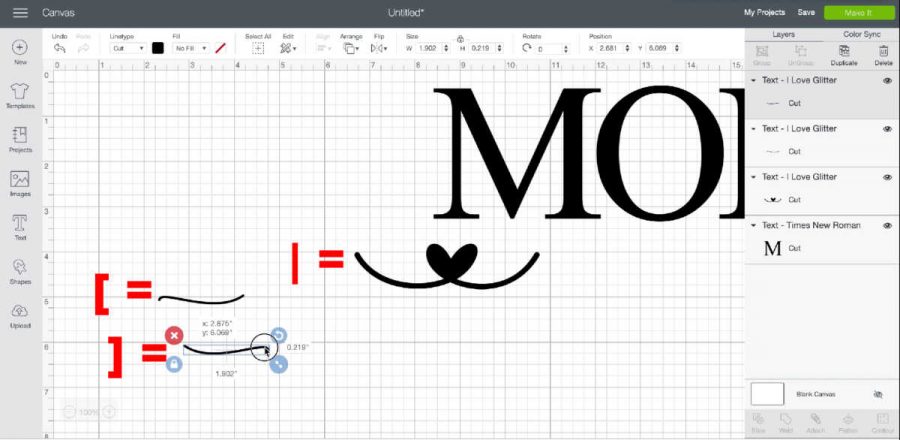
So click on the text box again and change your font to I Love Glitter.
Type in the up and down bracket that is just above your enter or return button to make the heart. Open a new text box and type in one of the square brackets to make a swirl. And then open a new text box and type in the opposite square bracket to make the other swirl.
Designing the Kid’s Names
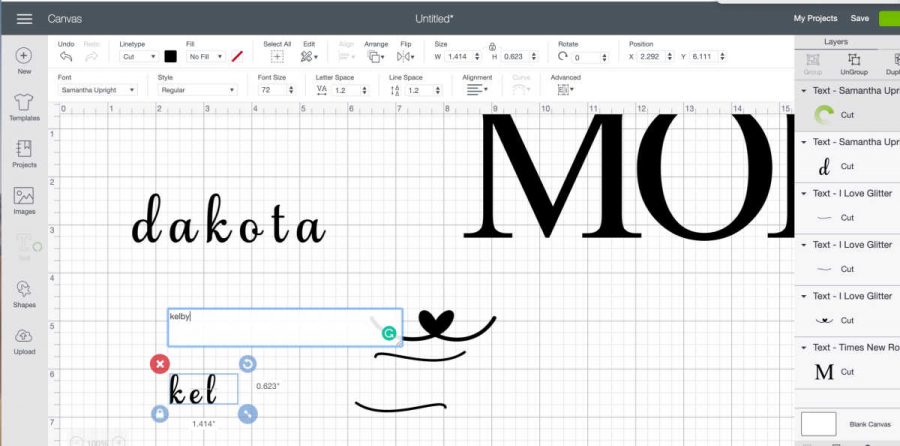
As far as the names go, I’m not a fan of using I Love Glitter. The inside loops are difficult to keep open and I find some names kind of hard to read when using it.
So for my kid’s names, I am using Samantha script font. Feel free to choose any script font you like. And then type each kid name into a separate text box.
Now we’re ready to start putting the names together.
Start with ungrouping the letters of the kid’s names and moving them together so it looks like a cursive word. Click the ungroup button on the top of the layers menu and then click and drag the letters together so they are touching.
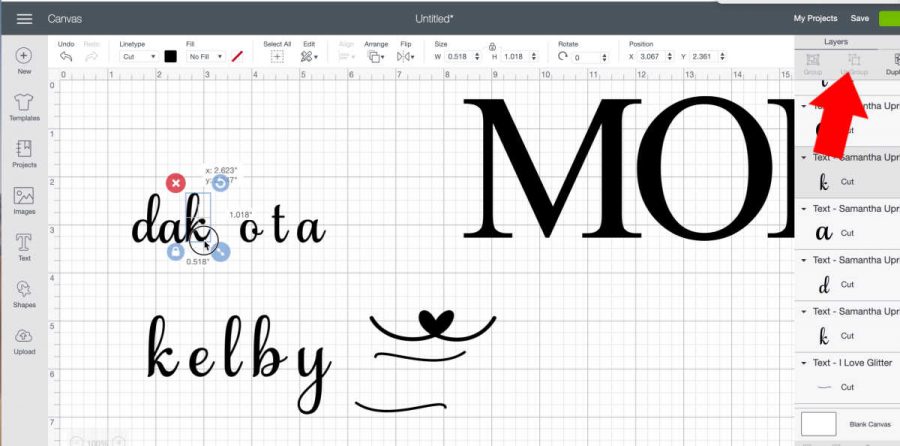
After the letters are together select each name separately and click the weld button. This will keep all of the letters stuck together.
If you want to resize and stretch a name out you can click the unlock button on the bottom right of the text box.
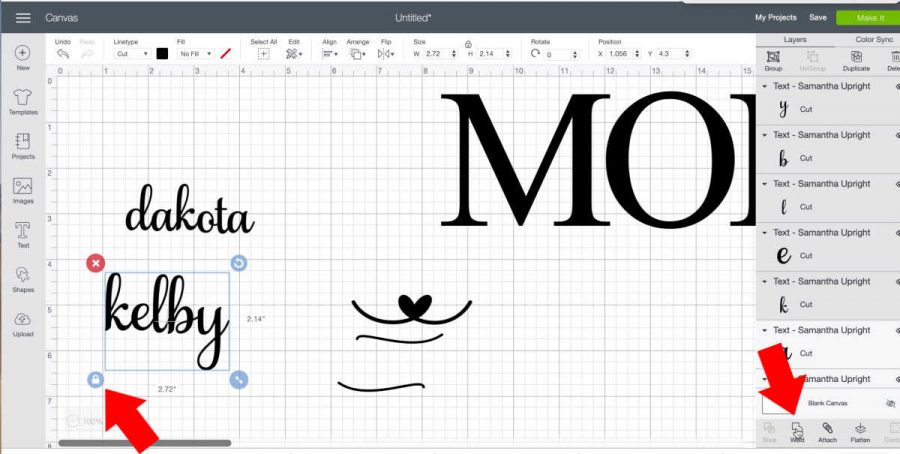
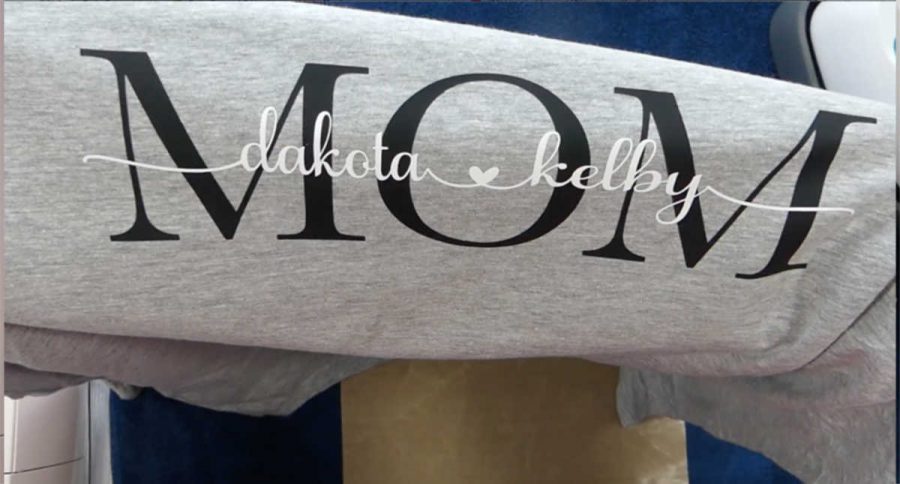
Great! Now we have our kids names done and the end swooshes and the connecting heart. It’s time to connect them all together to make our mom shirt.
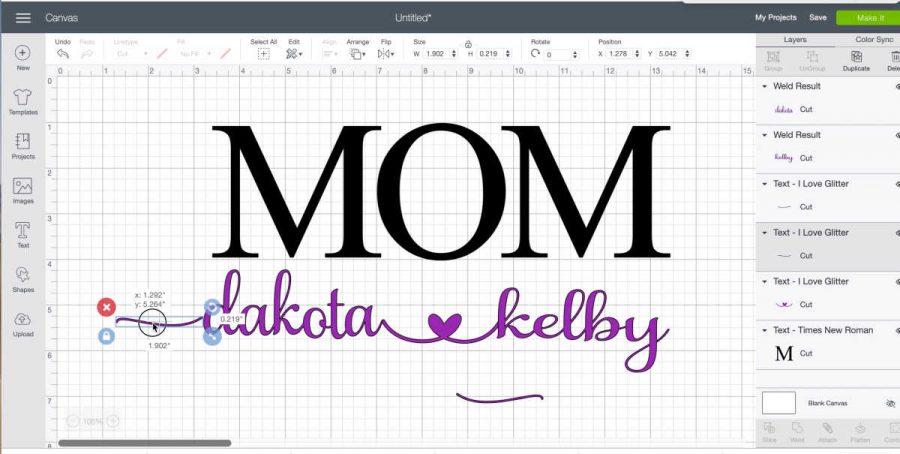
Click and drag each piece of your design and connect them with your names. I find it easier to get the heart lined up in the center of the names first and then add the end swooshes.
Use the line guides in Design Space to keep everything lined up and even. After everything is together, select the entire kid’s names design and click the weld button on the bottom left of the layers menu.
If you haven’t done so already, change the color of the kid’s names also.
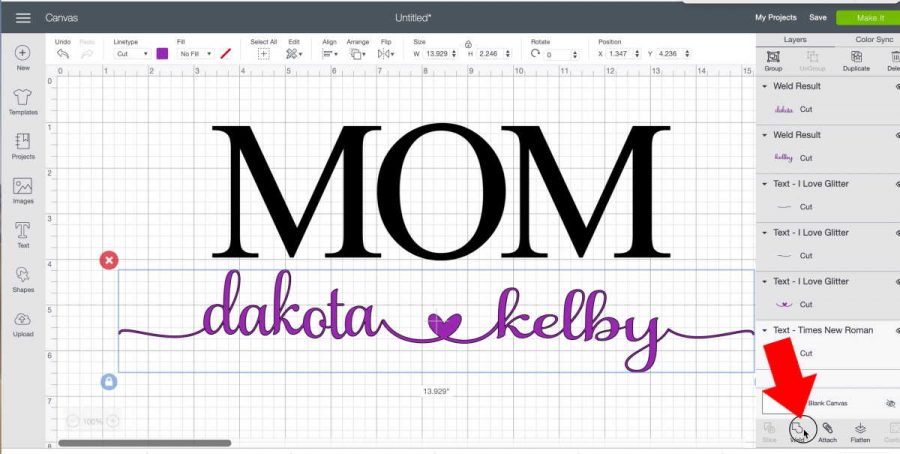
You can see the length of my kids names is 13.9″. That’s getting a little bit big for shirts, plus you’ll need the large mat to cut it. So you may want to size your names down to 11.5″ or below.
Cutting & Weeding the Mom Shirt Design
Now we’re ready to click the ‘Make It’ button. One thing you don’t want to forget is turning on the mirror image for the mats.
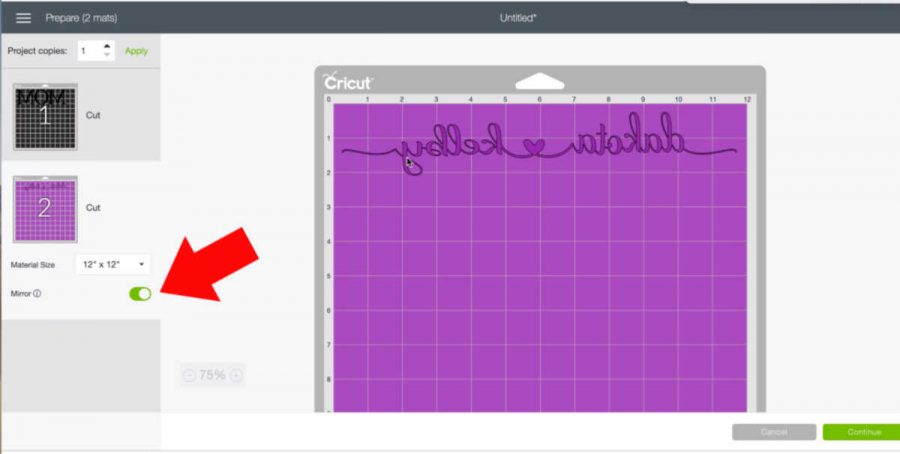
You’ll have to select each mat and turn mirror on. Just because you change one, doesn’t mean they all change. I learned this the hard way.
Next load up your mats with your two colors and begin cutting.
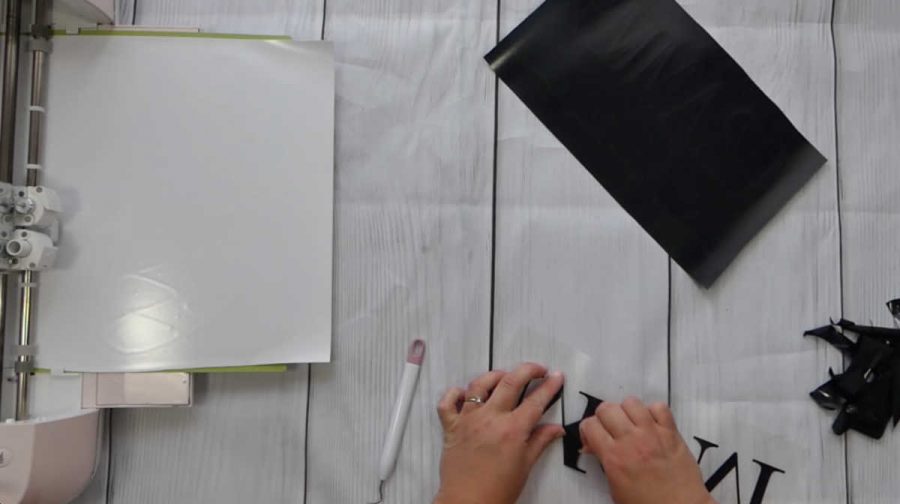
After the cuts are finished you want to remove the excess vinyl. Use your weeding pick to pull up the vinyl that we need to discard until only the letters remain.
Heat Pressing Your Mom Shirt
I’m using the Cricut Easy Press to press the vinyl on my shirts. The problem with using a home iron is they don’t always get hot enough and the plate heats up unevenly.
So it really is best to use some sort of heat press for long-lasting shirts.
To start we need to preheat our shirt. This helps get out wrinkles and moisture in the shirt. But I actually like to add a couple of wrinkles in.
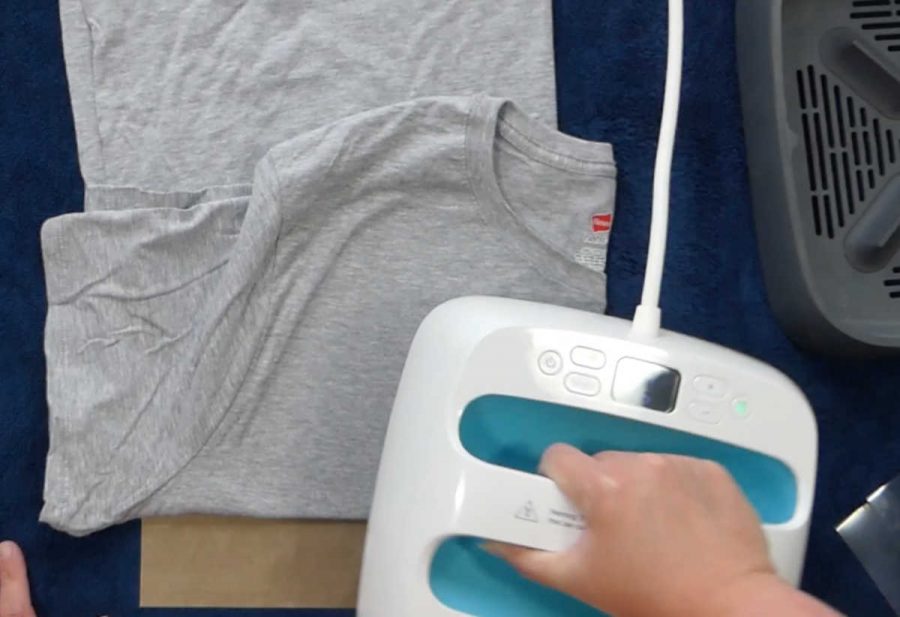
I fold my shirt in half lengthwise and then fold again under the armpits and then press. This gives me a crease in the shirt that helps line up the vinyl without any extra tools.
After the initial press unfold the t-shirt and center your design to the center of the creases you made.

Make sure your heat press is set at the recommended temp. In this case I need 305 degrees. Briefly press with firm pressure.
You will probably need to move your Easy Press over and briefly press again to make sure all letters get pressed.
On this initial pressing, you don’t want to press for the full time. You just need a few seconds to get it to stick. We will press for the full time when we add the second layer.
Slowly peel off the carrier sheet from the word mom after it’s cooled for a few seconds.
Second Layer of HTV
Next line up your kid’s names over the word MOM. Make sure the carrier sheet covers all of the letters, including the MOM. If it doesn’t place another carrier sheet over the top to keep the vinyl from ruining your press.
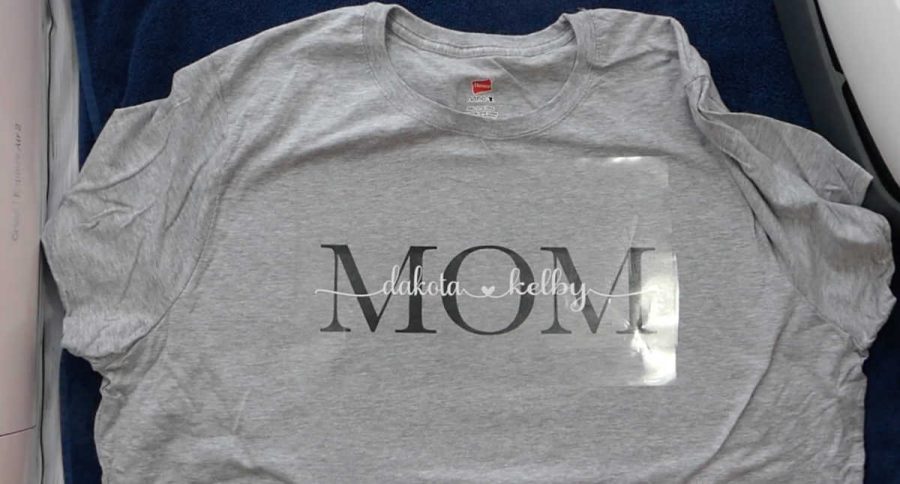
Now you’ll want to press the full recommended time for your vinyl. Mine is 15 seconds so I set the timer on my easy press and pressed one side with firm pressure.
Then I reset my timer and pressed the other side for a full 15 seconds also.
After that’s done I flipped the shirt over and pressed the back for an additional 5 seconds or so. After everything is slightly cooled I removed the carrier sheet.
Make sure you check the recommended time you should peel your carrier sheet off from the vinyl manufacturer. Some companies want you to wait until it’s completely cooled down before you can peel it off.
Make a MOM Shirt with your Cricut Video

Chris Butler has helped thousands of crafters learn how to use their Cricut machine without feeling overwhelmed. She is a best selling author and an up and coming designer. For fun Chris enjoys designing SVG Files, hanging out with her family (preferably at the lake), traveling, and volunteering at her church. She is a wife and mom of two crazy fun kids.
Hello Chris,
I love the “MOM” shirt and would like to make one for my daughter Emilie for Christmas. I was wondering how do we get the “I Love Glitter” font to go into the cricut font file? I saved it to a folder and then tried to bring it over to cricut by uploading the image, however, it tells me it is unsupported.
Thank you for your help,
Julia
Hi Julia! This post explain how to add fonts to Cricut Design Space. Hope it helps! https://dailydoseofdiy.com/how-to-edit-text-cricut-design-space/
Would love to just purchase the file and edit names!
Everytime I try to weed out the kids name the letter break?
Make sure you are welding the design in Design Space before you cut it.
I tried to get the font you mentioned for my he names but it doesn’t look the same.