This post may contain affiliate links for your convenience. If you make a purchase through one of my links I will earn a small commission at no additional cost to you.
Last Updated on August 12, 2023 by Chris Butler
DIY Growth Chart Ruler
Hello crafty friends, today I have a fun DIY Growth Ruler project for you. You can make this 6-foot Ruler using your Cricut Joy, Cricut Maker 3 or Cricut Explore 3. I also have a free growth chart template SVG file for you, so you can make your very own wooden growth chart ruler.
Let’s get started.
PIN ME!

Quick Links to Information in This Post
Supplies Needed for DIY Growth Chart
- Wooden board. The one I used is 6’ long and 10” wide. You can find these at any home improvement store for less than $10.
- Cricut Joy, Maker 3 or Explore 3 Cricut Machine (See on Amazon here)
- Masking tape
- Cricut Tools Here (The regular set is a better value than the Joy set)
- Cricut Joy Smart Vinyl ( you’ll need at least the 10-foot roll)
- Transfer tape
- FREE growth chart SVG file located in my Free Resource Library here (See instructions for how to grab it at the bottom of this post)
Step-by-Step Video
Step One: Prepare Your Pine Board
First thing you may need to give your board a light sanding, especially on the ends and edges. Next make sure all of the dust is removed and your board is clean.
You can use wood stain or paint your board. I chose to paint mine with acrylic paint in antique white. Make sure you paint or stain the entire board, front and back, and all of the sides. While it’s drying we will cut our vinyl.
Step Two: Upload the SVG File and Prepare to Cut
The SVG is in two four-foot sections since the Cricut Joy can only cut four continuous feet of one design.
For help downloading SVG Files and uploading them to Design Space see this post.
The first thing you’ll need to know is how to make this work with the Cricut Joy. In Design Space, select “Cricut Joy” from the dropdown menu at the top of the screen.
Upload the SVG into Design Space and add it to the canvas.
Once you have the SVG uploaded in Design Space, you’ll see that it’s split in half. One line is up to 4 feet long, and the next line has feet 5 and 6.

You don’t need to change anything here, the SVG is ready to go, so go ahead and click “Make It.”
Now, at the mat screen, you will need to make some adjustments so it will come out in one continuous cut. You will see that the image looks like a single roll, but the spacing between the two pieces isn’t enough for our ruler.
First, change the material size from 72” to 73”. That will give you a little more space to work with.
Second, move the top piece (the first 4 feet) over as far to the right as the margin will allow.
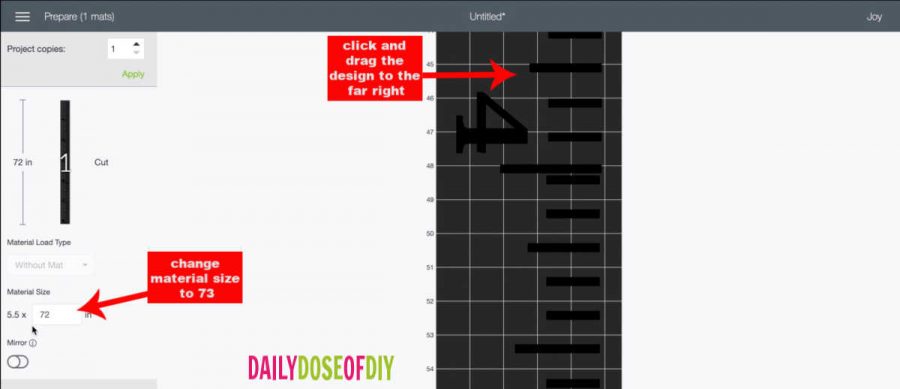
Third, take the bottom piece (feet 5 and 6) and also move it over to the far-right margin. At the same time, you need to set it 1” from the bottom of the top piece. In the video, you can see that the tick marks align roughly to the white lines on the screen. It may not be exact, but it’ll be close enough.

Once you have everything moved -click the continue button. That takes you to the materials, select the Smart Vinyl – Permanent. Then Cricut will prompt you to load the material into the machine. You’re ready to cut!
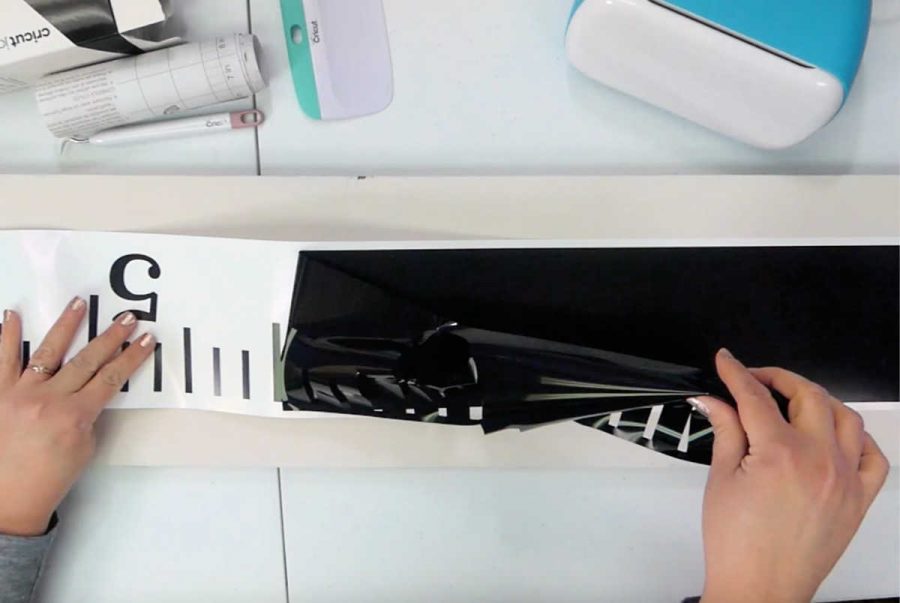
Step Two: Cut and Weed the Vinyl
When you insert the vinyl into your Cricut Joy, it will automatically begin rolling through to make sure there is enough. When it’s ready, there will be a prompt on the computer screen telling you to click “Go.” Once you do that, it will start cutting.

This is so handy – Cricut Joy, along with with Cricut 3 machines does the whole thing in one cut with no mat. We can totally multi-task now! You can go do the dishes or fold your laundry while your Cricut cuts out the project.
So the SVG took a total of about 8 minutes to finish cutting. When it’s done, the computer will prompt you to click the Unload button, and we will be all ready to weed.
This was my first time using smart vinyl. The backing is much stiffer than that of regular vinyl, it’s a plastic backing that’s taking the place of a cut mat. The vinyl weeded very nicely, and there were no pieces sticking or problems with the vinyl coming up.
Step Three: Transfer the Vinyl to Your Board Using the Hinge Method
I used a 12”-wide clear shelf liner as my transfer paper, so while my vinyl was cutting, I actually cut my transfer paper in half. That way it was only about 6” wide, and I didn’t waste any.
Tip: Not too long ago, I did a free tip about how to put on transfer tape without bubbles. It’s pretty easy once you get it started. See this post for more information: How to Quickly and Easily Apply Transfer Tape
Basically, you peel off the backing from one end, make sure the transfer tape is lined up straight, and then stick it down so that it goes over the edge of your vinyl backing and onto your table or board. And then just pull off the backing at the same time as you scrape down the front. I think this was the longest piece of transfer tape I’ve ever done, but it still went on nice and smooth this way.
As you can see, I put my transfer paper on in two pieces. This works fine on any project. Just overlap the pieces, so that the entire vinyl is covered.
Once the transfer tape is on, go ahead and burnish it, which means to scrape really hard with your scraper tool, to get the vinyl stuck to the transfer tape.
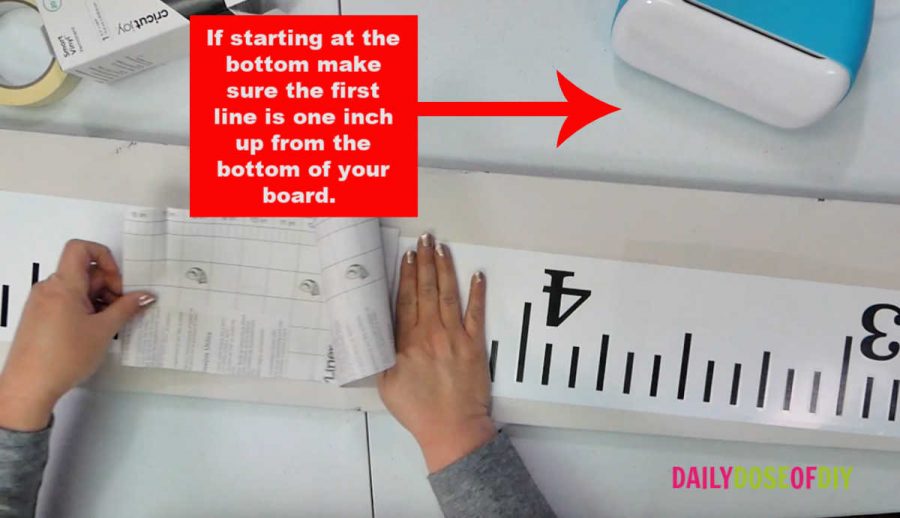
Next, you need to line up the design with one end of the wood board. Either end will work fine. If you choose the 6-foot end, line up the top of the design with the top of the board. If you choose the 1 end, make sure to use a tape measure and set that first little notch (the 1” mark) 1” up from the bottom of the board.
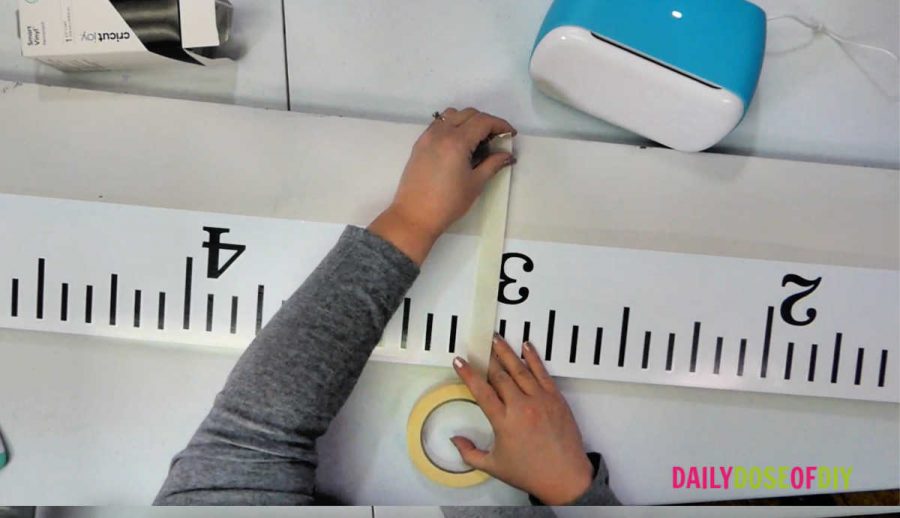
Now it’s time to apply the hinge method. You should have your vinyl lined up to one of the short edges of the board, as well as along one of the long edges. Take some masking tape and tape the vinyl down to the board at the 3 mark, which is the middle of the design.
Pull up one side of the vinyl (I started at the 6-foot end) and remove the backing from the vinyl until you get to the masking tape.

Once you get to the line of masking tape, cut away that half of the backing that you just removed and dispose of it. Don’t let your vinyl stick to itself or the board yet! Hold it out at about a 45-degree angle from the board, and line up the notches with the edge of the board. Very slowly, scrape as you lay it down, keeping it lined up straight as you go.
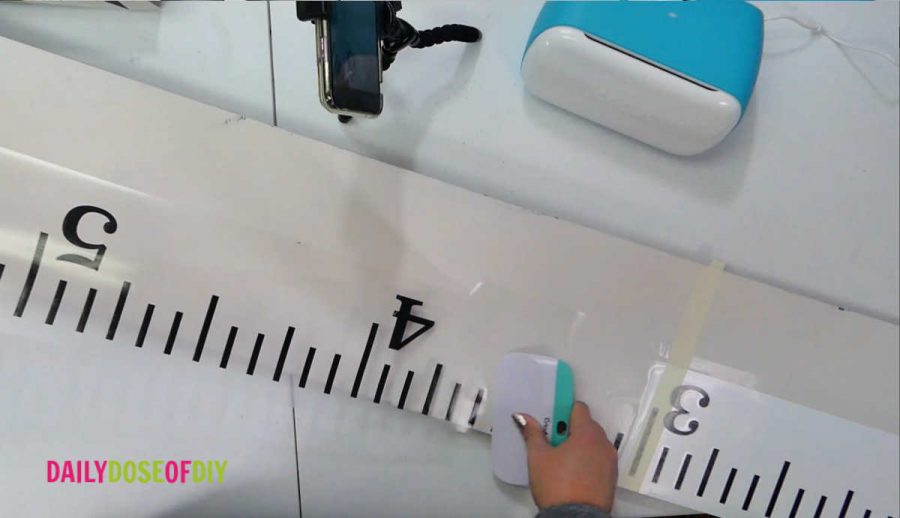
Once it’s all laid down, burnish it very well. Now you can go ahead and remove the masking tape.
Lift up the other end of the design and do the same thing: remove the rest of the backing, hold the design out at a 45-degree angle, line it up, and scrape as you slowly lay it down. Then burnish the entire thing to make sure it’s stuck onto the board good.
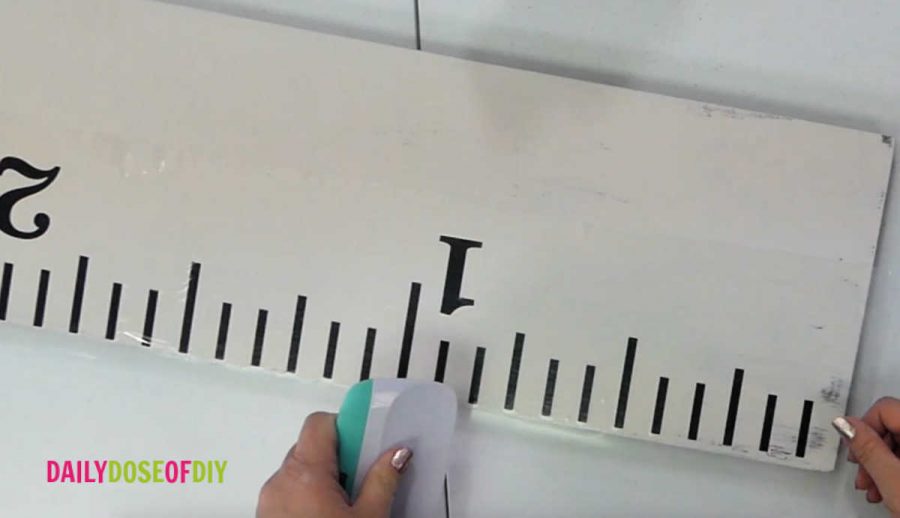
Finally, remove the transfer tape from the vinyl. And then you’re done!
Tip: You’ll see in the video that I had some trouble with my transfer tape. It didn’t let go of the vinyl very well. Next time I do a Cricut Joy project, I’m going to try using the Cricut Joy transfer tape found here, and see if that works better than my clear shelf liner. Normally I don’t have any issues working with the clear shelf liner.
So now you know how to make a 6” DIY growth chart ruler with your Cricut Joy, and how to apply vinyl using the hinge method. I hope you have as much fun with your Cricut Joy as I did! Be sure to grab your free SVG file below.
FREE 6 FOOT RULER GROWTH CHART SVG FILE
You can make your very own GIANT RULER with the SVG that I created. I keep all of my free SVG cut files in a resource library for your convenience. It’s like a one-stop-shop to find everything.
The SVG files are in alphabetical order, so once to get into the library scroll down to ‘RULER’, there’s also a picture to help you find it.
To access the free library simply fill out the form below and the link and password will be immediately sent to you.
All of my free SVG files and Designs are kept in a library for your convenience. We will send you the link and password right away, and you’re free to use all the resources you want in the library.
Already have the password? (It’s at the bottom of every email) Enter the Library Here
Thanks for crafting with me today and making a Wooden Ruler Growth Chart!

Chris Butler has helped thousands of crafters learn how to use their Cricut machine without feeling overwhelmed. She is a best selling author and an up and coming designer. For fun Chris enjoys designing SVG Files, hanging out with her family (preferably at the lake), traveling, and volunteering at her church. She is a wife and mom of two crazy fun kids.
Hi Chris,
Thank you for sharing this with us. I do have a question. How do I do this if I don’t have a Cricut Joy? Does it get broken into 12 or 24 in increments? I’ve been wanting to make one of these but don’t know where to start.
Thanks,
Jerri Rathjen
Hi Jerri! You could use the slice feature in Design Space to make it either 12″ or 24″.
when you say use the slice feature, can you explain how to do that, I have the cricut explore
I would love to make your growth chart, but I do not see where to download it. Can you tell me where to find it?
Thank you
Darlene
Hi Darlene! All of my SVG files are in the resource library https://dailydoseofdiy.com/free-plans-printables/
scroll down to the ‘R’ for Ruler and click to download
Love the design thanks so much for sharing! Making my daughter and my niece one! Could you tell me what font you used for the numbers? I’m thinking of adding their name and birthdays and would like it all to match. Thanks!
Can I use this with my explore? It says it is too big. I also only have the 1ft by 1 ft vinyl pieces but I can order the longer vinyl if needed. Is there any way to cut it into smaller sections in order to use the explore?
Can I print the VSG in my Maker 3?
Hi Chris,
I am trying to use this SVG on the Cricut maker. I am trying the slice feature and I am struggling to get the first SVG to slice so I can make them in 24inch increments. Can you please help with some instructions on how to make this project with the maker? Thank you!
I love this project!! I have a Maker and would also appreciate a video with instructions specific for that machine. Also, could you use a different colored mat so the project is more visible on the screen? My old eyes had trouble seeing it. Thanks so much. You are a great teacher Chris, and so generous with your projects! Thank you for sharing your ideas with all of us.
Hi. I am making the growth chart ruler. When I weeded the vinyl, my number five broke and didn’t come off correctly. I need to make another number 5. Can you tell me what font you used so I can make that to match?
Do you happen to have a 7? Or know the font used so I could make mine a little taller?