This post may contain affiliate links for your convenience. If you make a purchase through one of my links I will earn a small commission at no additional cost to you.
Last Updated on August 12, 2023 by Chris Butler
Hello crafty friends! Today I’m going to show you how to solve your Cricut welding problems. You’ll learn some tips on how to weld and even how to unweld in Cricut Design Space.
.
Doing a Cricut weld is kind of like welding metal. You will use weld in Cricut to get two or more objects to stick together and become one. It’s important to use weld on cursive text; we can even use it for shapes and images.
Let’s get started:
Quick Links to Information in This Post
Video: How To Weld and Unweld in Cricut
What Does Weld Mean on Cricut?
Just like welding two pieces of metal, welding in Cricut Design Space means joining two pieces together, so they cut as one instead of several pieces.
Why is this useful? First, I’ll show you an example using text.
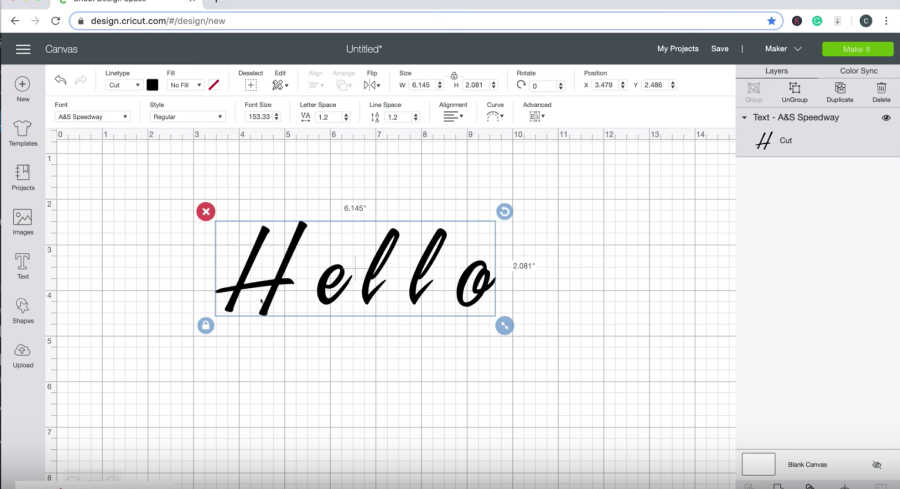
One of the most common ways that we use the weld feature is with cursive letters. If you haven’t worked with a script font before, Design Space doesn’t automatically put them together into one word. Instead, it adds a space between each letter.
Welding Text in a Script Font
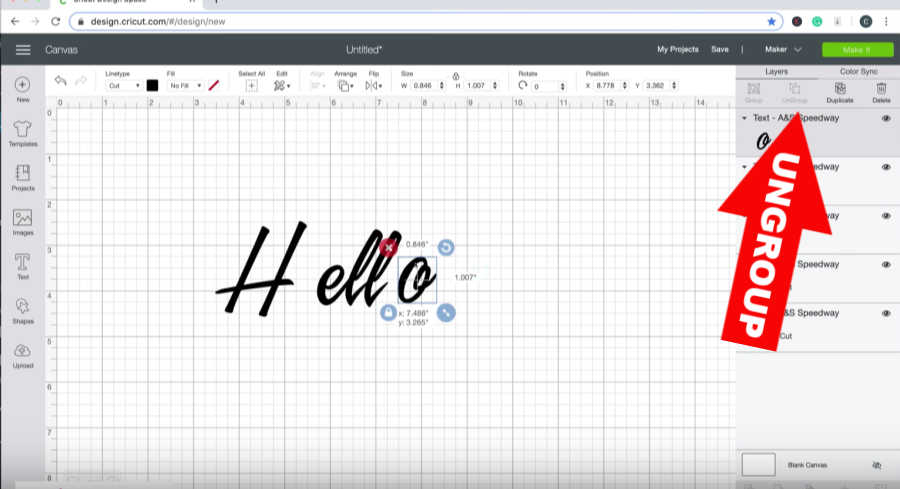
Type your text using a script font, and click “Ungroup” (located in the Layers menu). Now you can move each letter individually to place them closer together.
Now, you would think this would make Cricut cut them into one solid piece, right? But that’s not the case.
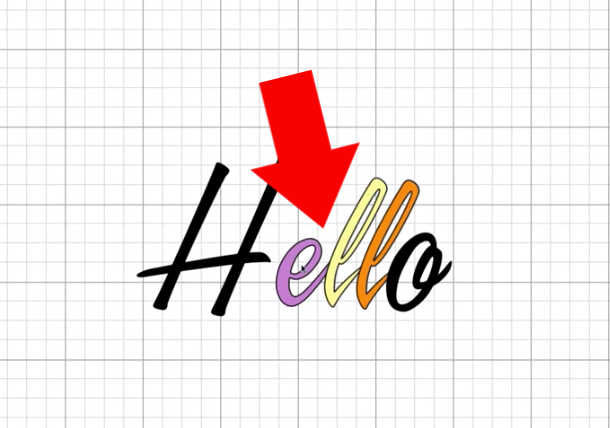
You can see that when I changed the colors of the letters, there were still little lines separating the letters from each other, even though the edges of the letters were touching. That means Cricut will cut them separately. But what we want is one continuous cut.
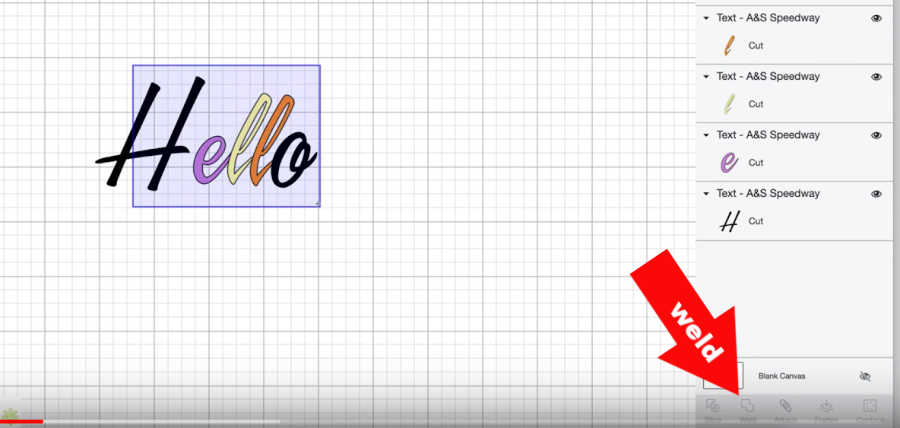
So, to weld, use your mouse to select everything, and then click the “weld” button at the bottom of the Layers menu. When you do this, not only does everything change to the same color, but the lines also disappear making it a single layer. It’s all one word, and Cricut will cut it as one piece. Just how we want it!
But what if you’ve made a mistake? How do you undo a weld on Cricut? You’ll notice there isn’t an “unweld” button next to the “weld” button. So what can you do?
Can I Unweld Something in Cricut?
The bad news is that there is no “unweld” button, so if you make a mistake and keep working without realizing it, you’re basically screwed. There’s no other way to put it. You’ll have to start over, or work with the design as-is.
However, the good news is that you can hit the “undo” button if you recognize the mistake early enough, and your design will unweld. You just have to catch it before you do too many other things.
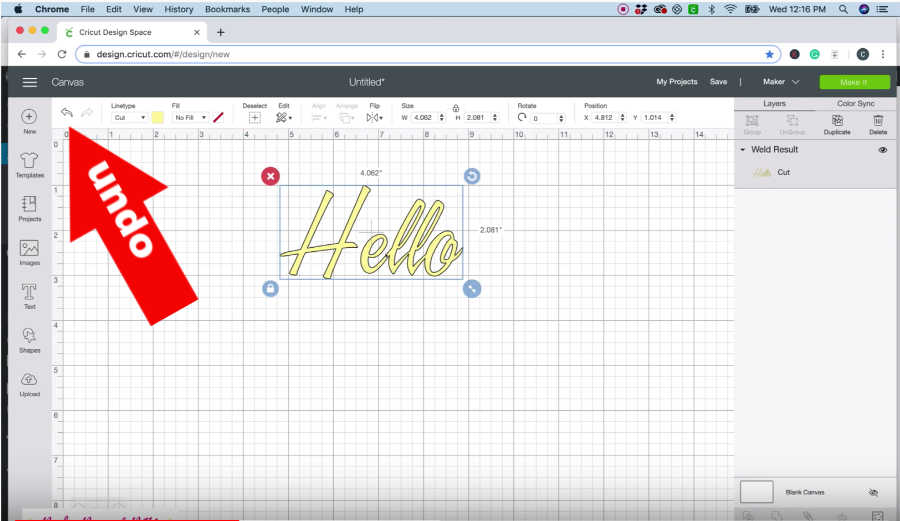
Tip: You can also use a keyboard shortcut to undo. If you have a Mac, use command + z, and if you have a PC, use ctrl + z.
So to unweld in Design Space you’ll need to click the undo button right after you weld or use the keyboard shortcuts to ‘undo’ the weld.
Now that you know how, what are some situations when you might need to undo a weld?
Common Cricut Welding Problems
Letters Too Far Apart
When you’re working with a script font, you may want to leave a space between the first and second letters of the word, like I did in the picture below. This is fine, but make sure you don’t leave too much space.
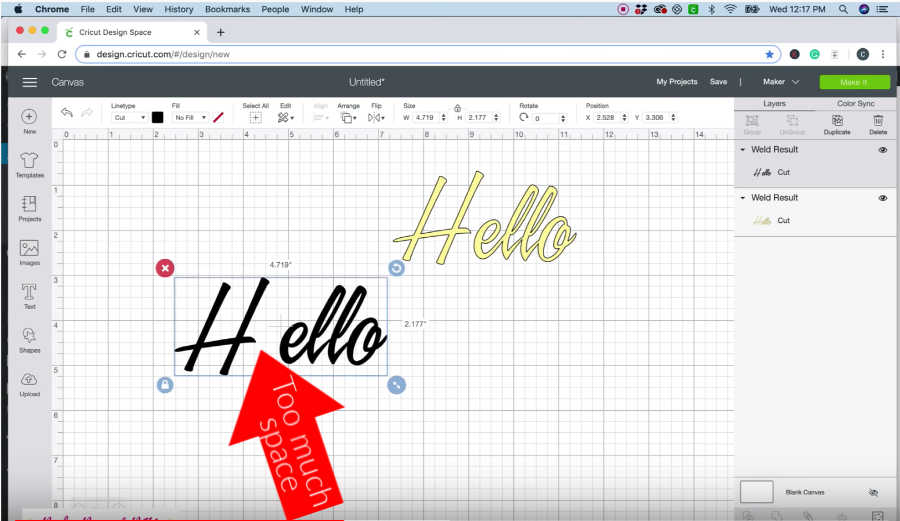
Check over everything and make sure the spacing looks good before you hit “weld.” Once you do weld it, check it over once again to make sure you’re still satisfied with the spacing before you move on – that way, if there is a problem, you can still hit “undo” before it’s too late.
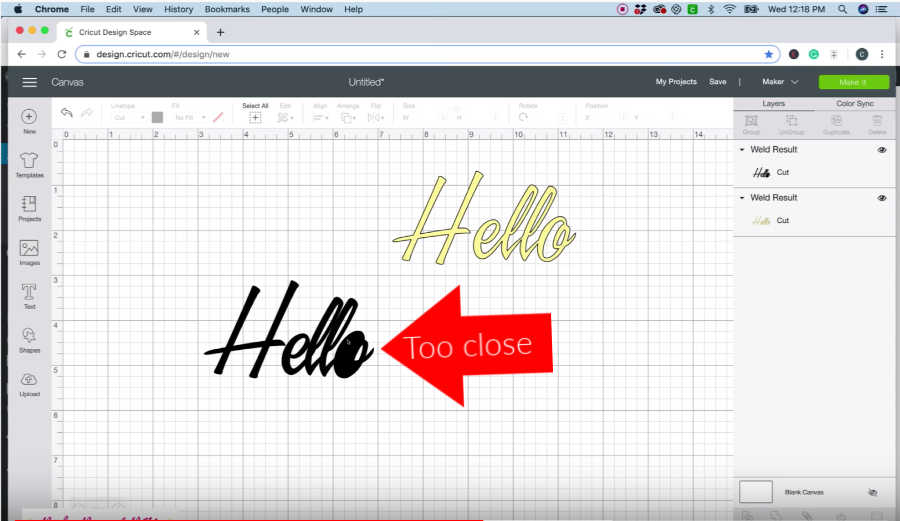
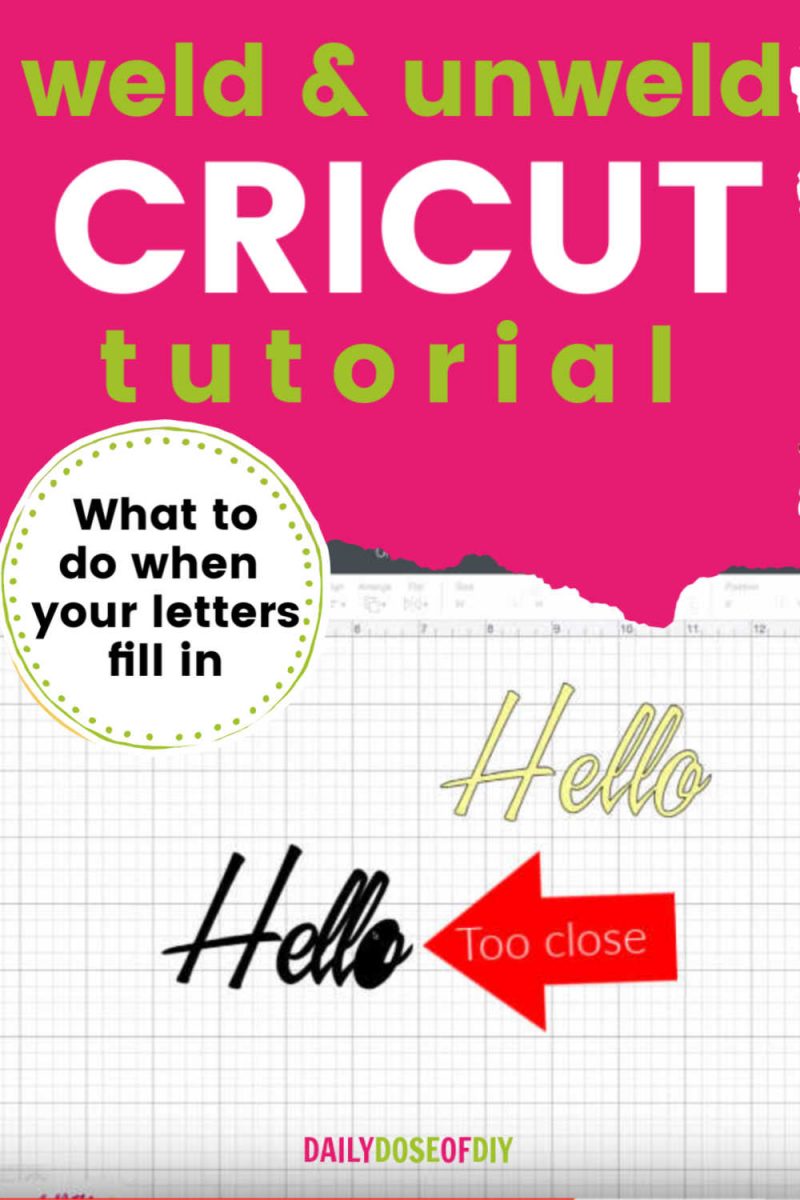
Letters Too Close Together
You might have experienced this before: You move your letters together and hit “weld,” and one or more of the letters get filled in with color in a place where color is not supposed to be. (You can see this happen in the picture below: my “O” turned into a black blob instead of a nice letter.)
This happens because the letters are too close together. You’ll need to undo the weld and fix the spacing issue.
There are two ways to do this:
- Select everything and make it bigger. If you really want your letters to be that close together, you can try this method. Most of the time, this will be enough to solve the problem. First click the undo button and then select all of the letters together and make them bigger. Once the letters are bigger, hit “weld” again, and then you can change the welded text back to the size you want it.
- Move the letters farther apart. If you don’t mind a little bit more space between your letters, this method works just as well. Click the undo button and then move the letters a little farther apart. Then try selecting all of the letters and welding again.
Whichever solution you use, and whatever problem you encounter, just remember to hit “undo” as soon as you realize there is a problem. If you take too many steps before trying to undo something, it won’t work anymore.

How Do You Weld Two Images in Cricut?
There are so many fun things you can make in Design Space using the weld feature! Let’s look at an example of how to make designs using shapes.
In the video, I made a Christmas tree using three triangles stacked on top of each other. I started with one triangle, made it green, and then duplicated it twice using the “Duplicate” button in the Layers menu. Then I stacked the triangles up into the Christmas tree shape.
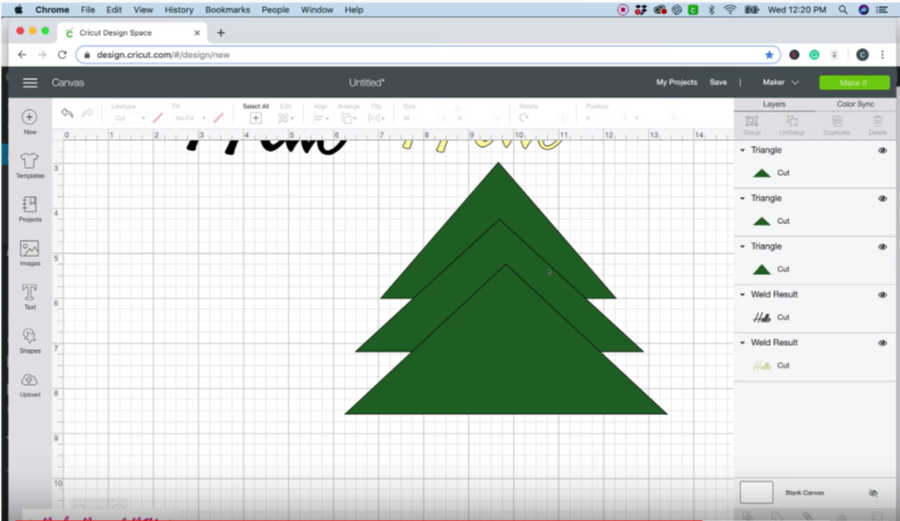
So now I have my Christmas tree outline, but I also have the same problem we had with the letters before: I can still see the outline of each triangle inside the other triangles. Cricut will cut those lines, and my tree will be in pieces.
Again, that’s what welding is for! When I selected everything and clicked “weld,” the inside cut lines disappeared, and my three triangles became one Christmas Tree.
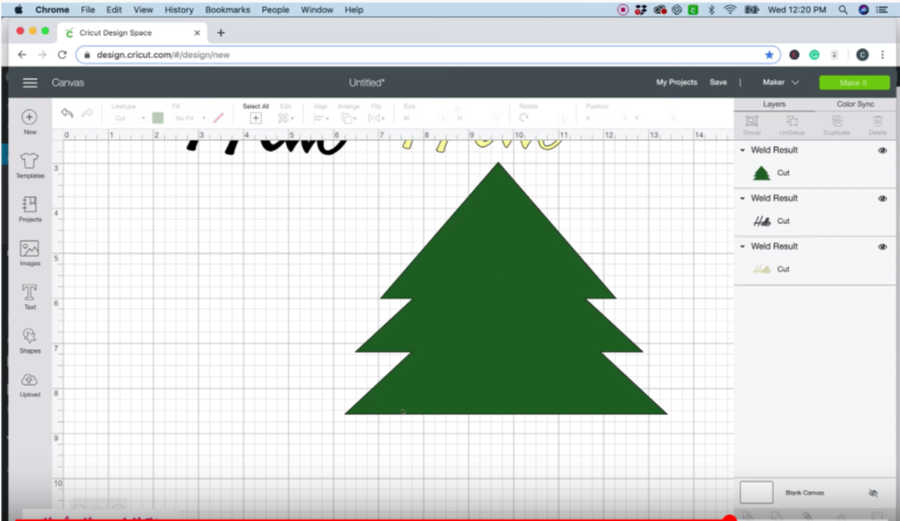
And, again, if you make a mistake or you aren’t happy with the shape, the only way to fix it is to click that “undo” button or use your keyboard shortcut. But you have to do it immediately. If you wait until after you’ve moved other things around, and added a “Merry Christmas,” and so on, it won’t work anymore. Once you get so far, you’re stuck with what you’ve done.
So now you’re familiar with how to weld and unweld in Cricut, you can recognize some of the common Cricut welding problems and know how to deal with them, and you also know how to weld images and shapes together into one piece. Have fun trying out different shapes and welding them into new designs!
Stay tuned for more Cricut hacks and fun things you can do in Design Space. You can also check out my other blog posts and videos for Cricut How-Tos, hacks, and FREE SVG files.
Thanks for crafting with me today!
PIN IT

Chris Butler has helped thousands of crafters learn how to use their Cricut machine without feeling overwhelmed. She is a best selling author and an up and coming designer. For fun Chris enjoys designing SVG Files, hanging out with her family (preferably at the lake), traveling, and volunteering at her church. She is a wife and mom of two crazy fun kids.
You can’t unweld, BUT there is a work around. You can duplicate your object, then use “contour” to remove specific parts from one, and specific parts from the other. Then you will have two different objects to work with.