This post may contain affiliate links for your convenience. If you make a purchase through one of my links I will earn a small commission at no additional cost to you.
Last Updated on October 15, 2023 by Chris Butler
Sublimation crafts have taken the world of crafting by storm. But if you’re just getting started with your sublimation journey it can be a little intimidating.
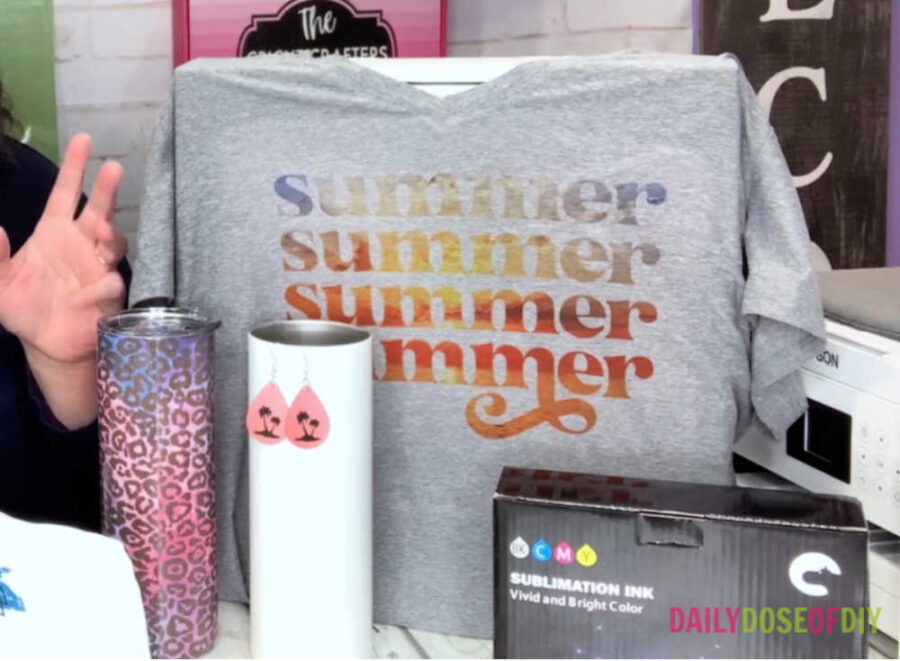
This sublimation for beginner’s ultimate guide will take you through the entire sublimation process, from choosing the right printer, paper, ink, and supplies to creating beautiful final products.
You’ll learn how to set up an Epson EcoTank printer for sublimation plus how to choose the best paper and ink. And I’ll show you how to do your first sublimation projects, you’ll learn how to sublimate a shirt and earrings.
This guide has everything you need for your sublimation journey including some tips and tricks to get great sublimation transfers. Let’s get started:

Quick Links to Information in This Post
What is Sublimation?
In Laymen’s Terms sublimation is a process of printing a design with sublimation dye and then using high heat to transfer that design to your final product. You can sublimate on specific shirts, mugs, tumblers, pillowcases, wood…. the list goes on and on. The possibilities are endless!
If you’ve ever used Cricut Infusible Ink before, it is similar. Infusible Ink is basically a sublimation design already printed for you and it’s a great way to dip your toes into the world of sublimation. This is what got me hooked on sublimation!
But with Cricut Infusible Ink the designs are chosen for you and you’re limited to what they have available. With sublimation, you can literally print whatever you want, even photographs.
And unlike heat transfer vinyl, sublimation transfers will never crack, peel, or fade. Your sublimation projects are high quality and will last a long time. Your shirt will probably wear out before your sublimation print does!
Getting Started with Sublimation -What You Need
Now you may be thinking sublimation sounds great, but what do I need to get started? How do you print sublimation step by step? Those are great questions that I cover in the Sublimation for Beginners video below.

Of course, I answer all of your questions here as well. You can keep reading for all the details you need to start your sublimation projects.
It is easier than you might think. I know it seems overwhelming, but it really isn’t. If you are a Cricut crafter, sublimation is an excellent add-on craft and you probably already have things you need like a heat press. Especially if you have a small business with your Cricut crafts.
But you don’t need a Cricut or other cutting machine to do sublimation. You don’t need to cut sublimation designs at all, they are directly transferred from the prints.
Sublimation Printer, Paper, and Ink
The first thing you’ll need for sublimation is a dedicated printer. This is because sublimation uses special ink. This ink goes through a chemical process at high temperatures that will bond the ink to your project. You can’t use the ink that comes with an inkjet printer. More on that soon.
There are special sublimation printers like the Sawgrass Printer. But they can run $700+. The best sublimation printer to get (and most cost effective) is one of the Epson printers.
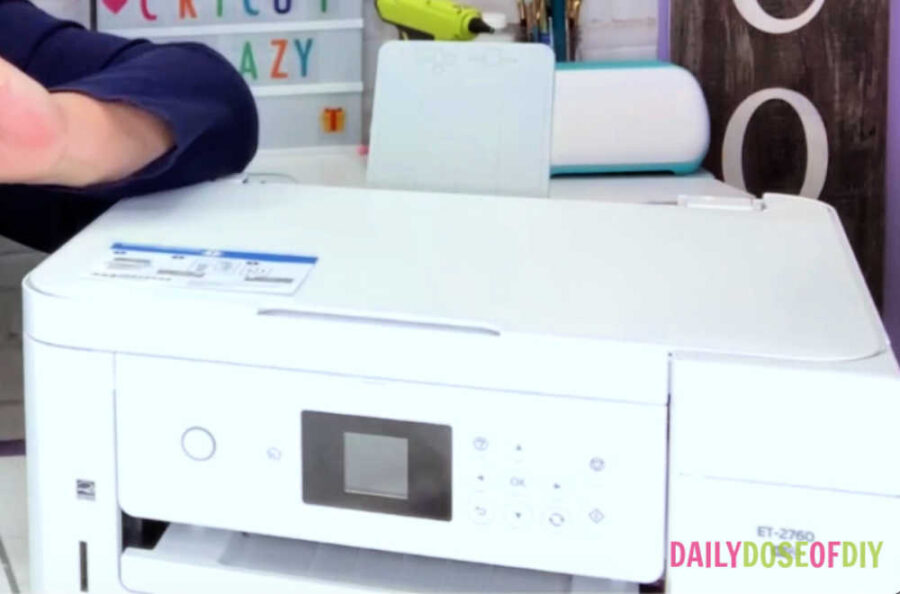
You can use an Epson Printer like the EcoTank 2760 (found on Amazon here) right out of the box for sublimation. Epson EcoTank does not use ink cartridges, all you need to do is fill the tanks with Sublimation ink. DO NOT use the ink that came with the printer. Skip ahead to learn how to set up an Epson EcoTank for sublimation
You shouldn’t use the same printer for your everyday printing and for sublimation. Once you use regular printer ink it will leave a residue on the print heads that can mess up your sublimation prints.
So what’s this special ink about? Dye sublimation printing uses a special ink that will turn to a gas when heat is applied which will dye your final product, like t-shirts and mugs.
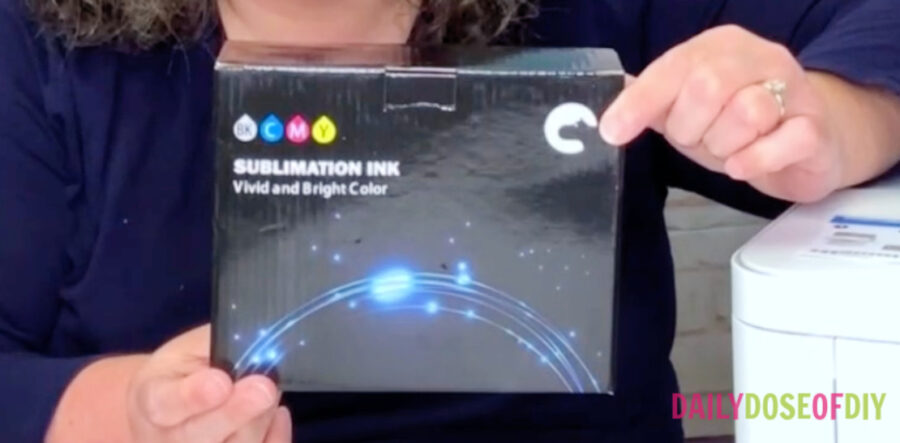
There are several places you can get sublimation ink. Hiipoo sent me some of their ink to try and I love that ink bottles are made to be used with Epson printers. There is no mess whatsoever. You can find it on Amazon here. Bonus –use code JBA9G4V5 to save an extra 10% through 6/30/22
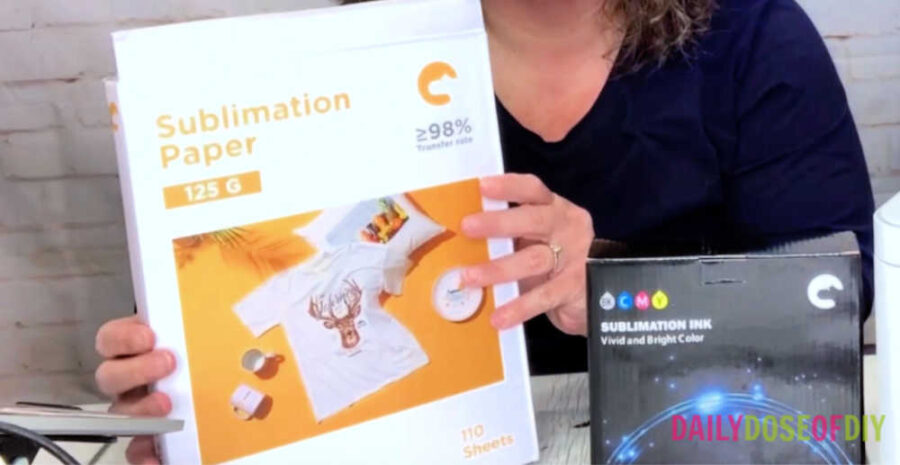
That brings us to the paper. Sublimation paper has a special coating that holds the ink. It can also withstand the high temperatures that are used in sublimation.
When you get sublimation paper one side will be the print side (usually the brighter side). Hiipoo also makes sublimation paper and I love that they watermark the back. So you know without a doubt which side is the print side. It’s one of the best sublimation papers I’ve used. You can find it on Amazon here
Other Supplies You’ll Need for Sublimation
Once you have your printer, paper, and ink you’ll need just a few other supplies. First and foremost you’ll need a heat source. If you’re pressing shirts or bags a Cricut EasyPress 2 will work just fine. The original Easy Press does not get hot enough and a home iron is definitely not hot enough.
You could also get a standard heat press. Mugs and tumblers can be done in a toaster oven, or with a Cricut mug press.
You’ll also need:
- Heat Resistant Tape – https://amzn.to/3sWQKRD Don’t skip this, it makes all the difference!
- Lint Roller
- Parchment Paper, Butcher Paper or a Teflon Sheet
What Can You Sublimate On?
So what can you sublimate on exactly? The answer is a whole lot of things! But just like we need special sublimation ink and paper, you also need special blanks to sublimate on.
Shirts and Fabrics
When it comes to t-shirts, tote bags and other fabrics you’ll need to look for a high polyester count. 100% polyester fabrics will give you the most vivid colors from dye sublimation.
You can use poly-cotton blends, but the dye will only bond to the polyester, so the lower the polyester count the more faded your transfer will be. This is not totally a bad thing tho, though faded retro designs still look great.
Skip down to learn how to sublimate on shirts
I’ve seen around the web the minimum polyester count is 40%, but I like to stick to 60% polyester or higher.
Other Sublimation Craft Blanks
There are hundreds of other items you can sublimate on from tumblers, coasters, ornaments, earrings, keychains, and even wood! When choosing products like these to sublimate on make sure they say sublimation blanks on the description.
Sublimation blanks will have the special coating that is needed for the ink to bond to. The good news is they aren’t super expensive and cost about the same as regular craft blanks. You can find hundreds of sublimation blanks on Amazon here.
Other products you can sublimate on that don’t need the special coating include acrylic and rayon.
Convert Epson Printer to Sublimation
Ok now you know everything about the supplies you need for sublimation, let’s set up an Epson printer so we can get started.
It’s super simple and there really isn’t any conversion needed. Instead of filling the ink tanks with regular inkjet ink, we’re going to fill the tanks with sublimation ink.
The normal printer start up is just like any other personal printer. The instructions are super clear and I was hooked up and connected to my computer within minutes. Let’s go through the steps of filling the printer with Hiipoo Ink.
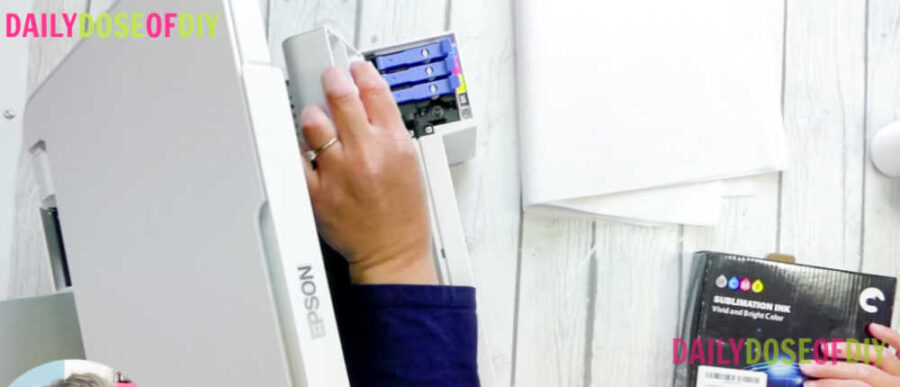
Fill Epson Printer with Sublimation Ink
Open up the top of the printer and then the ink tank cover. The ink tanks are not removable. Instead you will open the blue tabs covering each ink color to reveal the fill port.
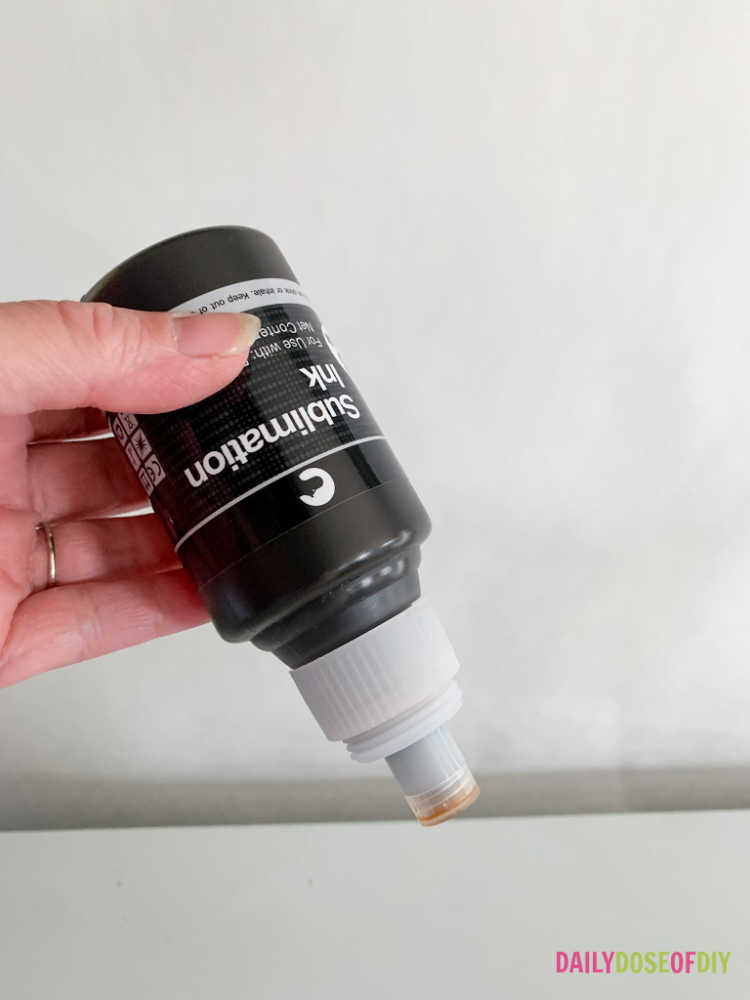
Remove the top cap from the Hiipoo Sublimation Ink. It is a non-spill bottle so it is not messy at all. Go ahead and flip it upside down and shake it, the ink won’t come out! I did not get one drop of ink on me during this process.
Next place the ink bottle on the same color tank on the Epson printer and push down. You may have to have all of the ink ports open so that the bottle will go down far enough.
You don’t even have to squeeze the bottle. Just let gravity do its thing and all of the sublimation ink will drain into the tank. Once one color is empty pull it off, replace the lid and fill the next color.
Tip: If the ink doesn’t automatically start draining, remove the bottle and try again. This is where I figured out it’s helpful to have all of the ports open. It may take 2-3 tries to get a bottle to start to drain.
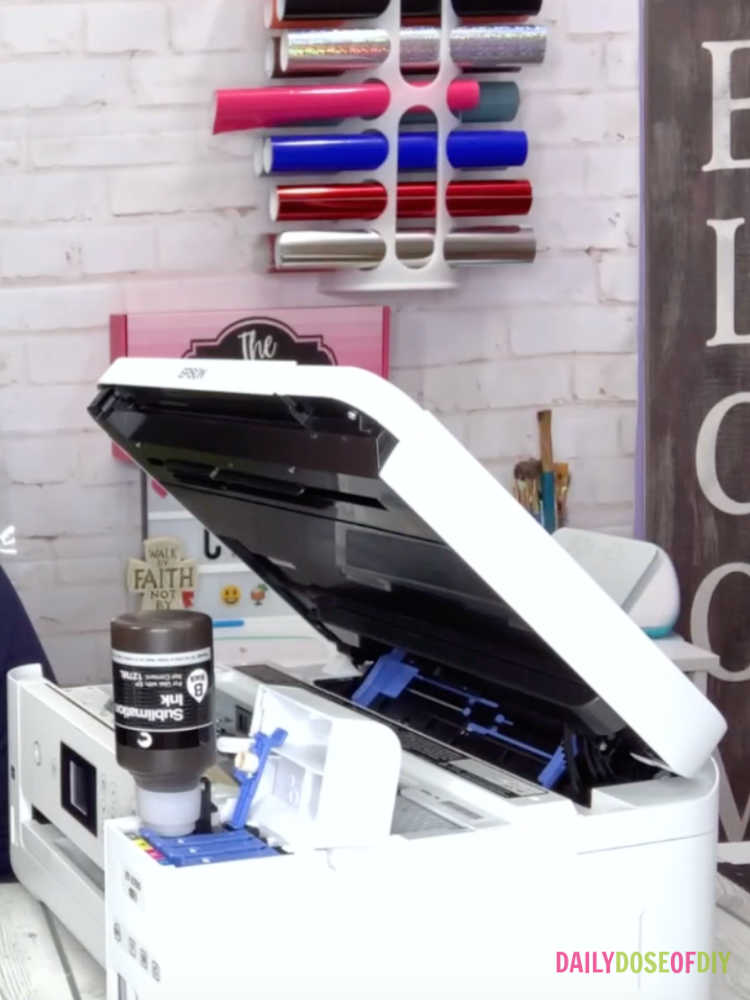
Once your ink is in, Epson will go through the preparing the ink heads. Follow the prompts on the printer screen, or refer to the instructions that came with the printer, they are super easy to understand. This process takes about 10 minutes once you start it.
While the printer is doing its thing, It’s an excellent time to get the printer software installed on your computer. Again it’s super easy just follow the prompts. Once all of that is finished, you are ready to print.
Where to Find Sublimation Images
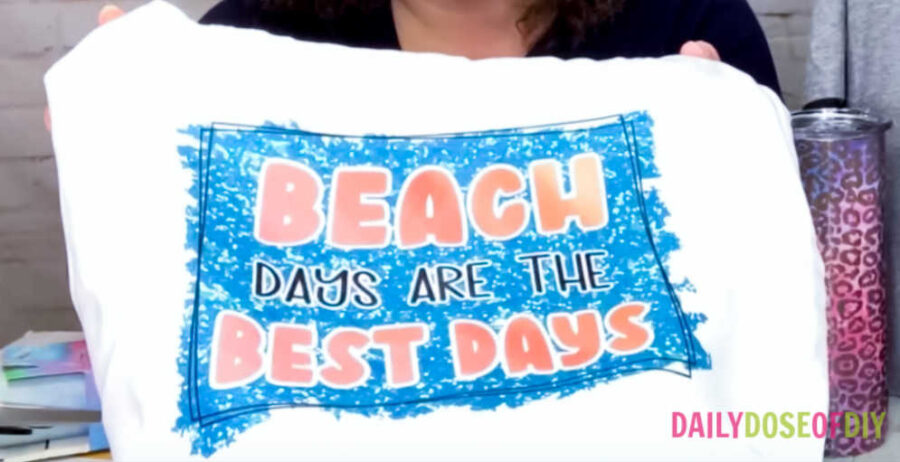
Now we need a design to print for our project. I’ve made three designs for you to use for your sublimation projects.
All of my free SVG files and Designs are kept in a library for your convenience. Simply CLICK HERE to get access. We will send you the link and password right away and you’re free to use all the resources you want in the library.
Already have the password? (It’s at the bottom of every email) Enter the Library Here
Already have the password? Enter the library HERE

You’ll also find Sublimation Designs in a lot of the same places you find SVGs, like Design Bundles here or Etsy. Simply type sublimation in the search and you’ll find all sorts of goodies. Look for PNG images as they’ll be the best print quality.
In the next video and post, I will show you how to design Sublimation prints in Cricut Design Space so stay tuned!
How to Print Sublimation Transfers
Ok now that you have your design picked out, we’re ready to print. You do not need to use Cricut Design Space but you can if you wish. The disadvantage of going through Cricut to print is they will print the black lines around your design.
We can cut the lines off, no problem. But it is a waste of ink.
The best way is to print directly from your computer. Once your design is downloaded open up the image by double-clicking or right-click and open.
Mirror Your Design
Now every computer and system is different, but this should open up the design in a preview window. From here we need to mirror the design . To do this on my computer I go to tools and flip horizontal.

If you can not figure out how to mirror the image on your particular computer, you can upload it to Design Space and mirror and print it from there.
Printer Settings for Sublimation
And once the design is mirrored I click on file and then print. This brings up the print menu. Make sure the Epson printer is selected.
Change your print quality to Photo on Matte Paper. Also, check the scale size, a lot of times the scale will be less than 100%. This partly depends on the designer that made the image. But in most cases, the designer already made the image at the optimal size you need.
So make sure the scale is 100% for proper sizing.
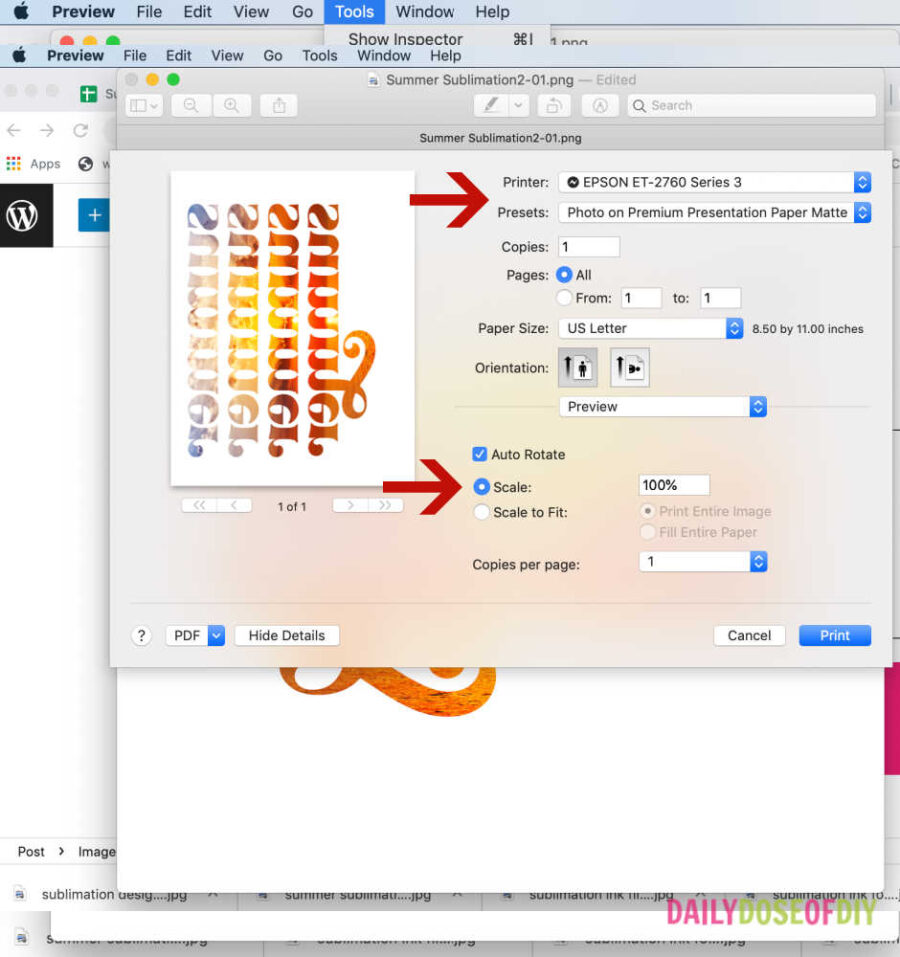
Now you’re ready to load the paper and click print.
Load the Sublimation Paper into the Epson Printer
As mentioned before sublimation paper has a print side. With the Epson EcoTank 2760, the print side faces up. And with the Hiipoo Sublimation Paper, the non-print side is watermarked so you know which side is which.
On the back of the printer pull the gray paper rest up and move the green paper guides all the way out. Place the paper print side up into the slot and move the paper guides up against the paper if needed.

Once your design is printed you may notice that the colors are not as bright and vivid as you were expecting. It is normal for the printed design to look a little duller than the final transfer will be. (provided you’re using the correct materials to sublimate on)
Preparing Your Blanks for Sublimation
Before you heat transfer your design you’ll want to get your sublimation blanks ready.
For fabrics like t-shirts and tote bags, this includes pre-heating the fabric to remove extra moisture. Once your heat press is heated up pre-heat your fabrics for about 5-10 seconds. You’ll need to let the material cool back down before you transfer.
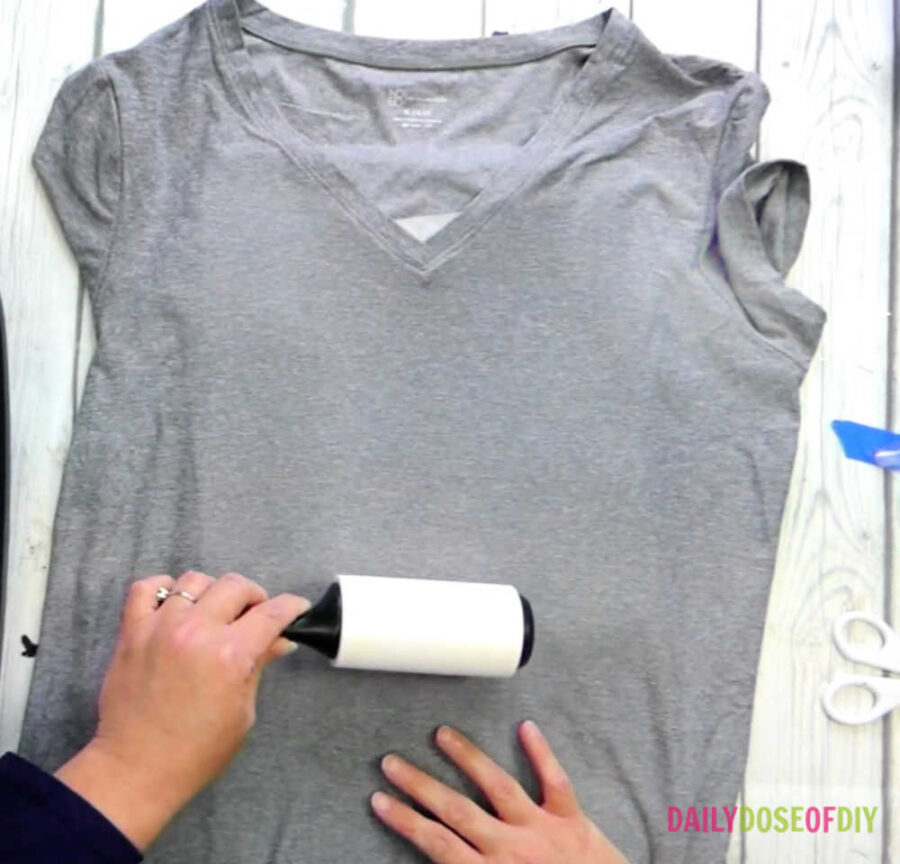
While it’s cooling it’s a great time to use your lint roller to remove any particles stuck to the material. It may look like nothing is there, but I guarantee your roller will have fuzz and other debris stuck to it when you’re done.
To prepare hard surfaces like ceramics, metals, and different woods you’ll want to wipe them down with alcohol or another cleaner to remove fingerprints and oils.
You can also use a lint roller on these hard surfaces to remove dust and particles, but using a microfiber towel is a bit easier.
Heat Press Settings for Sublimation
The time and temp for sublimation have a few different factors. One is the heat press you’re using. Most heat presses will have a couple of degrees variance from the temp it’s set at and the actual temp.
The other factor is the material you are sublimating on. Most blanks you purchase will tell you the temperature and time. Like the earring blanks found here say to sublimate at 356 degrees for 40-75 seconds. That’s still quite the time range. I pick a time near the middle of the recommended time and start there for a test.
The lowest temperature you can use for sublimation is 350 degrees.
The lower the temperature the longer the time you’ll have to press to get vibrant colors. Generally, around 120-130 seconds Use low temperature only on products you’re afraid will burn at a higher temp like polyester blends, or as recommended by the manufacturer.
The average time and temp for sublimation is 400 degrees for 50- 60 seconds for most materials.

I like using poly-blend shirts as I don’t like the feel of 100% polyester. So the sweet spot I’ve landed at is 385 degrees for 55 seconds. Just keep in mind that you may have to do some testing to find the best settings for your heat press.
Sublimating a Shirt
Ok, now you know everything to get set up with sublimation and how to print your designs. Now it’s time to sublimate something.
You also know your shirt needs to have a high polyester count and how to prepare your shirt for sublimating. But before you do the transfer there are a couple of more things you need to do.
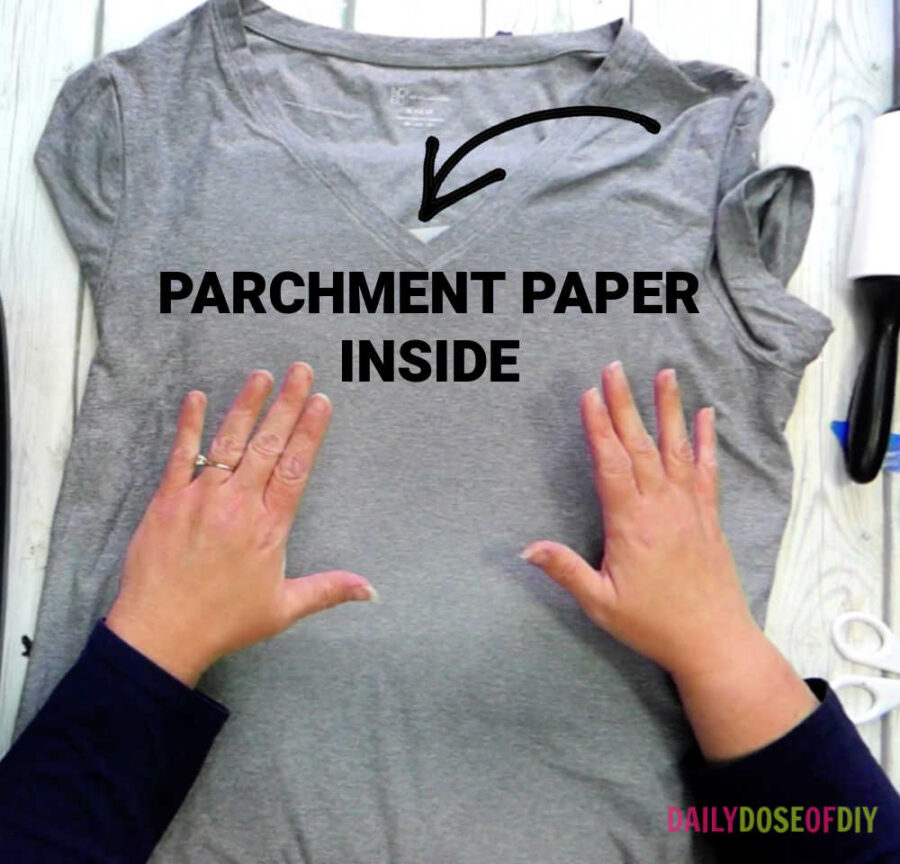
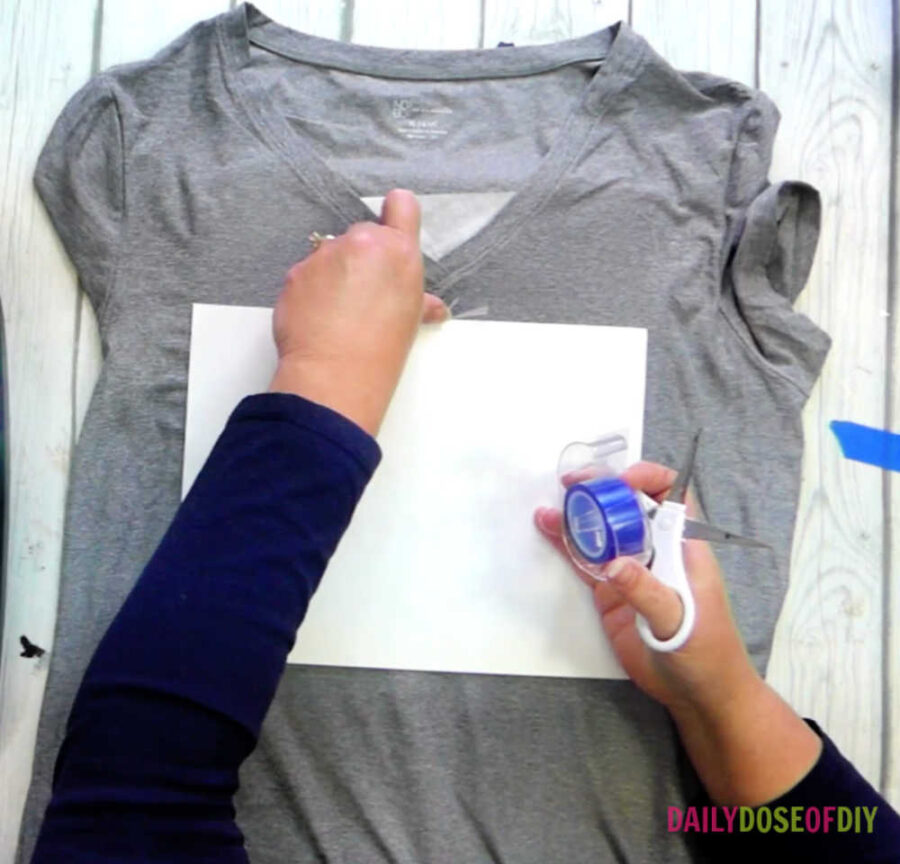
First place a piece of parchment paper or a teflon sheet inside the shirt. This will keep the ink from transferring to the back of the shirt.
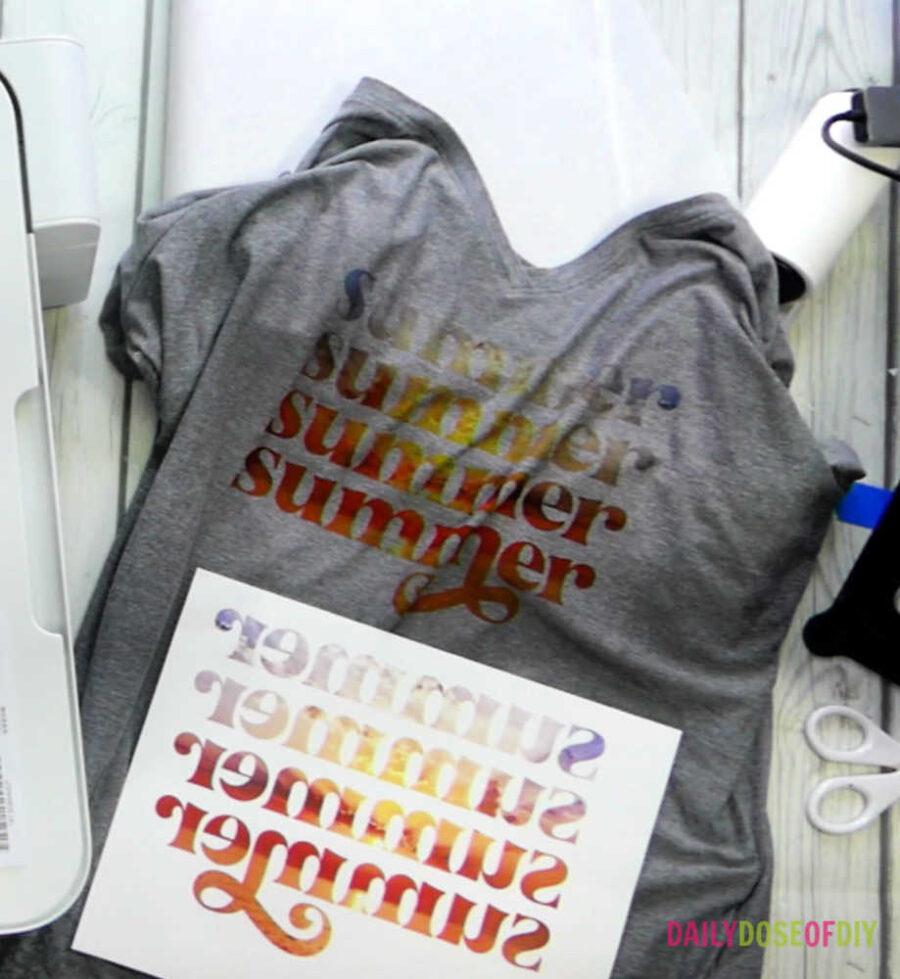
Next place your sublimation design print side down on your shirt. The general rule of thumb is for the top of your design to start 2 inches below the collar. With a v-neck shirt, it’s easy to know and eyeball the center of a shirt.
Tip: If you have a scoop neck you can fold the shirt in half and press it so you’ll have a press mark going down the center.
Once your design is centered on the shirt you’ll want to tape it down with heat-resistant tape. This is an important step. If the paper shifts while lowering or raising your heat-press, it could mess up your design.
Next you’ll want to put another piece of parchment paper or teflon sheet on top of your design. Remember the sublimation ink changes from a solid to gas. During the heat process, you can get what’s called off-gassing, which basically means ink on your heat-press or other places you don’t want it.
Heat Press your Shirt
Now you’re ready to press your shirt. As mentioned earlier the time and temp will depend on your heat-press and your shirt materials. The benchmark is 400 degrees for 60 seconds. My shirt is a 92% polyester blend so I’m pressing at 380 degrees for 55 seconds.
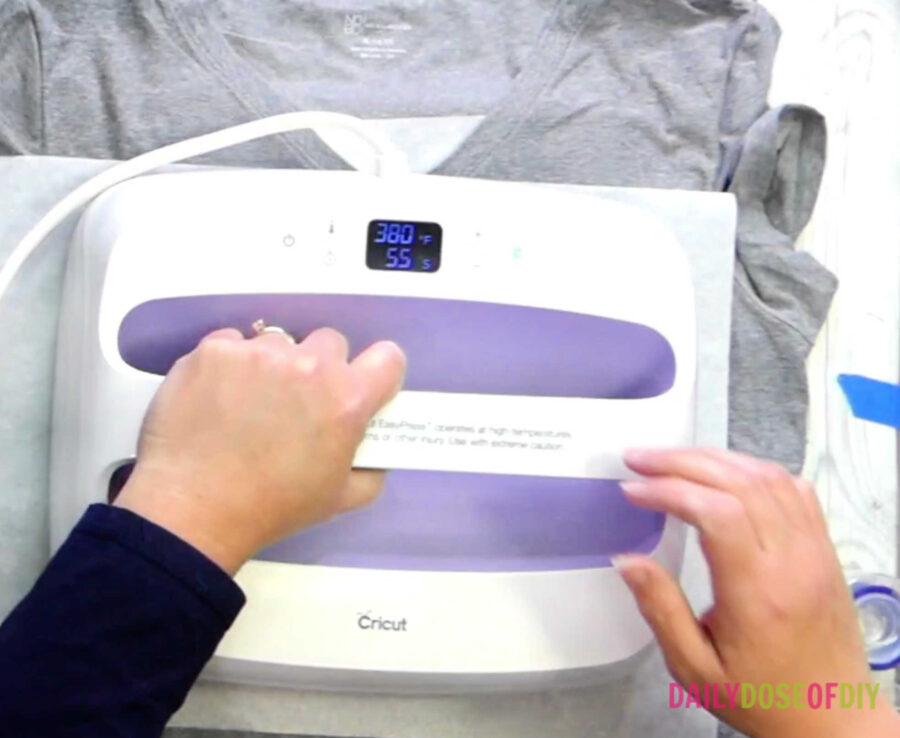
If using an EasyPress use firm pressure and try not to move the press at all during the transfer process.
Once the timer goes off slowly lift your easy press and put it back on the base. Let everything cool down before you remove anything.
Once cool you can remove the parchment paper and the sublimation paper.
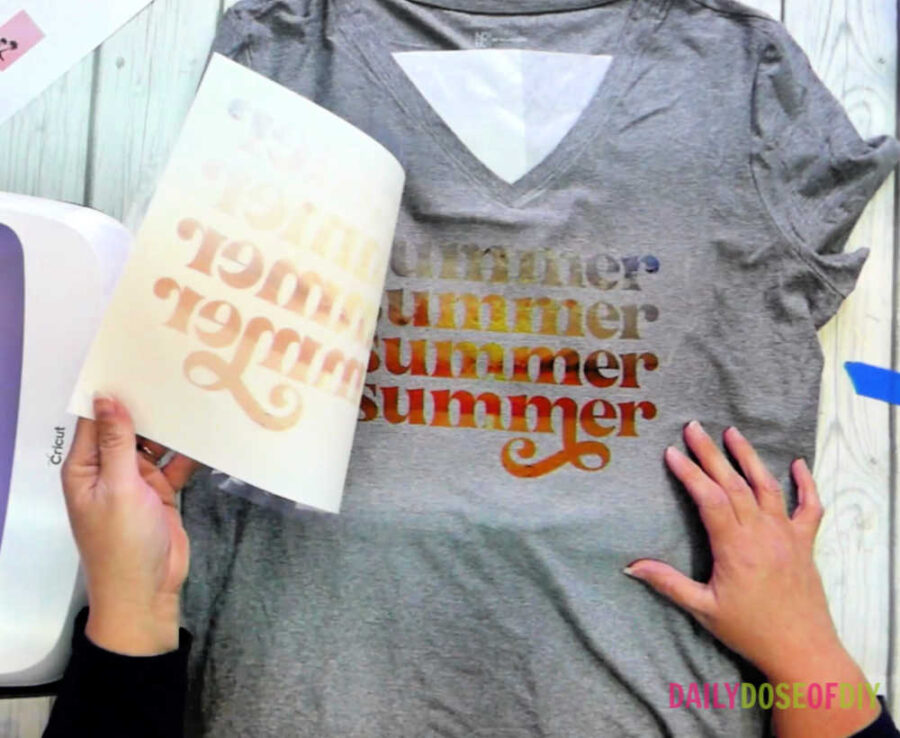
Your shirt is immediately ready to wear or toss in the washer. You don’t have to wait for the ink to set, it will not fade, crack, or peel.
Sublimate Earrings
The first step is to prepare your earrings for sublimation as covered above.
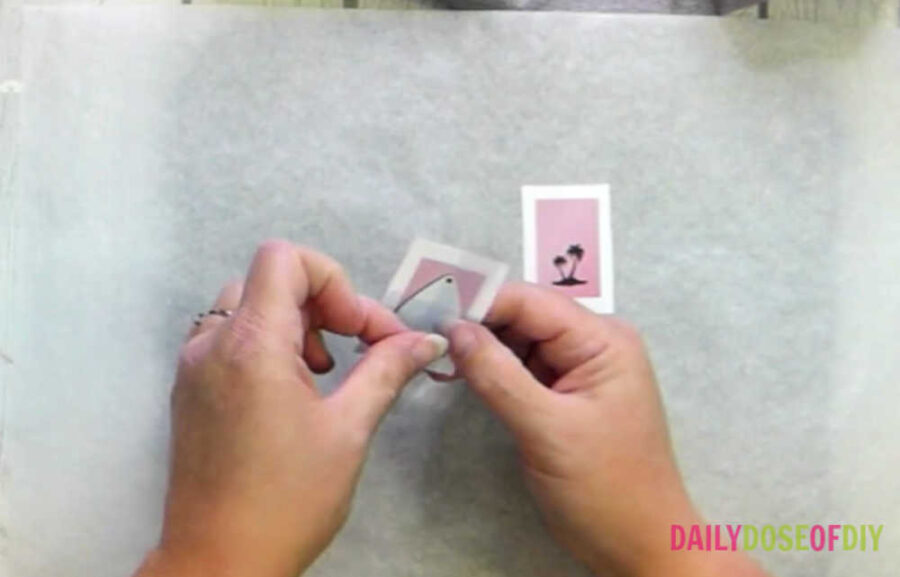
You can print a whole lot of earring designs on one sheet of sublimation paper. I print at least 4 copies of one design so I can sublimate the front and back of the earrings.
When sublimating small objects it’s easiest to cut out the design. Remember the white paper won’t transfer so you don’t have to worry about that. But it’s easier to work with if it’s trimmed down.
Next, place a piece of parchment paper or a Teflon sheet on the bottom to catch the off-gasses. Then center your earrings over the design and tape them down well.
I always press both earrings at once with the design paper up and earring side down.
When you purchase earring blanks they should give you the best time and temp to press them for the materials they’re made of. I pressed mine at 380 for 55 seconds, which is kind of on the high side. But they turned out well.
Place another sheet of parchment paper over the earrings and then heat press them.
After pressing allow to cool completely before removing the design. You might have to cut away the tape to get it off. I had mine completely wrapped!
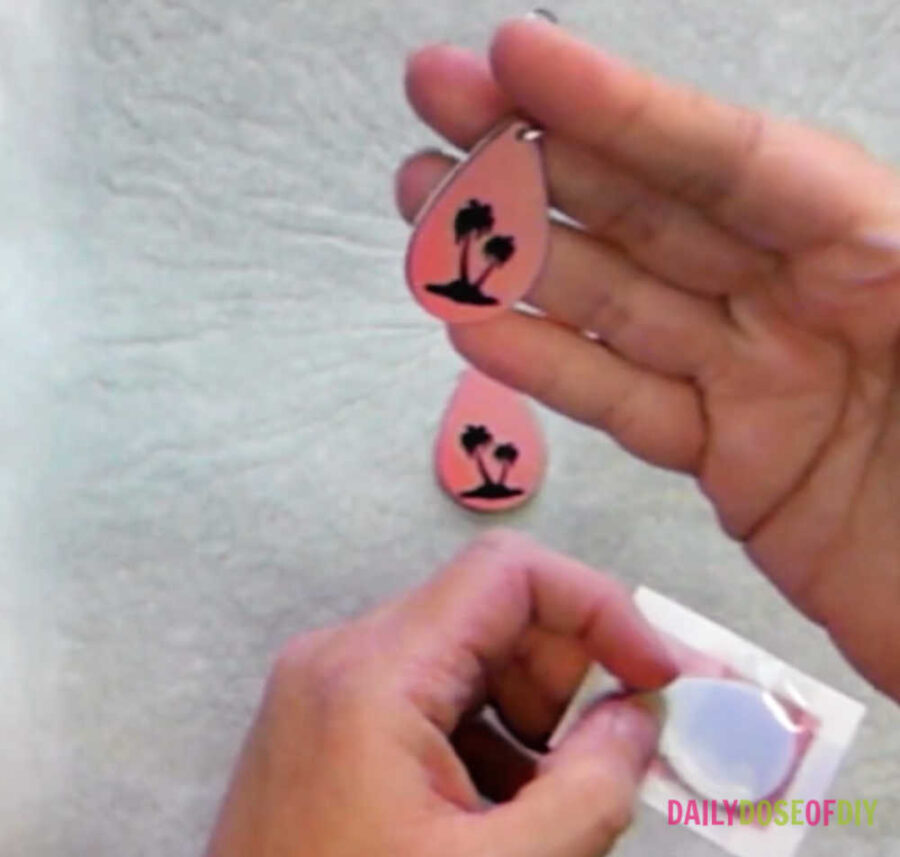
If you want to sublimate the backs you can go ahead and do that right away. Don’t forget to clean the backside also.
Your sublimation earrings should also come with the hardware to finish them. Place the jump ring through the earring hole and the fish hook and then close the jump ring. The easiest way I’ve found to close the rings is to use 2 pairs of needle-nose pliers.
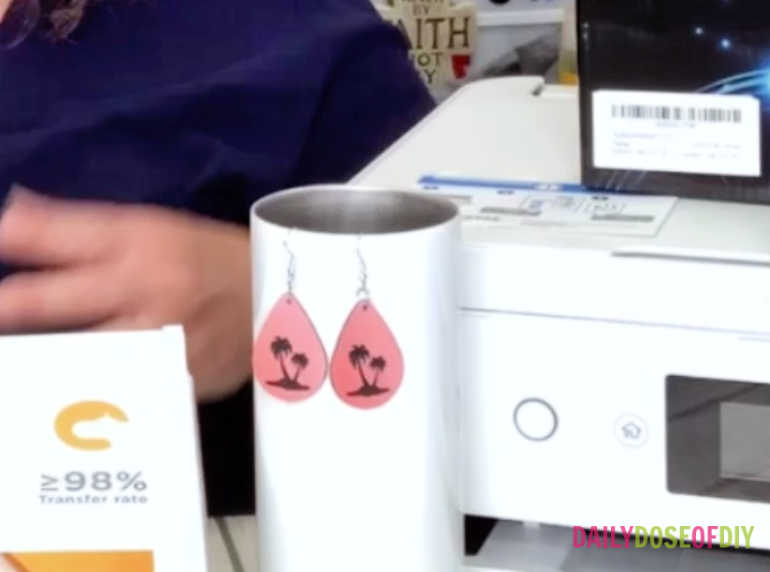
Now you know everything you need to get started with sublimation. You learned all about the printers, ink, paper, plus other supplies you need. We covered the materials you can sublimate on plus walked you through some great first projects.
Keep reading for sublimation FAQs and trouble-shooting
Sublimation Trouble-Shooting and FAQs
Like any craft there are some things that can go wrong when sublimating. We’ll cover the most common problems and frequently asked questions sublimation beginners have.
How to make Sublimation brighter?
There are two main reasons your sublimation transfer is not as bright and vivid as you hoped. First remember when your sublimation prints it should look much brighter than it does on the paper.
If your sublimation is still faded after your transfer check your materials. You’ll get the brightest transfer using 100% polyester on white fabric. Less than 100% polyester or darker colored fabric will not be as vibrant.
Don’t forget hard surfaces need a special coating, you can’t just grab a mug from the Dollar Tree
If your materials are correct then you need to look at your temperature and time. Try a hotter temperature or press 10-20 seconds longer.
Why is Sublimation Black not Black?
Black is the easiest color to notice that it’s a little off when sublimating. Again it could be two things. If your black has a faded green or blue tint you did not press at a high enough temperature or long enough time.
If your black looks like a faded gray or has turned brown that means the temperature was too high or the time too long. Adjust settings as needed.
Why are there spots in my Sublimation Colors?
The main reason for getting a spotty transfer is too much moisture in the fabric. Don’t forget to pre-heat and then allow to cool before sublimating. The 2nd reason is there are fibers or fingerprints on your blanks. Be sure to clean them first and remove fibers with a lint roller or microfiber cloth.
Why is my Sublimation Ink Bleeding?
If it looks like your sublimation ink is bleeding this is called ghosting. It most commonly happens when there is movement during the transfer or while cooling.
To solve this problem make sure you are using heat-resistant tape to keep your transfer stuck to your blank and wait for it to completely cool before removing it.
If you are using an EasyPress as your heat source do not move it while transferring and lift it off slowly when you are done.
Why is my Sublimation Blurry?
Again a blurry image could be ink ghosting (see above). You also want to look at the quality of the image that you printed. For best prints use a PNG image at 300dpi. If you purchase sublimation prints this is standard.
Also, make sure the print quality on your printer is set to photo or better on matte paper.
If all of that is good then a blurry image is most likely from pressing at too high of a temp or for too long. Lower your settings and try again.
Thanks so much for crafting with me and learning all about sublimation for beginners. Don’t forget to grab your free sublimation designs!
To grab the free SVG for this craft fill out the simple form below
All of my free SVG files and Designs are kept in a library for your convenience. Simply CLICK HERE to get access. We will send you the link and password right away and you’re free to use all the resources you want in the library.
Already have the password? (It’s at the bottom of every email) Enter the Library Here

Chris Butler has helped thousands of crafters learn how to use their Cricut machine without feeling overwhelmed. She is a best selling author and an up and coming designer. For fun Chris enjoys designing SVG Files, hanging out with her family (preferably at the lake), traveling, and volunteering at her church. She is a wife and mom of two crazy fun kids.
Great work Chris, glad to see woman at work
I wish you had this to where it can be printed for this newbie. It would help me if I could put it in a notebook to refer back to without having to do a lot of searching. Love this! It has helped me a lot.
I have just started doing sublimation and I am so excited. I love your videos! I have a couple of questions. Is there any way to save all your videos on my computer so I can keep them to watch over again? What program do you use to make your images to print them?
Thank you
Sandy
Hi Chris! I purchased the Epson et2760 and the hiipoo ink. Went through the setup process as per directions from epson and I can’t get my printer to print anything but blank pages. I have gone through head cleans, nozzle checks and even a power clean. I called into Epson and of course since I am using sublimation ink….they won’t warranty anything (which I knew they wouldn’t) but thought could walk through some things. I know your not a printer tech but wondered if you have heard from anyone having same issue right out of the box with their Epson printer and any suggestions. I’m not having any luck finding anything.
Thanks for your help!