This post may contain affiliate links for your convenience. If you make a purchase through one of my links I will earn a small commission at no additional cost to you.
Last Updated on September 3, 2023 by Chris Butler
Do you want to know how to make your own stencils with your Cricut cutting machine? Can Cricut even cut reusable stencils? The answer is yes!
Want to make a one-time use stencil? See how to make vinyl stencils with your Cricut be sure to see my post here.
In this Cricut tutorial, you’ll learn the best materials to use to cut a reusable stencil, the cut settings you need to choose, and how to paint with your stencil. Reusable stencils are great for stenciling furniture, floors, and walls. It’s the easiest way to stencil a repeating pattern.
But instead of being limited to stencils that are available for sale, you can make your very own. Which means the possibilities are endless!
Plus I have four stencil designs you’re more than welcome to use. See the bottom of this post for all the details on swiping them.
Let’s get to it.
DON’T FORGET TO PIN IT

Quick Links to Information in This Post
Supplies Needed To Make Reusable Stencils
- Mylar Sheets 4 Mil
- Laminator and Laminating Sheets (If not using Mylar)
- A Cricut Machine (I used my Cricut Explore Air) This will work for any Cricut Explore or Cricut Maker
- Elmers Spray Adhesive (optional)
- Sponge for Painting (I Love These)
- Paint
- Stencil Designs ( I have 4 stencil designs you can use in my Free SVG Library!)
To grab the free SVG for this craft fill out the simple form below
All of my free SVG files and Designs are kept in a library for your convenience. Simply CLICK HERE to get access. We will send you the link and password right away and you’re free to use all the resources you want in the library.
Already have the password? (It’s at the bottom of every email) Enter the Library Here
Best Stencil Material For Reusable Stencils
So you can buy handy dandy reusable stencil sheets made out of mylar. They come in several different thicknesses. The best material size I’ve found to work with is 4 mil. My Cricut Explore will cut through 6 mil and they are a sturdier stencil, but my Cricut Maker would not cut through it.

You can also try laminate sheets. I was on Pinterest one day and saw a Silhouette blogger made stencils with laminate sheets. I thought this was genius so I dug out my laminator and gave it a try for myself.
After I figured out the correct settings for Cricut it worked like a charm.
Using Laminate Sheets
If you have a laminator load an empty laminate pocket into your machine and let it do its thing. I started with the 3 mil laminating sheets, they also come in 5 mil.
For the 3 mil size set your Cricut to cut cardstock. For the 5 mil you’ll want to set the dial to custom and choose posterboard from the menu.
Using Mylar Stencil Sheets
If you don’t have a laminator no worries, you can order the Mylar sheets on Amazon. Make sure you get 4 mil for the easiest cutting. As you’ll see in the video tutorial below, my Maker would not cut the 6 mil at all!
For 4-5 mil mylar stencil film you’ll want to choose mylar or poster board from the material settings.
How to Make a Reusable Stencil Video
Click here to subscribe to my youtube channel
Finding an Image to Make a Stencil
You can turn any SVG file into a stencil. Keep in mind when cutting a reusable stencil, the design is going to cut like it would on paper. And that’s a bit different than using Cricut stencil vinyl.
That means centers of letters, windows, or anything that’s inside something else (the negative space) will not be there after its cut. That’s just something to think about when you are picking your own design.
Don’t forget I have four free designs you can use or you can check places like Design Bundles here. If you search Stencil, you’ll find several designs all ready to go for you.
Cutting Words with a Reusable Stencil
If you want to make a design with words in Cricut Design Space it’s easiest to use stencil fonts like this one. Stencil fonts come with the letters already bridged which is connecting the negative space so you don’t lose the centers of letters.

Related: How to Find Free Fonts and Download them to Cricut
You can also bridge the letters yourself using any font in Design Space. It’s a little tedious, but it’s totally easy to do. In Design Space click on new project and then text over on the left. Type out the text you want to use on your stencil

You can see the difference, if we cut this font using mylar sheets we would lose the centers of the letters. The next step to adding a bridge is to click on shapes on the left menu and select the square.

Next, click the unlock button on the bottom left of the square so that we can reduce it down to a small rectangle. Place the rectangle over one of the letters that have an inside space. Make sure both ends of the rectangle are in the white space.
At this point, it’s also a good idea to make several duplicates of your rectangle. You’ll need one for every letter that you need to bridge and it will keep your sizing consistent.

Once your rectangle is over your letter select both the text and the rectangle. Then click Slice on the bottom right of the layers menu.

If Slice is not available to click, make sure you only have one rectangle and the word selected. You’ll have to slice one letter at a time. Like I said it’s easy, but a bit tedious.
After you click slice, select your word and pull it up out of the way. You’ll now have a gap in your letter connecting the white space. Repeat this process for every letter you need to bridge.

Add a Stencil Border
The next thing I like to do when making reusable stencils is to create the border. This is so I can center my design and have the outside of the stencil cut out. Select the square shape from the shapes menu again and unlock the square.

You’ll want to make this square the same size as the board you’re stenciling if making wood signs, or the dimensions you want the stencil. Change the size of the square on the top menu. When you have the size correct click on arrange and move the square to the back so our design will be on top.
Once the design is on top, select both the design and the square and on the top menu again click align and the center.

Check the margins of the design and the stencil edge. You may need to make your design smaller or your stencil bigger if possible. When you’re happy with the way everything looks, select both your design and the square and click attach on the bottom right.
This will keep everything together when we go to cut it.
Cutting Reusable Stencils with Cricut
Once you have your design ready click the make it button. You do NOT need to mirror your design for a reusable stencil. If you have a dial set it to custom. From the materials list choose Mylar, Poster Board also works well. Depending on the thickness of your stencil material you may have to adjust settings.

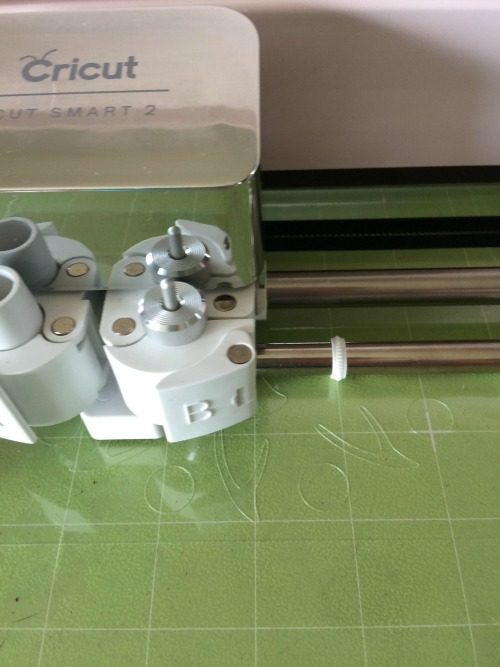
Load your stencil sheet onto your cutting mat. You can use a newer green mat that’s still super sticky or use a purple strong grip mat. (See the differences of Cricut Mats Here). You can also use masking tape to tape down the sides of the stencil sheet if your mat isn’t super sticky.
Insert the mat into your Cricut and hit the go button. Once it’s done cutting flip your mat over and remove the mat from the film. This will help reduce curling.

If there are any areas that didn’t cut all the way through use a craft knife to finish the cut. Now we’re ready to use our stencil.
Using Your DIY Reusable Stencils
You don’t need transfer tape with reusable stencils as they don’t have an adhesive backing like removable vinyl.
I used Elmers spray adhesive for my stencil adhesive. This really helps keep the stencil in place while you’re painting. And you can easily remove it when you are done. Plus you can reposition it to the next spot and stick it down again a few times before it needs re-sprayed.

The downside to using spray adhesive is you have to re-spray. You can tape your stencil down with masking tape instead. If doing a large area like a wall, you may have to replace your tape a couple of times.
The not so good part about using tape is when doing a repeating stencil pattern, the tape may stick to an area already painted and smear your wet paint.

After the spray adhesive dries (it only takes a minute) position your stencil on your project and smooth it down. You want to make sure there aren’t any areas popped up where you’re going to paint. I just went over once or twice with my hand and it was good to go.
Painting with Reusable Stencils
So now we’re ready to paint! Painting is my favorite =)
The best way to paint with reusable stencils is to use a sponge (sometimes called a sponge brush). I’m not a fan of using a stencil brush (the kind with bristles), I find it causes too many bleeds.
You don’t want a lot of paint on it either, only use a very small amount of paint to help keep the bleeding down. Plan on doing two coats. Don’t worry it goes fast. When you use very little paint it dries super fast.
Even though we have an adhesive on the back, reusable stencils will bleed easier than vinyl stencils. A great way to reduce bleeds is with a makeup sponge. They don’t absorb too much paint and they are super easy to use. Just dab in the paint, dab the excess paint off, and dab onto your stencil.

After you paint the entire stencil, where you started should be dry so you can do the second coat right away. When you’re happy with the paint coverage simply pull the stencil up and place it in the next position.
You’ll be able to reposition the stencil about 5 times before needing to respray the back.
The project I am working on is a small tabletop. Here it is after I finished stenciling it.


Swipe My Reusable Stencil Designs SVG File

I keep all of my SVG designs plus printables and plans in a resource library that I created exclusively for subscribers to my weekly newsletter. When you sign up for the newsletter you will be given the password and the link, plus it will be immediately emailed to you.
To grab the free SVG for this craft fill out the simple form below
All of my free SVG files and Designs are kept in a library for your convenience. Simply CLICK HERE to get access. We will send you the link and password right away and you’re free to use all the resources you want in the library.
Already have the password? (It’s at the bottom of every email) Enter the Library Here
More stencils you can make with your Cricut:
How to make and use Vinyl Stencils
Make Stencils out of Freezer Paper
Make a Larger Than Mat Stencil for Big Signs


Chris Butler has helped thousands of crafters learn how to use their Cricut machine without feeling overwhelmed. She is a best selling author and an up and coming designer. For fun Chris enjoys designing SVG Files, hanging out with her family (preferably at the lake), traveling, and volunteering at her church. She is a wife and mom of two crazy fun kids.
Very easy to follow directions/tips and great SVG files to use. So glad I happened on the this site!
Thanks Debby!
Glad I found this because I waste so much of the cricut vinyl stencil. I love your directions. They are very easy to understand. Thank you.
Awe Thanks Dana!
Lady you are such a blessing! I’ve wasted so much vinyl trying to get projects measured correctly, or they are cut on the wrong setting its been a nightmare! THANK YOU SO MUCH FOR ALL OF YOUR TUTORIALS! Where have you been all this time. Lol. You are so appreciated by so many and a blessing. Thanks again! 😘💞
Thanks, that was super informative. I appreciate the tute.
Thanks so much for all the info, I’m waiting on my stencil sheets!
Do you need a special blade to cut the stencils? or will the one that comes with the machine work?
No special blade, the one that comes with the machine will cut it.
It depends on the thickness. I bought the only blanks I could find at Michael’s and needed the deep cut blade and housing on magnetic sheet 0.6mm setting to cut through nicely. Once I did that, my stencils turned out great!
Did you use the knife blade for this or just the regular blades that come with the matching?
Just the regular blade that came with the machine.
What setting should I use for the cut? Can you share the customized setting, if it’s needed?
Yep it’s listed. The thicker ones, around 6 mil use the custom setting and select posterboard. And on the thinner sheets like 3 mil the cardstck setting worked fine.
Can you use 10 mil mylar with the cricut maker
I was just wondering about this as well…does anyone know what setting you would use for the 10 mil
This is helpful thank you – excited to try. Can you get larger stencil sheets – or is this the only size?
Yes, you can even buy it in rolls. here are some of the options https://amzn.to/2RDzUWn
Do you clean them and how to keep reusing them?
Yes. You can clean them with warm water and soap and save them until you need to use them again.
If I make a stencil with words, how do I keep the insides of some of the letters, so that they look correct?
Hi Debbie! The easiest way is to use a stencil font like I mentioned in the post.
Hey there. Do you laminate the sheets first?
If you are buying the mylar stencil sheets, you don’t need to laminate them.
Do you laminate your sheet before or after cutting?
Hi Jenny! I don’t actually laminate the stencil sheet. But you can use laminate sheets in place of stencil sheets. In that case you would run plain laminate sheets through your laminator and then cut them.
Thank you for the information. I have a question that is somewhat related. I purchased a stencil that I used for my kitchen backslash. I have to go around several different corners and don’t want to cut the stencil since the areas are all different. Is there a way to duplicate this stencil using a cricuit and then print it on something that is thinner like mylar so that it is easier to bend and I can also cut without destroying the original.
You would have to have a way to get the design of your stencil into design space. You can try taking a picture with a plain high contrasting background and see if it’s workable with design space when you upload it. You could also try converting the photograph to an SVG
i would love the free files. thank you!
Can you use these stencils and the adhesive spray to paint on fabric? Would it work just as well?
Yes they will work on fabric. I don’t think I would use the adhesive spray, it could leave a residue on fabric, Painters tape around the edges should hold it in place or you can try a freezer paper stencil which also works really well for fabric. https://dailydoseofdiy.com/freezer-paper-stencils-diy/
I want to try using a reusable template on a coir doormat, could I use spray paint.? It very time consuming and difficult to cover the mat using a sponge / brush.
I would think spray paint would work. Light strokes, probably at least 2-3 layers. If you get a lot of paint on it, that’s when it will bleed.
Great tutorial! Thank you! I am still a Cricut newbie and have a basic question. I bought a variety pack of specialty vinyl by Cricut. It includes a stencil sheet. Is it reusable?
Hi. I love all ur blog/posts about the cricut tips. Im looking to buy one, havent yet so alot of what im reading is foreign to me at this point. I do have a question i hope u can help me with. Im looking to print regular stencil words for making signs. Sure i want to explore more for that price of a machine i want to use all its capabilities but my main goal is the word stencils. So would u suggust i get the explorer air by itself or with a beginners bundle? I just dont wanna spend the xtra for stuff i may not use or do u suggest for the extra price its worth it to get all that stuff with it? Also would u say the explorer air is the machine i should buy for what i want to do vs the maker? I would really appreciate ur unput. I dont know who else to ask and i dont want to just trust a clerk in a store. For the price of this machine.
Thanks.. Tracy
Hi Tracy! So going by the bundles on Amazon I would say it’s not worth it for what you want. To get started you need the machine a weeding kit, stencil vinyl and transfer tape. Or just mylar if you are doing reusable stencils. You can get that cheaper than the bundle and have exactly what you need. And the same if you start doing vinyl or paper crafts, you can probably find what you need on sale cheaper.
The explore will do everything you need it to do. That said once people get used to using a Cricut and start making more and more things they usually want to get the Cricut Maker because it can cut more materials and do more things.
Are you in a rush? If you can wait until black friday we usually see some awesome sales and maybe the Maker will drop enough or at least you’ll save some extra cash on the explore.
Also you can download Design Space now and start playing around so the tutorials make more sense to you.
Good luck and if you have any more questions don’t hesitate to ask!
Instructions look clear and easy to follow
Hello, thank you, this is great information. I have a question tho, after you cut the laminating sheet, you pass it through the laminator?
Thank you!
Yes, If you are using a laminating sheet you’ll put it through the laminator by itself
Good Afternoon
Can you tell me if the Cricut Explore Air 2 can cut through 190 micron mylar sheet.
Kind Regards
John
How do you cut such a thick material? My maker says it doesn’t cut material thicker than 2.4mm, I’m not sure if that’s the same as mil which I associate as milliliter, so I’m a little confused.
I stopped cutting chipboard bc it cut through 2 of my mats.
Thank you in advance for clarification.
It’s thinner than 2.4 mm. I believe mil refers to weight?, it’s not any thicker than posterboard.
For a women’s event at our church, we made stencils using plastic pocket folders. We originally planned to make with my cricut, but the font we wanted to use wouldn’t have worked. They were easy to cut and made good stencils. If you catch them on sale, you can get a great bargain, too. We wanted between 2 & 3″ letters, so we got about 2 sets of stencils for every one pocket folder. Thanks for your tutorial, too! We’ll change our font next time.
Awesome idea for stencil material =)
Thank you for all the help you give newbies! Especially me!
Hi on my Cricut explorer 2 when I go into custom there is no poster board option but there is a poster board option on my dial but I tried using this option to cut Mylar but it didn’t go right though am I doing something wrong?
Thanks robert
Can you use these stencils for glass etching as well?
For etching glass I would use a vinyl stencil. https://dailydoseofdiy.com/make-stencil-cricut-easy-way/
I painted a aluminum pizza pan while with spray paint. Then I stenciled with removable cricket vinyl. When I finish I pulled off the very stuck vinyl and the while background paint pulled off with it. How can I redo this without the same result?
Thank you!
I was planning to make a stencil like these to paint on my wall. Do you think the spray adhesive would damage the painted wall?
I am so glad that I came across your tutorial! This was so helpful. Can’t wait to make my stencil!!!