This post may contain affiliate links for your convenience. If you make a purchase through one of my links I will earn a small commission at no additional cost to you.
Last Updated on September 13, 2018 by Chris Butler
These light up Christmas signs are loads of fun to make! The best part is you can make them from your old Christmas gift bags. If you don’t have any leftovers, the dollar stores have great selections for just $1.00!
I found this bag at Dollar General. Grab a strand of battery operated lights while you’re there. I think they were around $3.00.

Supplies You Will Need
-
- Small Christmas Gift Bag
- Strand of Battery Operated Lights
- 1 sheet of printer paper or light colored construction paper
- 8×10 Frame
- Tape
- Safety Pin
- Scissors
- Glue Stick
- Wrapping Paper (optional)
How To Upcycle Christmas Gift Bags to Light Up Signs
Gather up all of your supplies. The first thing we are going to do is cut one side of the Christmas bag out. You can actually make two signs out of each bag if you like.
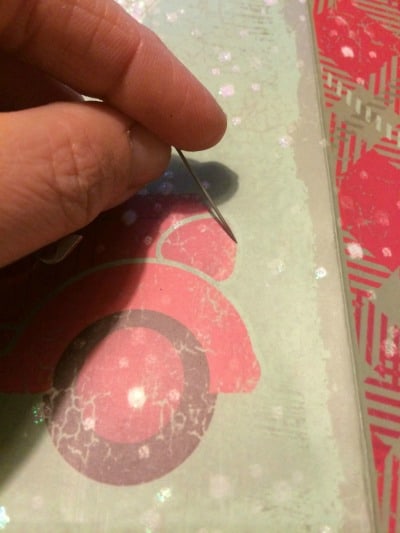
Glue your copy paper to the back of the Christmas picture and cut the excess paper off. This will help filter the light and give it a softer glow. Next, you are going to use a safety pin to poke a hole through the picture everywhere you want the light to shine through.
Once you have your holes poked, flip the picture over so you are looking at the back. You should be able to see all of your pinhole marks. Now we are going to tape down the lights to the back. Start at the top and locate your first pinhole. Place one of the lights directly over it and tape it down.
Repeat this process for every pinhole that you made.
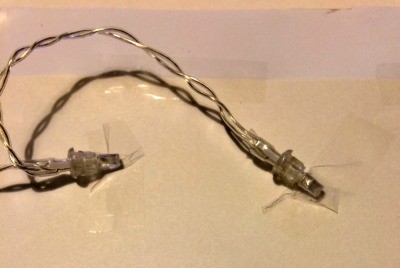
After you’re done there will probably be some of the wire parts sticking up that you will want to tape down too.
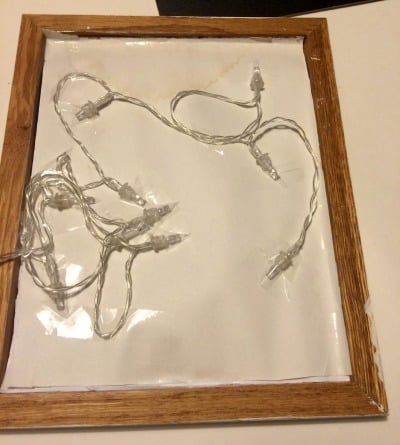
My bag was slightly smaller than the 8×10 frame I put it in. I used the sides of the bag, like a matte to fill in the gap between the picture and the frame. You could also use a fun design from Christmas gift wrap, a ribbon or an actual matte board if your bag isn’t exactly 8×10.

The last thing to do is put the back on the frame. If the lights will not allow you to put the tabs back in, you can just tape it down, which I had to do in some places.

Set your frame up, turn on the lights and enjoy your new light up Christmas Sign!
Be warned, they are fun and addicting to make. I may have had my husband looking through all the gift bags at the store with me so I could make more for friends.
Thanks for stopping by, don’t forget to check the links below for more great Christmas crafts.
And be sure to sign up for my weekly newsletter and get more fun and easy craft ideas delivered straight to your inbox.


Chris Butler has helped thousands of crafters learn how to use their Cricut machine without feeling overwhelmed. She is a best selling author and an up and coming designer. For fun Chris enjoys designing SVG Files, hanging out with her family (preferably at the lake), traveling, and volunteering at her church. She is a wife and mom of two crazy fun kids.
Best and easiest tutorial I have seen for this craft! Thank you!
You’re very welcome!
Such a cute and simple idea. Love it! 🙂
How did you conceal the battery pack for the lights?
Hi Dani! I just put the pack behind the frame. If you are hanging it up you’ll want to use a heavier duty tape to tape it to the back.
Awesome
How do you turn the lights off and on if you’ve concealed the battery pack?
The switches for most battery packs are on the end, If you’re concealing it with tape, don’t tape over that part. Also keep in mind you’ll need to be removing the battery pack to change the batteries at some point.
Did you put the glass back in the frame?
Yes the glass is in the frame.
Can you hang on the wall or is the battery pack too thick
It will depend on how thick your battery pack and frame is. I have one that hangs on the wall ok and one with a thinner frame that didn’t work out for hanging.
Excellent tutorial. I think that supporting this on a plate holder and set on a shelf or as part of other display would work nicely and make the battery more accessible. 🙂