This post may contain affiliate links for your convenience. If you make a purchase through one of my links I will earn a small commission at no additional cost to you.
Last Updated on April 1, 2022 by Chris Butler
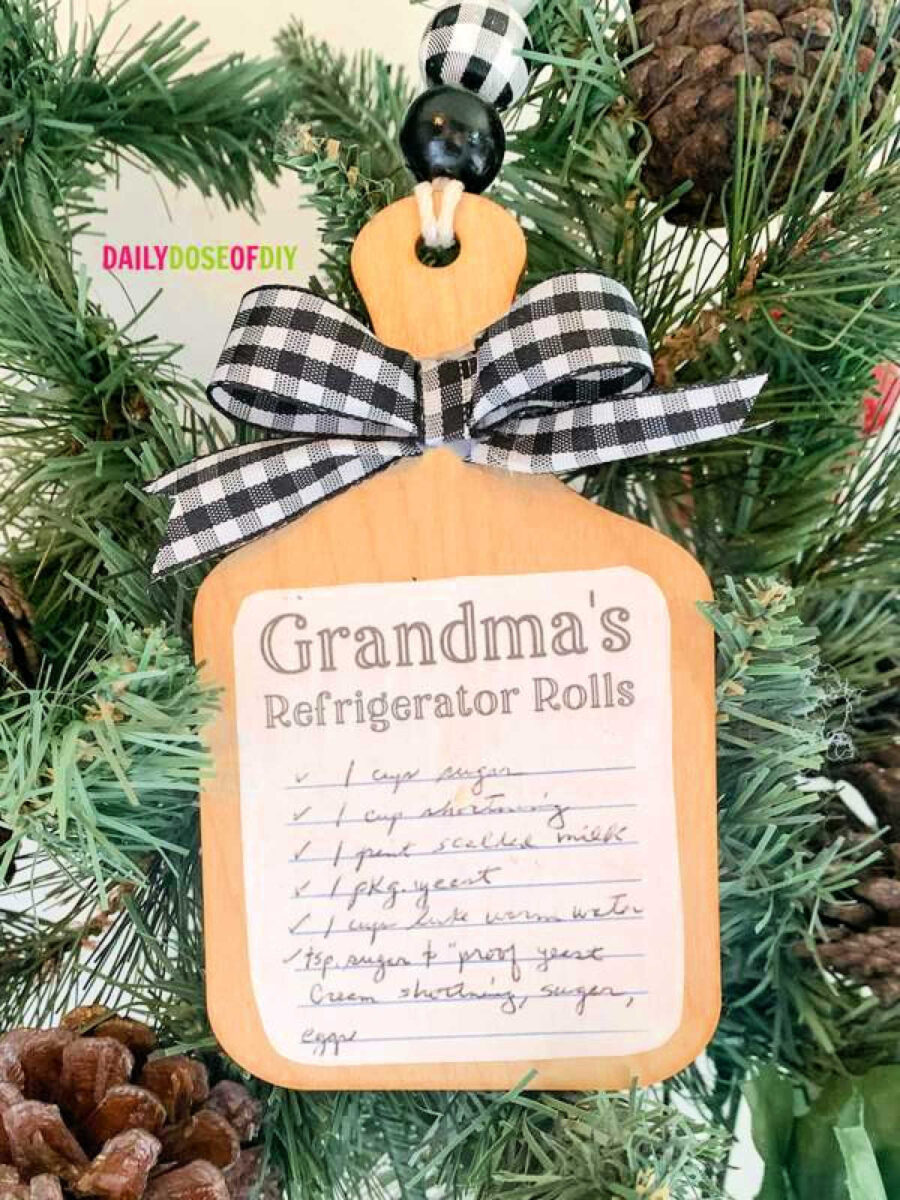
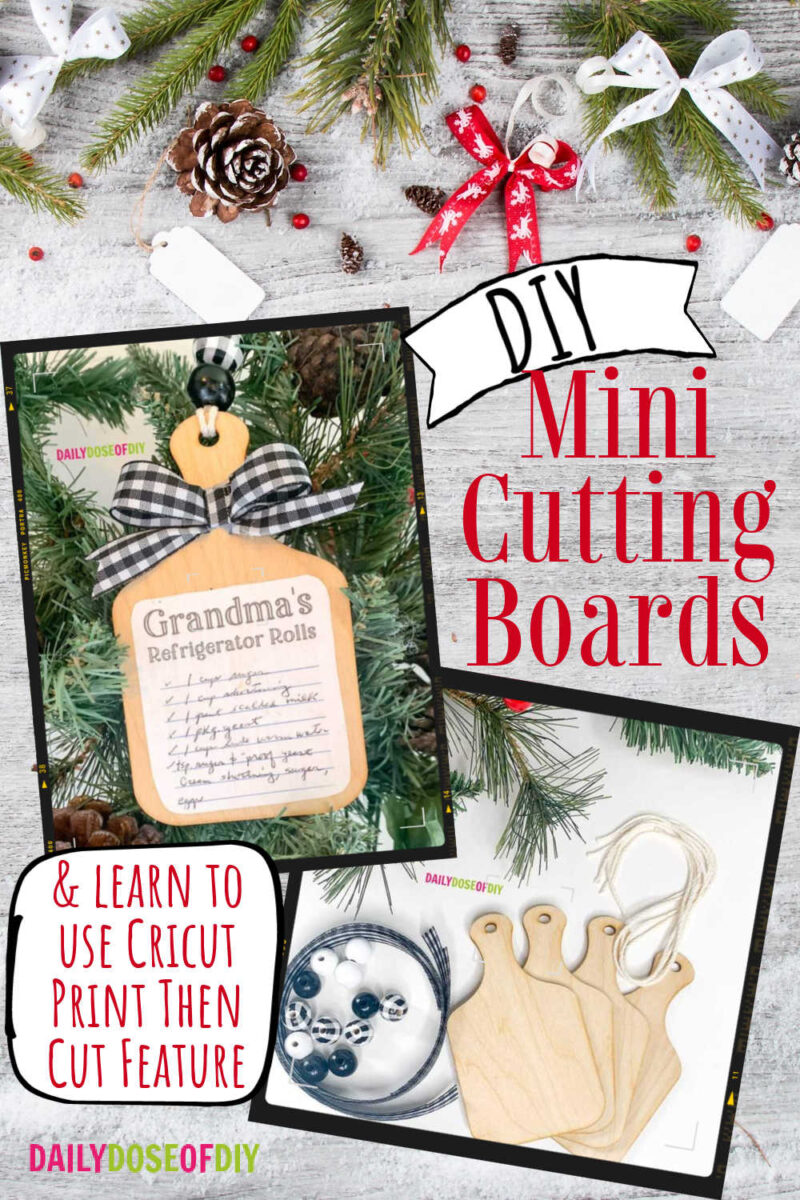
Hello crafty friends! I’m so excited to show you how to make the cutest mini cutting board. There are so many ways you can personalize these. And once you see how easy they are to make, I’m sure you’ll try a few different things. But, today I want to show you a really special way you can customize them using Cricut’s print then cut feature to add a hand written recipe.
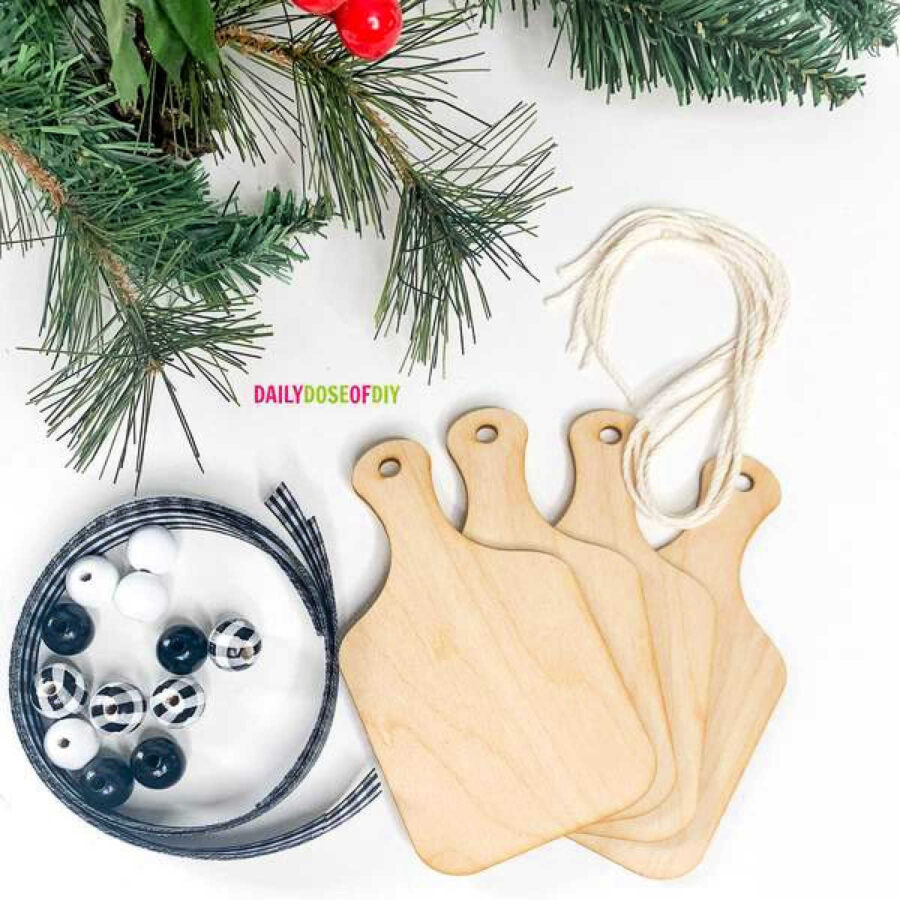
I’m also currently selling these in my shop as a craft kit! In the kit you’ll get (almost) everything you need to make four of these, including the mini cutting board, ribbon, beads, and twine. The first time this craft kit went up for sale it sold out in 24 hours, so make sure you get yours while they’re still available! I think they make great holiday gifts!
Related: Another Holiday Gift Idea – Monogram Studded Tumbler!
Let’s get started!
Quick Links to Information in This Post
Supplies to Make a Mini Cutting Board
You can grab a kit that will allow you to make 4 of these and includes the cutting board, ribbon, twine, and beads here – https://www.dailydoseofdiyshop.com/b6gc1
- Mini Cutting Board – https://www.dailydoseofdiyshop.com/ca2ge
- Black Wooden Beads
- White Wooden Beads
- Black and White Check Wooden Beads
- Black and White Check Ribbon 12″ long
- Bakers Twine 12″ Long
- Mod Podge –
- The recipe you want to use
- Copy Paper
- Hot Glue Gun
Mini Cutting Board Video
Step 1: Upload Your Recipe to Design Space
Upload Your Image
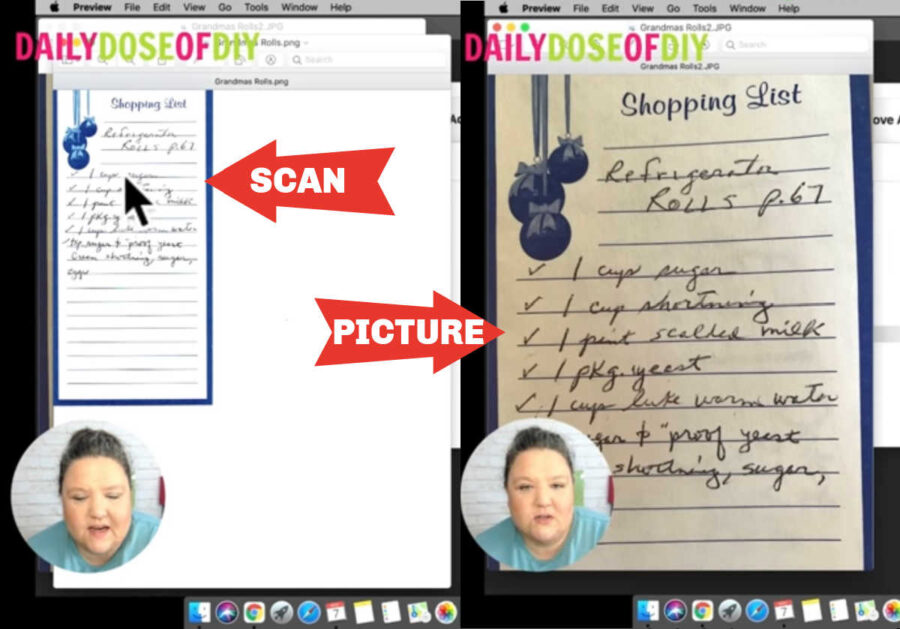
To get started, we’ll need to have a recipe to use. For my cutting board I’m using a handwritten recipe for my grandmother’s rolls. There are two different ways you can upload it into Design Space.
The first, and easiest way to upload the design is by scanning the image into your computer and uploading as a .jpg file. The second way is by taking a photo of the recipe and uploading that into Design Space. This will require a lot more image clean up due to the coloring being so inconsistent on the image.
To upload your recipe in Design Space, select upload. Then, you can either browse through your files and select your image or drag and drop the file into Design Space.
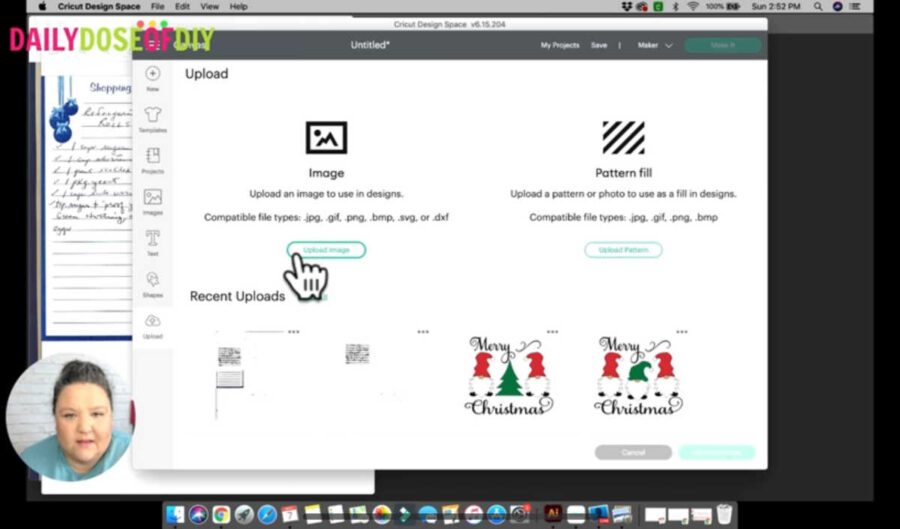
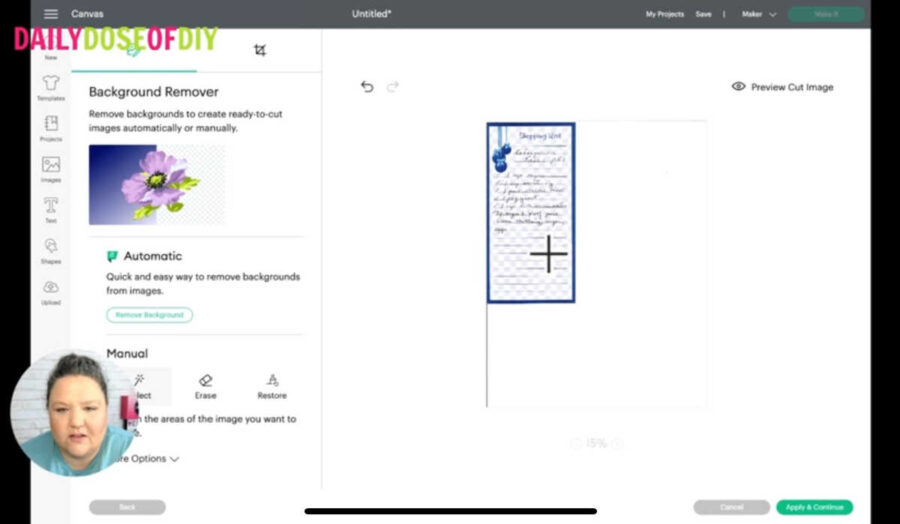
From here you will have the option to select the image type. Select “Complex” and then click continue. The next screen will allow you to preview the cut image. If you have Cricut Access you may think that the background remover feature would be the way to go on this, however, I’ve found that doing a manual image clean-up is a lot more effective.
Step 2: Clean Up Your Image
On the left of the screen there is a Manual clean-up section. The three options under this are ‘Select’, ‘Erase’, and ‘Restore’. First, use ‘Select’ and click the largest area surrounding the words on your recipe. When that portion of the background has been removed you’ll see blue and white checkered boxes behind your text.
If your recipe is just on a sheet of blank white paper, this may be all the clean-up necessary for you. However, for me, the recipe was written in a shopping list with a blue border and some other designs.
When I clicked the colored areas with the select tool I was left with a lot of grainy blue dots. So, for the rest of that part of the clean-up I switched to the erase tool.
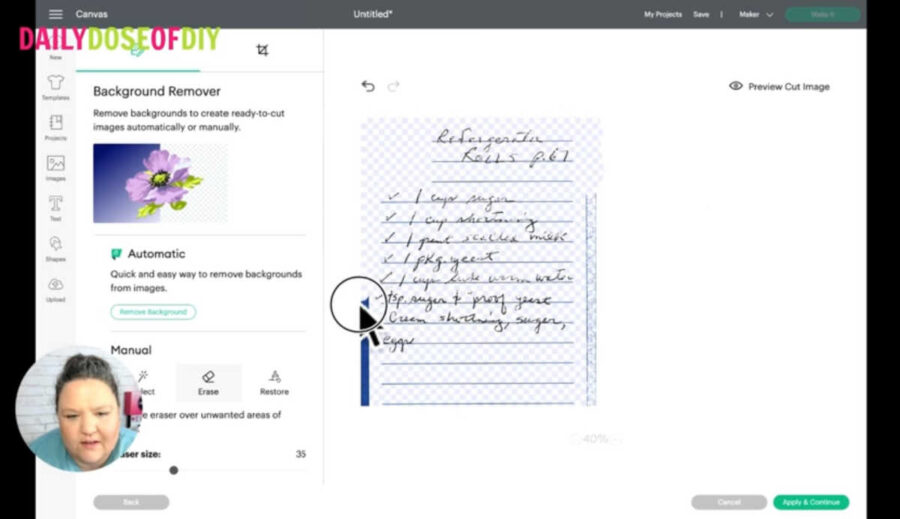
The eraser size can be changed right under the eraser tool selection. I made my eraser size somewhere in the 30s. From there, just click and drag the eraser over any of the sections you don’t want to keep.
The clean-up doesn’t have to be perfect (I’ll show you why in just a minute), but clean the image the best you can. When you’re satisfied with the image, click ‘Apply & Continue’. The next screen will give you the option to save as a cut image or a print then cut image. Select print then cut, click upload, and then insert the image onto your canvas.
OOPS!
In the video you will see that when I tried to insert the image onto my canvas I had a little issue where I could not see my recipe at all. Hopefully this won’t happen to you, but if it does, don’t give up in frustration! Cricut does a lot of updates, and sometimes something will work one day, but not the next. Stay calm and try again!
Step 3: Resize Your Recipe
Trim Your Recipe
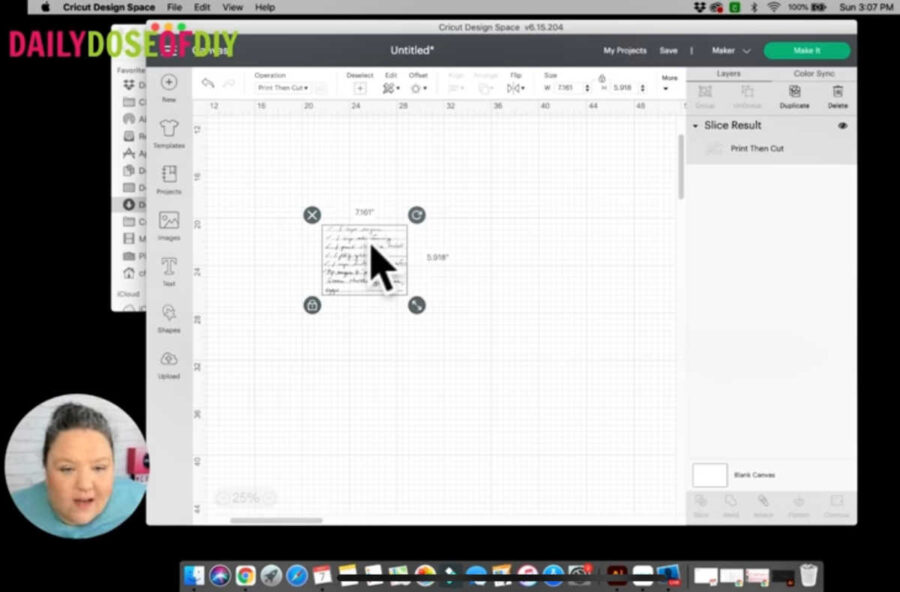
Once you’ve got your recipe onto your Design Space canvas you’ll need to resize it to fit onto the mini cutting board. If you’ve got a lot of excess lines and grainy dots on your image (like I did), there is a simple way to remove it. First, make a square from the shapes menu.
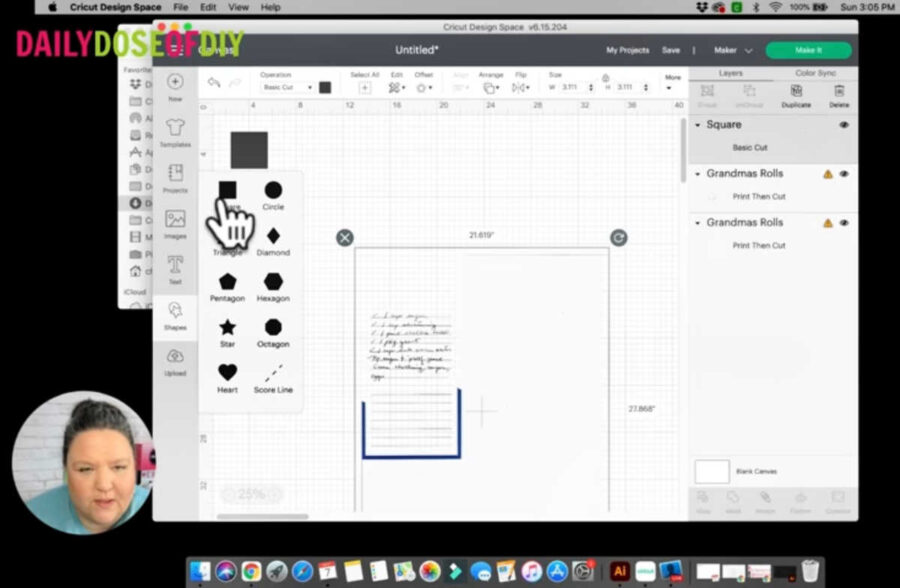
I like to change to color on my square so I can see what I’m working on a little more easily. So, I’ll change my square to pink and then make the square big enough to cover all of the writing on the recipe that I want to keep. You may need to unlock the dimensions of the square if your recipe is more rectangular.
Next, you’ll select your square and your recipe, and click slice from the bottom of the layers menu. Make sure you’ve only got two layers selected or slice won’t work!
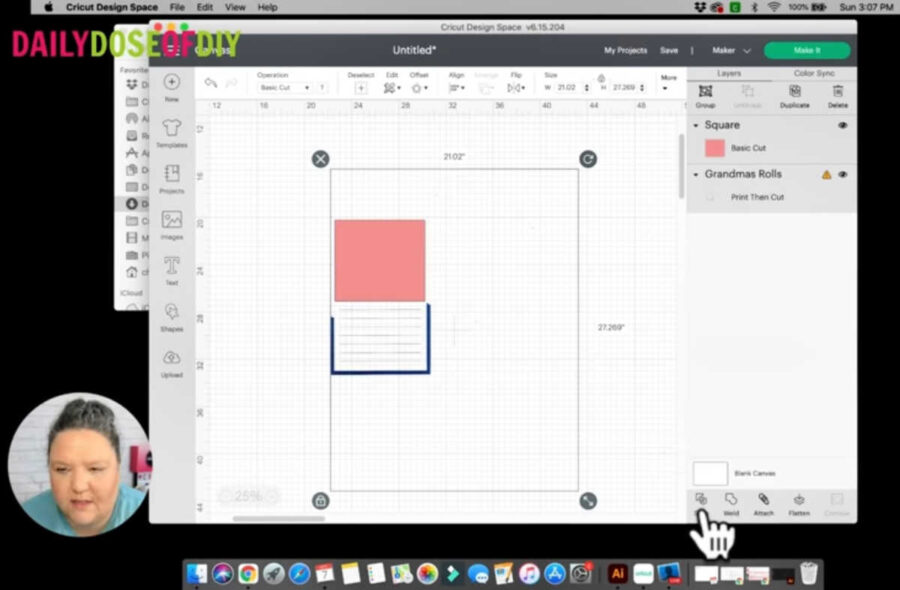
After using slice you can delete all of the extra layers. You should be left with only the writing from your recipe.
Resize Your Recipe
Now that we’re left with just the writing of the recipe, we’ll make another square. This one will be the square that your Cricut cuts after it has been printed with the recipe on it.
Tip: During this step I chose a square with pointed edges, but later realized I would prefer my edges to be more rounded and ended up having to round my edges with scissors. Instead, try selecting the rounded square from the shapes menu!
With your square selected, go to the top of the canvas and from the ‘Arrange’ drop down menu select ‘Send to Back’. This will place your square behind the written recipe.
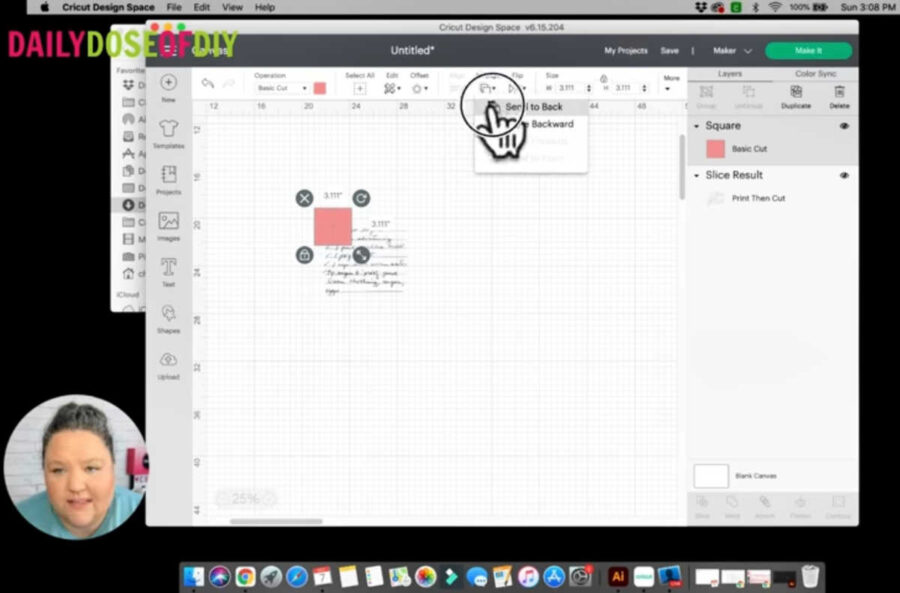
Now, the size of the area you have to work with on the mini cutting boards is about 3″x3″, so we need to stretch our square to be around that size. Once the square is the right size, we can resize the recipe to fit on top of it.
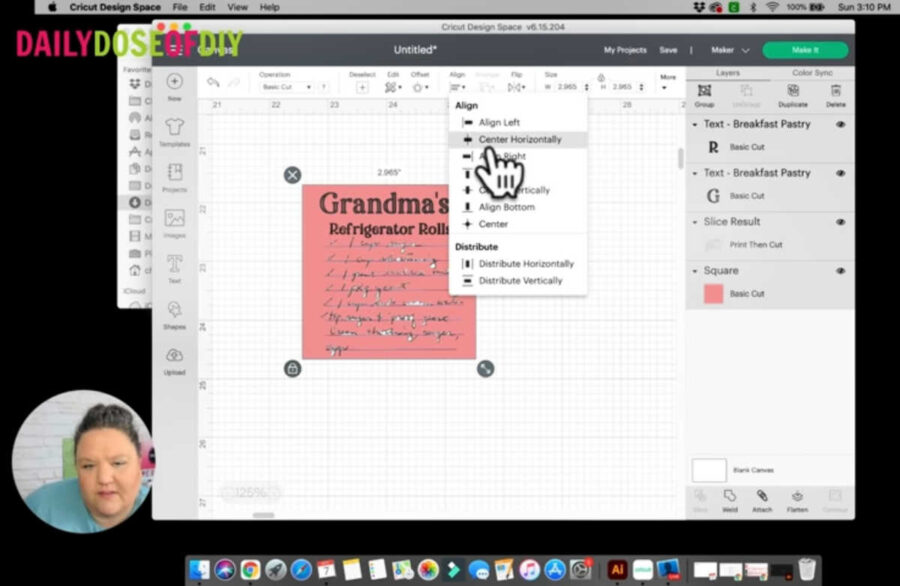
Since I was using my grandmother’s recipe, I decided I would put some cute text at the top that says, ‘Grandma’s Refrigerator Rolls”. I did this in a font called ‘Breakfast Pastry’ – a super cute font from fontbundles.net!
Related: How to Find Free Fonts and Download them to Cricut
Once all of the text is resized to fit onto your square, you’ll want to select all of your layers, and from the align menu, select ‘Center Horizontally’.
Step 4: Print Then Cut
Get Ready to Print then Cut
Now, even though our design looks good we still have a few extra steps to do to make this design ready for print then cut.
First, select any layers of text you have (select multiple layers by holding the shift key), and from the top menu under ‘Operation’, change it from a basic cut to standard print then cut.
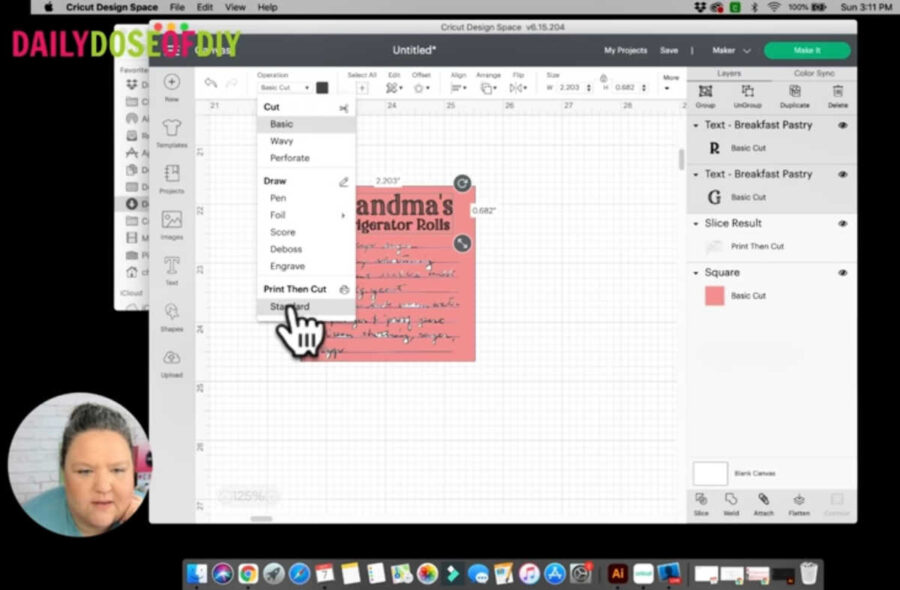
Then, do the same thing to the square. You’ll also want to change the color of your square into whatever color you’d like for it to print. For mine, I’ll just make it white.
Another step you need to do for print then cut is to select all of your layers and from the bottom menu, click ‘Flatten’. If you don’t do this step, then your Cricut will try to cut out all of your text as individual letters. By flattening them all, it will only cut the square.
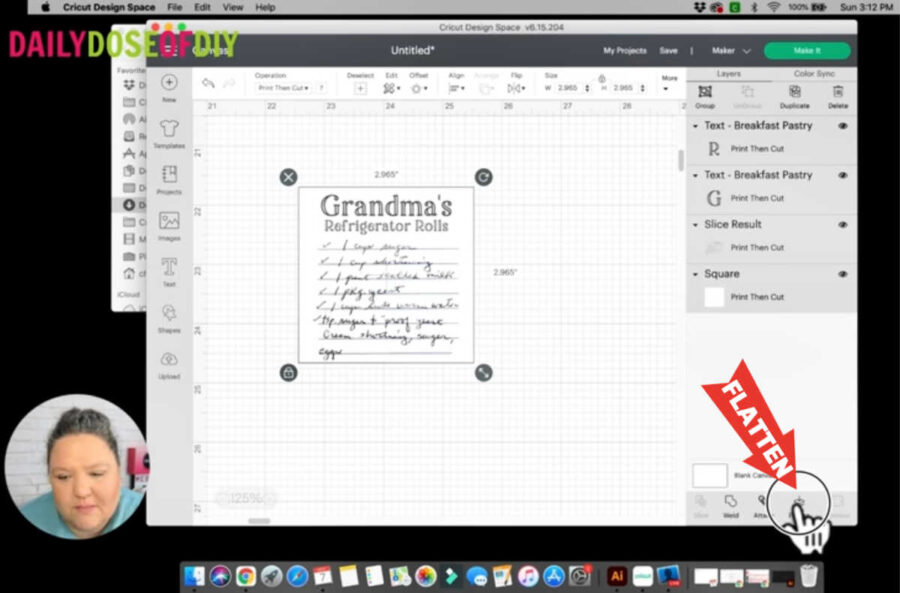
From here, if you’d like to make multiples of the same design you can duplicate it as many times as you’d like. Then, click ‘Make It’.
Send Design to Your Printer
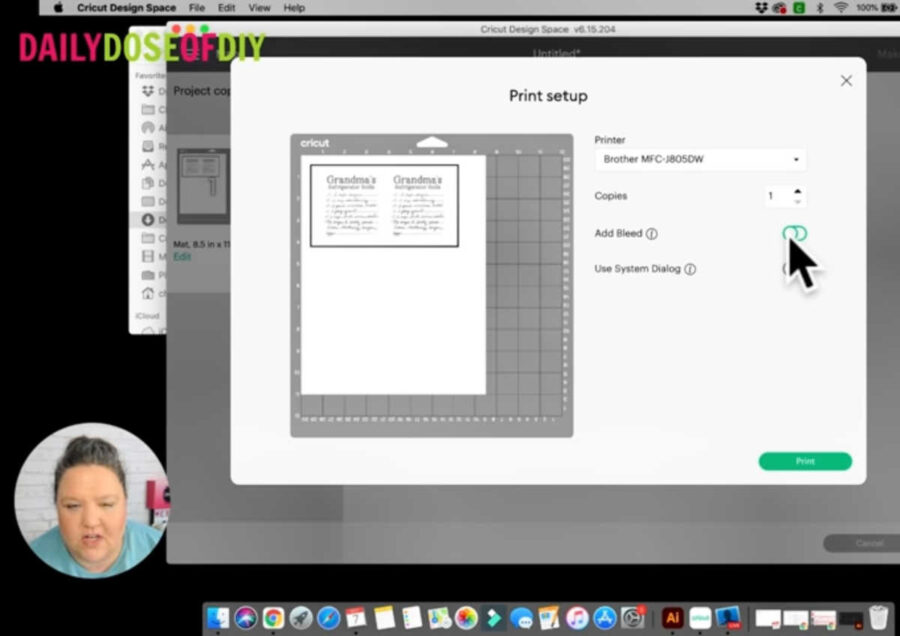
On the mat screen you should see a dark black registration line around your print then cut image. Your Cricut will read this line, so it knows where to cut when you load your mat.
Click continue. On the next screen, click ‘Send to Printer’. This will open up a print setup page where you can select your printer, change how many copies will print, add bleed, or print using your computer’s print setup page to change paper quality and things like that.
Since this print is fairly simple, I’ll leave bleed off and print directly from the Cricut print setup.
Cut Your Recipe Out
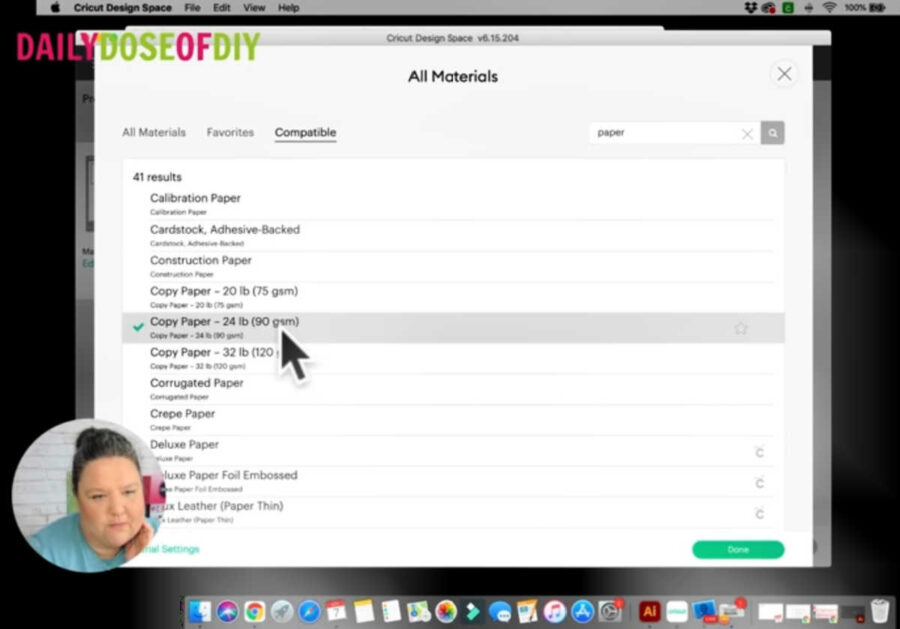
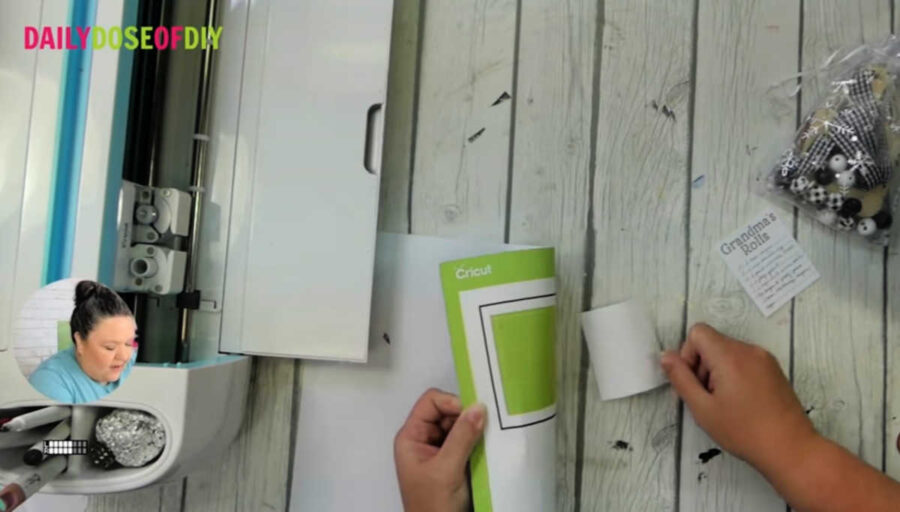
Once you’ve got your design printed, Design Space will go to the next screen where you can select your materials. If you have a Cricut Explore, turn your dial to custom, then browse your materials and find ‘Copy Paper’.
Place the printed paper onto your mat in the top left corner, then load your mat into your Cricut, and press the flashing C button. Your Cricut will begin to read the registration marks. This may take a few minutes.
And, as I said earlier, sometimes glitches happen. While my Cricut was trying to read the registration marks there was an error that popped up saying it couldn’t read the cut sensor marks. I’m not sure why this happened, but I unloaded and reloaded my mat and the next time it worked with no issues.
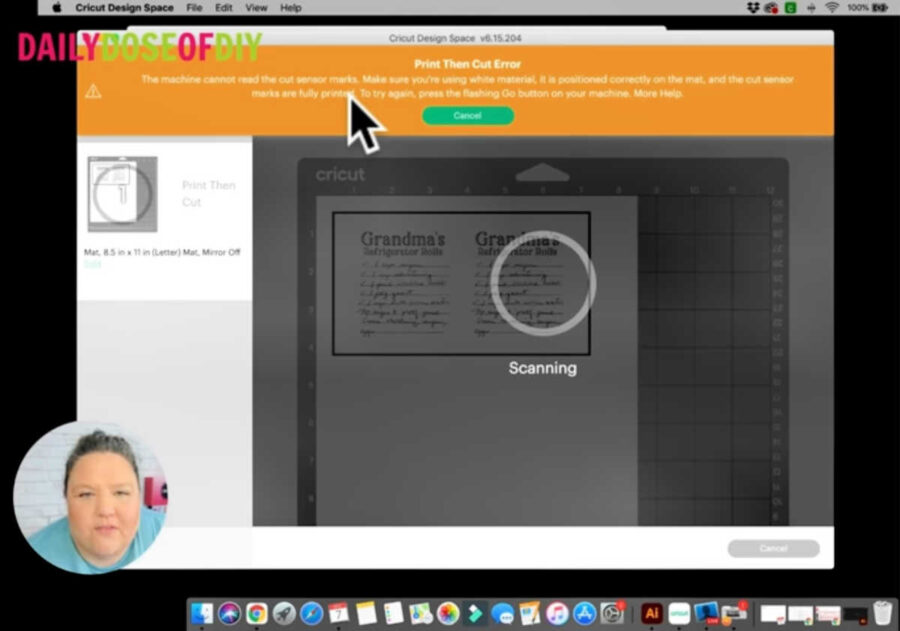
This feature tends to be a little touchy, so if you experience this error, don’t worry. Just try it again. And the good news is, if you can’t get the print then cut feature to work, this is a pretty simple cut so you could always cut it out by hand if you needed to.
Once your machine has cooperated and cut out your design, flip your mat over. Then peel the mat away from your paper to keep the paper from curling or tearing.
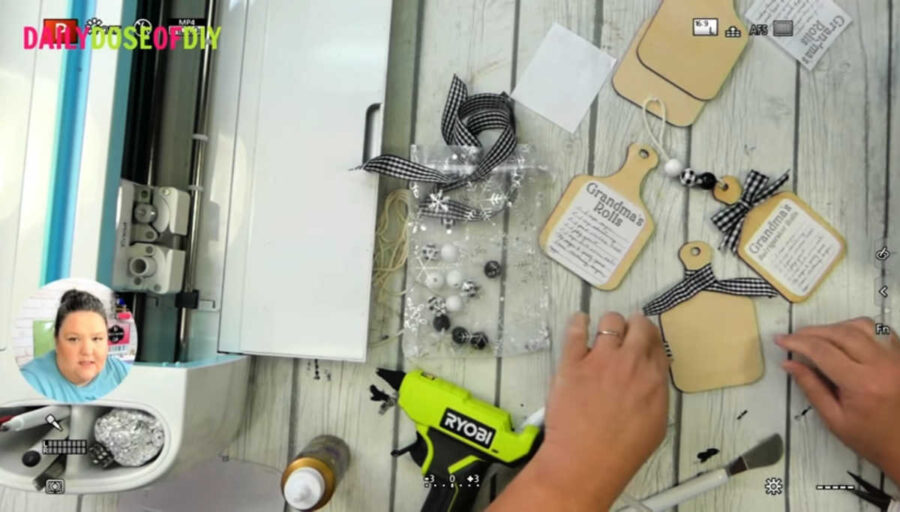
Step 5: Put Your Recipe on the Cutting Board
Now that we’ve got our recipe cut out, we can put it on our mini cutting board. To do that just put a thin, even layer of Mod Podge on the surface of the cutting board. I put it all over the cutting board, even the handle part, because Mod Podge acts as a good protective coating.
Then, take your recipe and center it on the cutting board and gently smooth it down with your fingers. Keep an eye on the paper for a few minutes while the Mod Podge dries. If it starts to curl or wrinkle just smooth it back down again until it’s dry.

When the Mod Podge has dried, you’ll need to do another layer over the top of the paper to protect it. Again, you’ll want to just apply a really thin, even layer. Then watch for paper curling or wrinkling for a few minutes.
Let the Mod Podge dry completely, then you can put your bow and beads on.
Step 6: Add Your Bow & Beads
To make the bow for the cutting board I cheated, shhh! Because I wanted my bow to lay flat, I didn’t just tie my ribbon around the handle of the cutting board. To make this little bow, you’ll start with about 6 inches of ribbon. If you got the craft kit from my shop that will be about half of one piece of ribbon.
Make Bow
Start by wrapping the ribbon around the handle of the cutting board, with the middle of the ribbon at the back. Then, put some glue on the front of the cutting board in the middle of the handle and wrap one side of the ribbon over the top of the handle. You’ll then place another dot of glue in the same spot and wrap the other side of the ribbon around the handle.
Next, take the leftover ribbon and cut a small piece off the be the center of the bow. Then you’ll make a loop with the larger piece of ribbon and glue it with your hot glue gun.
Now you can take the smaller piece of ribbon and fold it in half and glue it to the back of the loop. Then, scrunch up the middle of your loop and wrap that center piece of the bow around to the back and glue it into place. Be careful not to burn yourself. Using your weeding tool to hold the bow in place until it dries is a good way to keep your fingerprints!
Attach Bow
Once the bow is made you can place another dot of glue on the handle and then glue the bow on top of your cutting board.
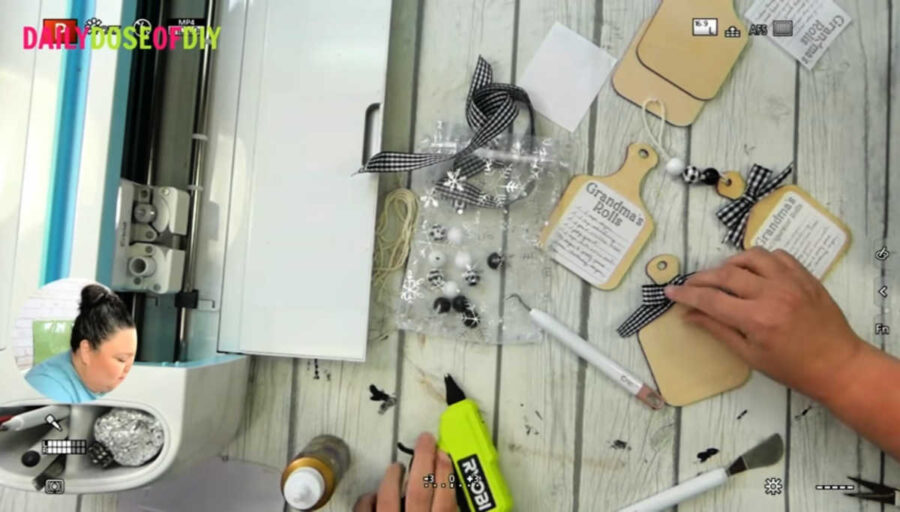
Then tidy up the tails of your bow by cutting them in a dovetail shape. To do that, fold the ribbon in half and cut at an upward angle.
Add Beads
To add the beads, I’ve got a little tip for you! This tip came from our Cricut Crafters Club member Andrea (Thanks, Andrea!). Wrap a piece of tape around both ends of the twine to make an aglet. This will make stringing the beads so much easier!
Once you’ve got the tape on, thread both ends of the twine through the hole on the cutting board to make a loop. Then feed the ends of the twine back through the loop and pull it tight.
Next, add your beads one at a time, feeding both ends of the twine through the hole on the bead at the same time. This may be a little difficult at first, but each bead you put on will be a little easier.
When your beads are on, you can cut off the aglet. Then, tie a knot at the top of the twine to make a little loop to hang it. And that’s it!
I love the mini cutting board with a hand-written recipe. It’s such a special keepsake that you can gift to family or friends. But I couldn’t do this tutorial and not show you a couple of other ideas for these little cutting boards! Check them out below!


Aren’t those great? I hope you loved this craft as much as I do. Thanks for crafting with me today!

Chris Butler has helped thousands of crafters learn how to use their Cricut machine without feeling overwhelmed. She is a best selling author and an up and coming designer. For fun Chris enjoys designing SVG Files, hanging out with her family (preferably at the lake), traveling, and volunteering at her church. She is a wife and mom of two crazy fun kids.
Leave a Reply