This post may contain affiliate links for your convenience. If you make a purchase through one of my links I will earn a small commission at no additional cost to you.
Last Updated on January 18, 2024 by Chris Butler
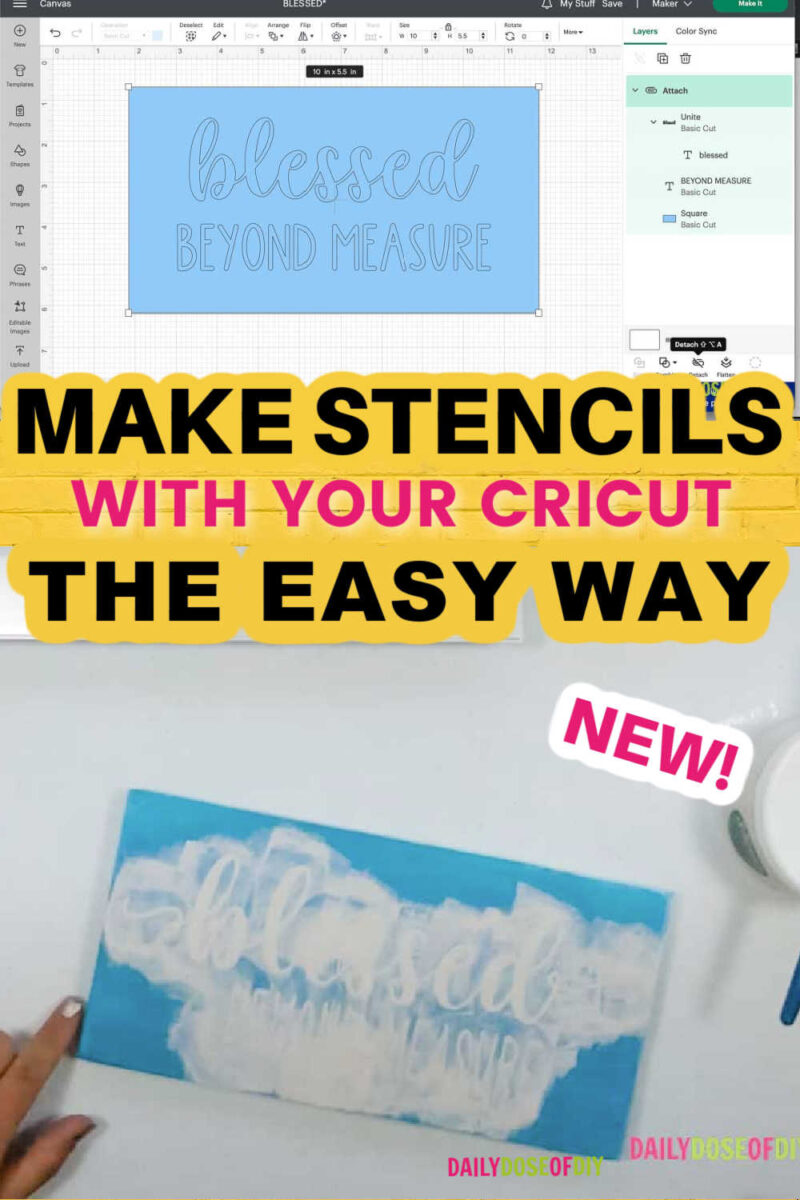
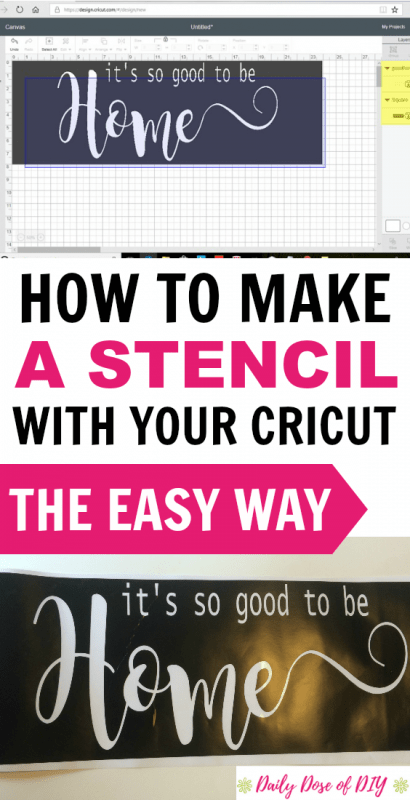
In this Cricut tutorial I’ll show you how to make a stencil in Design Space. It’s overwhelming to figure it out on your own. And you’re probably ready to rip your hair out after a failed attempt. But once you know the simple steps in order, it’s really quite easy.
This tutorial +video is going to cover vinyl stencils, which is a one time use stencil. I also have a post on how to make a reusable stencil that you can use over and over with your Cricut here.
Using stencils is a great way to make wood signs and more. To create a stencil, you can either make your own design or upload a ready-made design to Cricut. I’ll show you both ways, plus how to turn that design into a stencil.
I love making my own stencils and I have the one I’m using in this tutorial available in my resource library if you would like to use it. All the info is at the bottom of this post.
I’ve watched a variety of crazy tutorials for making stencils, and this is by far the easiest way I’ve found to do it. You can cut stencils with any Cricut cutting machine including the Cricut Maker machines, Cricut Joy, and Cricut Explore Air or Explore 3 machines.
So let’s get started.
Quick Links to Information in This Post
The Easy Way to Make a Stencil With Cricut Plus Painting Tips Video
The Best Material For Making Stencils
The best stencil material can be a matter of preference and you may just have to try to see what you like. For this tutorial, I am using Oracal Stencil Vinyl also known as Oramask 813 Stencil film, and I’ve also used Oracal 631 removable vinyl. (I order from Expressions vinyl (linked), they have great prices and good quality.)

Cricut stencil vinyl is my least favorite of all. I have more trouble cutting, transferring and painting with that one than the others.
You also want to stay away from using permanent vinyl for your stencil. Using regular vinyl (especially permanent) is stickier than stencil vinyl and you could ruin your project when removing the stencil.
You’ll also need transfer tape to transfer your stencil to your project after it’s cut. My all-time favorite transfer tape is Oracle from Amazon here. It has the right amount of stickiness and you can reuse it multiple times.
I have a vinyl guide here if you need more help.
Supplies Needed to Make a DIY Stencil
- Removable Vinyl or Stencil Film – https://amzn.to/3RfngeH
- Transfer Tape
- Cricut Tools
- Cricut Machine- Maker, Joy, or Explore
How To Make Your Own Stencil Designs in Cricut Design Space
Do you have a saying you really love and want to put it on a sign? You can totally do that. I’ll go through the basics of starting from scratch to turning it into a stencil.
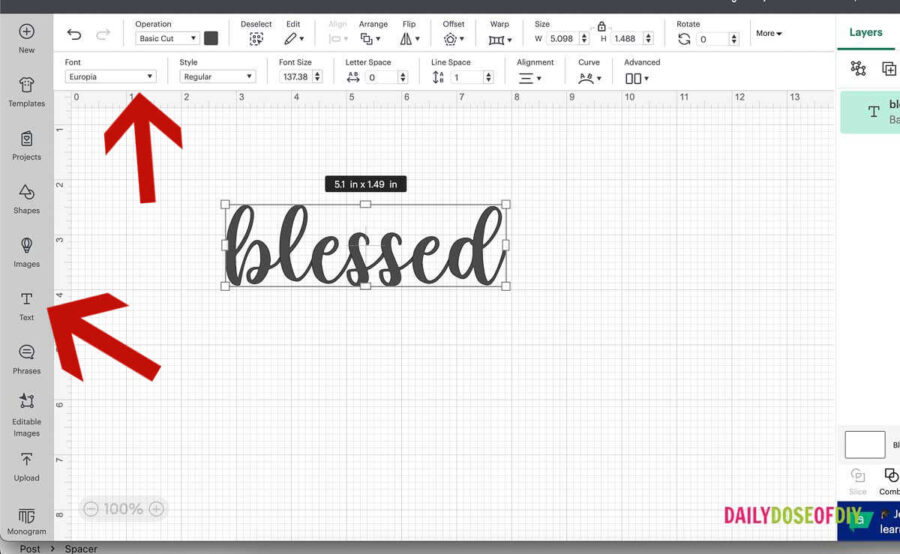
Start with hitting the text button I have highlighted on the left. On the top bar is where you choose your font (see arrow). When you click on the font dropdown it shows you all fonts, yours and Cricuts. But there is a tab within the fonts box that says system. If you click on that, you will see just your own fonts.
Related: How to Find Free Fonts and Download them to Cricut
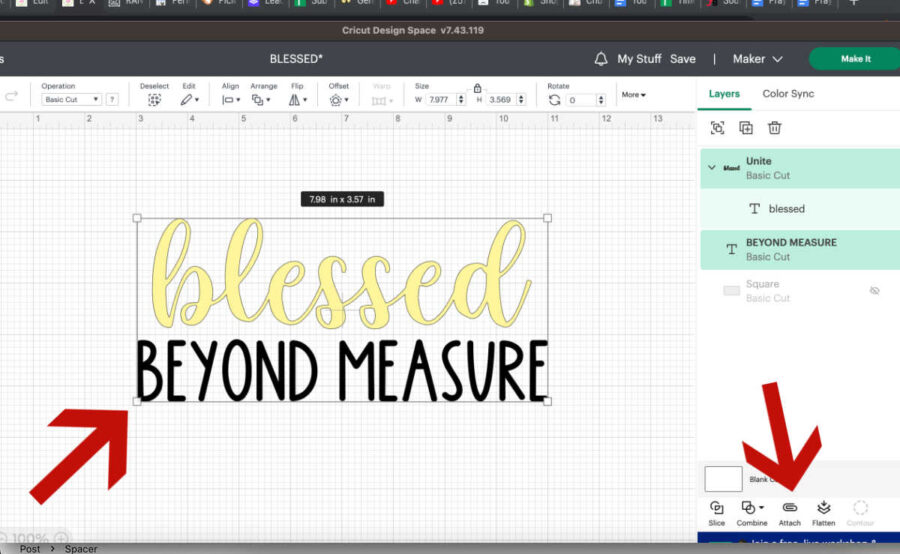
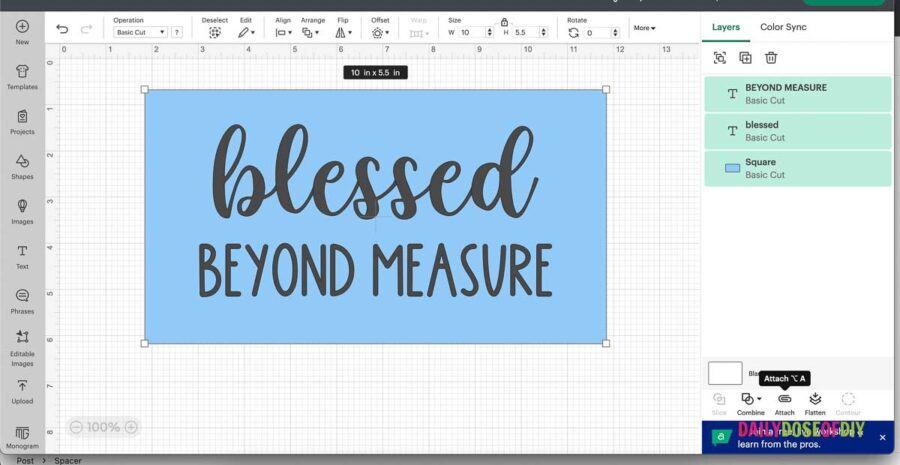
It’s easiest to have one text box per line so you can space things how you want it. So my first line is ‘blessed’ with Europia font found here
After your first line is done, hit the text box again.
A new box will appear to type your second line. Repeat this process for every line of text you have.
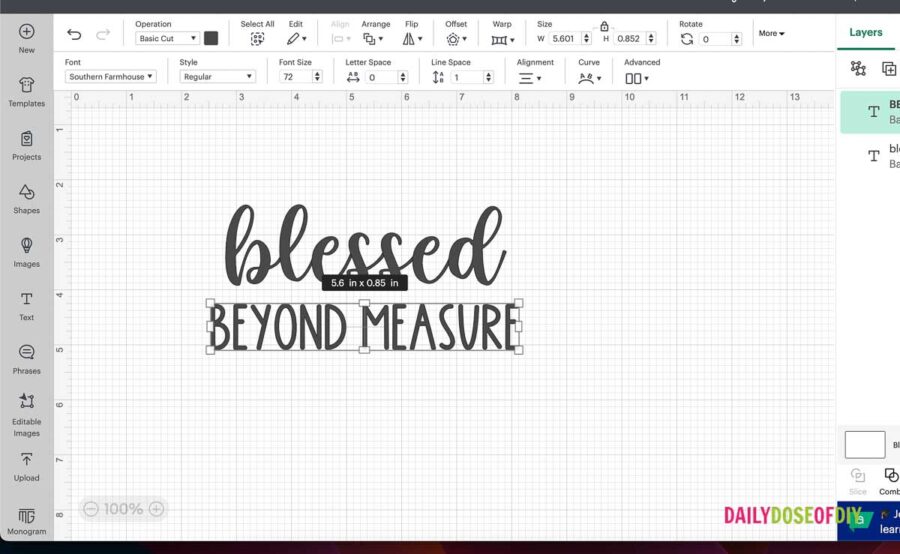
My second line says ‘BEYOND MEASURE’. This is SOUTHERN FARMHOUSE font that you can find here.
Before we get to creating the stencil part we need to unite our words together. I changed the color of the word blessed to you can see there are cut lines between each letter. These cut lines are not that big of a deal when making a stencil, but it will be easier to weed if they’re all together. You will need to weld or unite all script fonts.
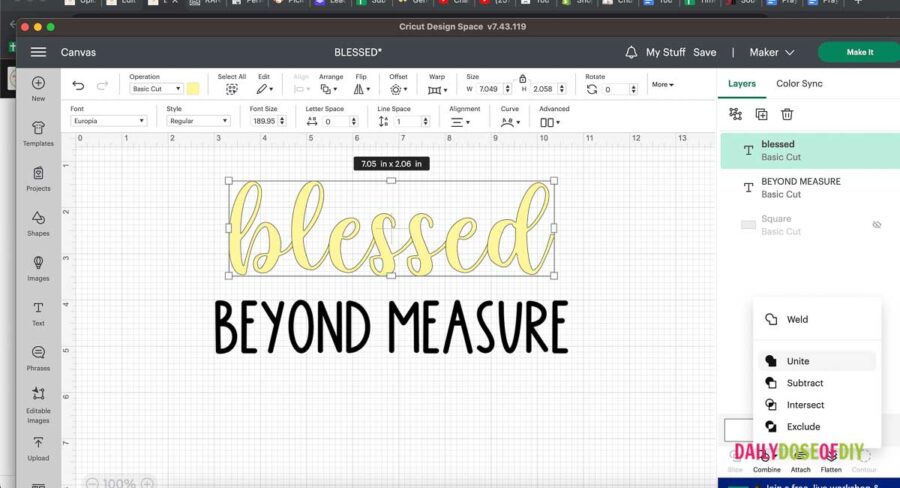
With your word selected click on the combine menu on the bottom right and then click Unite. You could also click Weld and get the same result, but Welding can’t be undone if we need to make changes.
Next you’ll want to select all of the words and elements that make up your design and click Attach on the bottom menu. This will keep them together on the cut mat. Once attached, place your curser over any box on the corners to size your design. Drag in to make it smaller or out to make it bigger.
Option One for Cutting a Stencil
From here you have two options for cutting your stencil. The first way is the fastest, but it can be a waste of vinyl depending on your design size.
Click the make it button and on the mat screen click and drag your design to the center. For this design I’d use a piece of stencil film that is 12 inches by 7 inches. The natural edges of the vinyl become your stencil border.

Skip to Weeding and transferring your stencil if you’re going to use this option, though I prefer to use option two.
Option Two Create a Stencil Outline
We’ll create the stencil part now that the design part is done. I prefer this method because you can create your stencil the exact size you need and keep everything centered.
Go to shapes on the left menu and select a square.
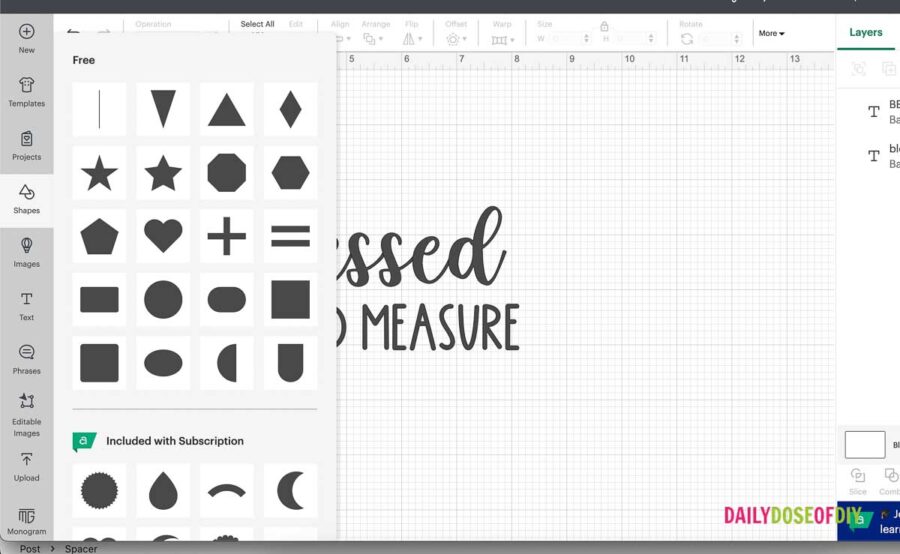
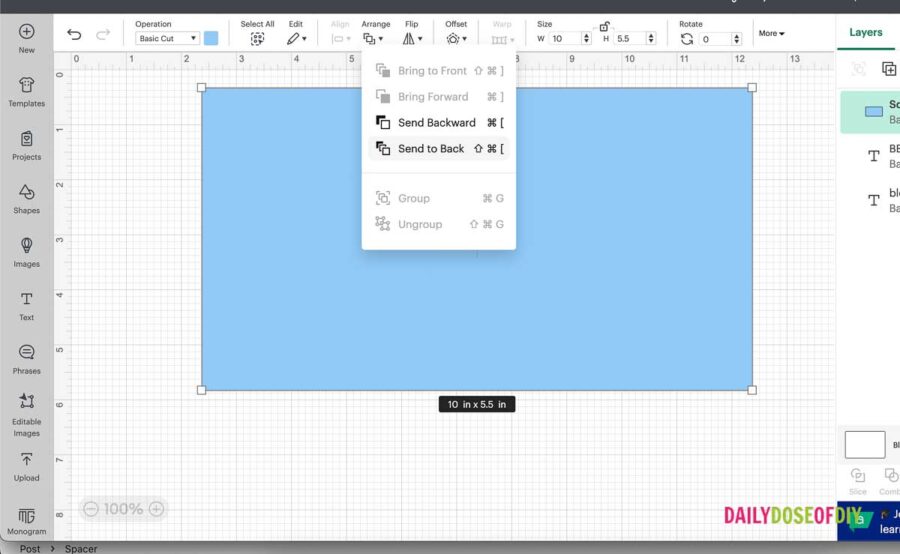
Then go to the top Menu and change the color to light blue so we can see what we’re doing. Next click the lock on the top menu to unlock the aspect ratio so we can make the stencil the correct size.
And this is why I love this method. You can enter the width and the height of the sign you’re stenciling and make the stencil the exact size of your board.

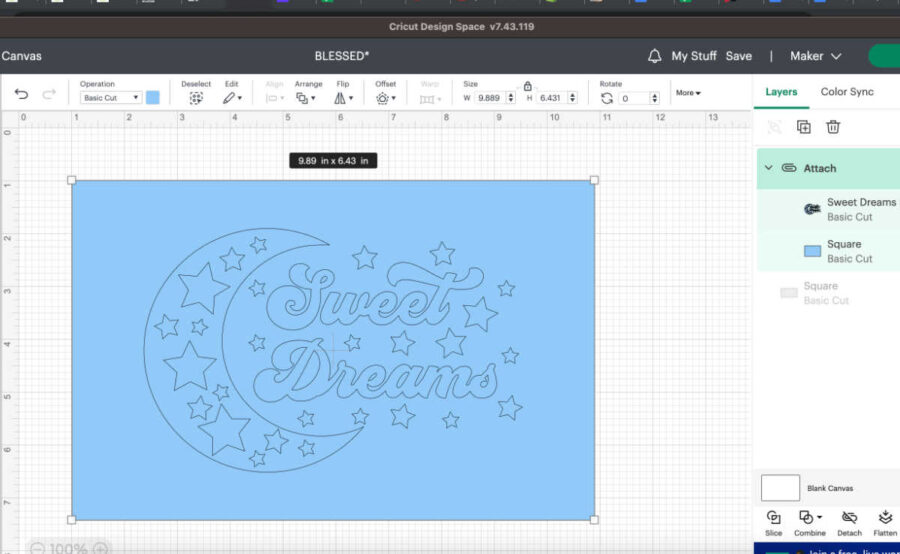
Next, select your stencil and on the top menu click arrange and then send to back.
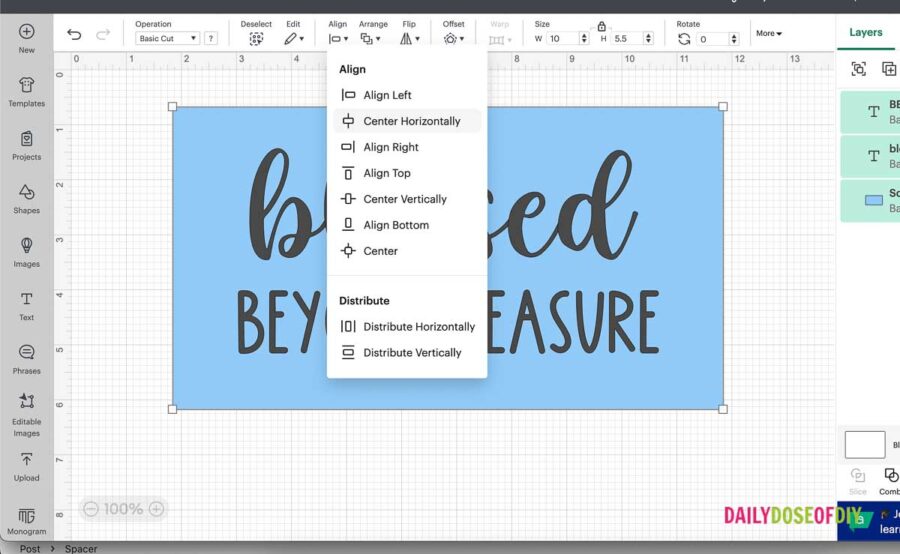
Then select both your design and the stencil and click Align and then Center. Now you know you’re design will be centered perfectly on your sign.
When you are happy with how everything looks, you need to attach it all together. Otherwise, when you go to the cut mat Cricut will arrange everything for the most economical cut.
To attach, highlight all of your text (make sure all letter parts are in the box) and then click the attach button I have highlighted on the bottom right of your screen. There’s a little paper clip above it.
After it’s attached the whole thing should move and stay together when you click and drag. You can also click Combine and then Unite to get the same result.
In the next section, I’m going to show you how to upload an SVG file into design space to make a stencil. If you don’t need that info you can skip ahead to “How to make a stencil”
How to Upload a File in Design Space to Make a Stencil
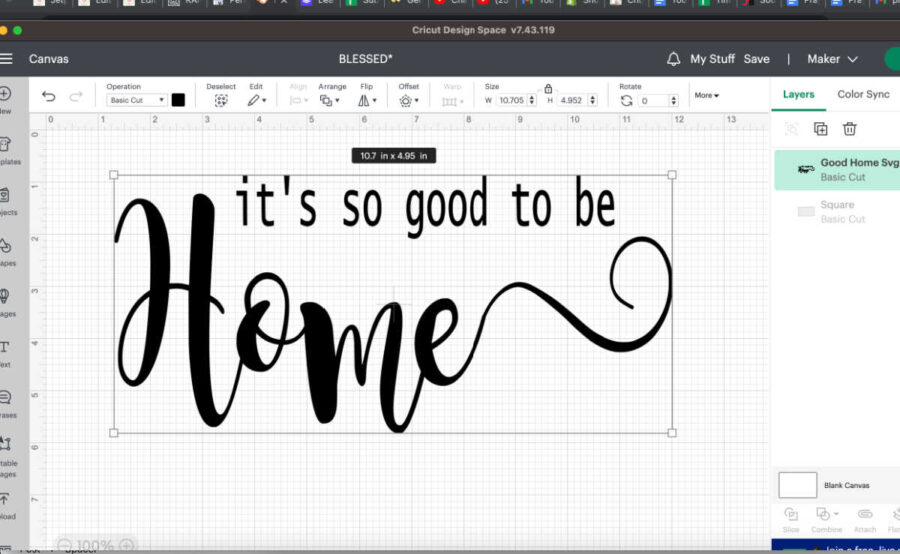
If you are not up to creating your own stencil designs, no problem. There are hundreds and thousands of SVGs out there you can use. They are for sale on Etsy and often found free many places too, like on this website.
If you want to swipe my free file for ‘it’s good to be home’ I have it available in my Resource Library at the bottom of the page.
After you find the design you want, download it to your computer. It’s most likely in a Zip File so it will need to be extracted. Open design space and select new project. On the left panel at the bottom select upload. And then on the new screen select upload image.
For help downloading SVG Files and uploading them to Design Space see this post.
Select the SVG you uploaded and add it to the canvas. Once the SVG is in Design Space, you can use either Option 1 or Option 2 from above to create a stencil.
Note that as with design in your own stencil, before you make a stencil, your file will need to be all one cut.
Some files you upload may need to be welded or attached together before you can make a stencil. Check the layers bar on the right side, If you see letters and shapes listed individually, you will need to do some uniting and attaching.
Cutting and Weeding Your Stencil
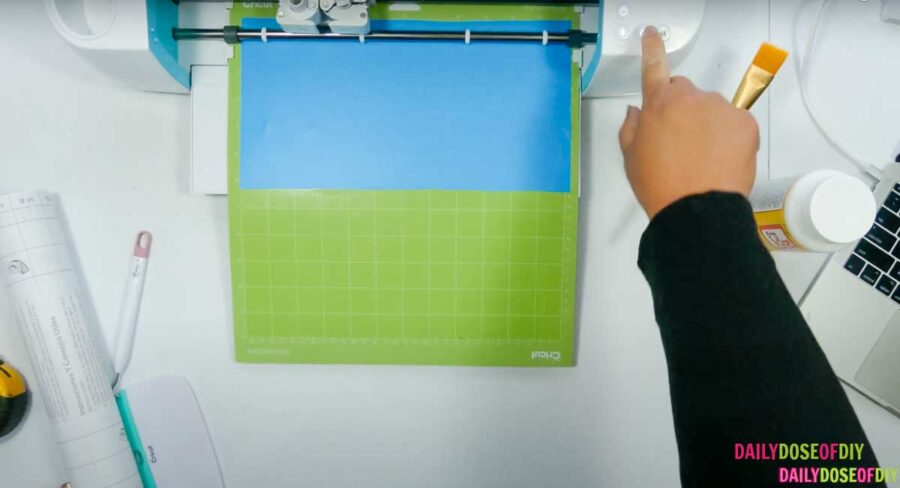
Place your stencil film on your cutting mat and insert it into your Cricut. Press the load mat button. The cut setting for stencils is matte vinyl. Cricut has a setting for stencil film as well, but I’ve always used the regular vinyl setting.
After the Cricut is done, remove the excess vinyl from around your rectangle. Use your weeding tool to pull out the vinyl from the letters. Be sure to keep the centers of letters like ‘o’ or ‘e’ there.
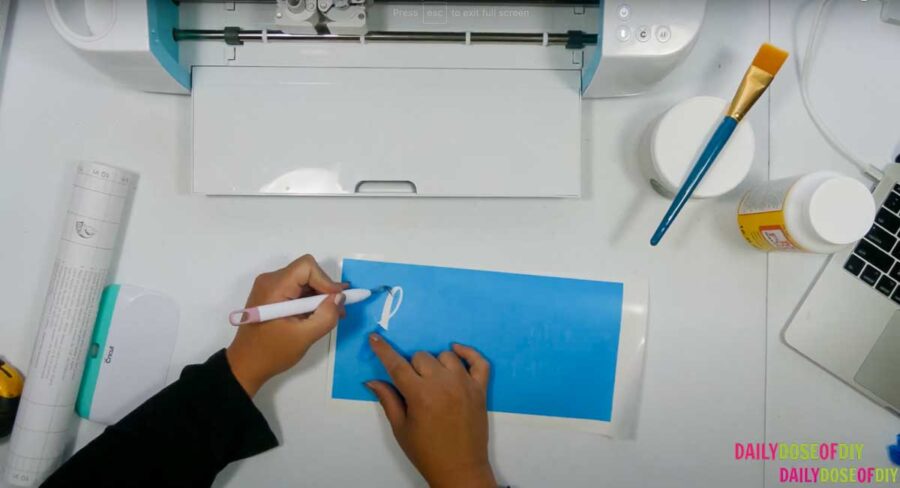

Now you are ready to transfer your design to your project!
See that wasn’t so bad. Simply knowing the right steps in order takes you from wanting to rip out your hair to a stencil making pro. Now you can make your own custom stencils whenever you want!
In the next post, I cover transferring the stencil to your project. Plus my method to paint the perfect sign every time . From getting the stencil on easily, to stopping the paint from bleeding and getting the stencil back off without pulling up any paint. You can read my secrets on How to Paint using Stencils Here
Swipe My Cut File
If you would like to use my ‘it’s so good to be home’ design, I have the SVG file available in my free resource library. Simply fill out the form below to get instant access. The file is for the last design pictured with the swirly at the end of the ‘e’ Here it is cut.
Exclusive Access to the Free Resource Library and the “it’s so good to be home” SVG file.
More DIY Stencils to Make with Different Materials
Stencil Tea Towels with Freezer Paper
Use Mylar Sheets or Laminate to make Reusable Stencils
Make Larger Than Mat Stencils to Make Large Farmhouse Signs
Make a Welcome Front Porch Sign Using Stencils

Pin How To Make A Stencil The Easy Way With Your Cricut

Chris Butler has helped thousands of crafters learn how to use their Cricut machine without feeling overwhelmed. She is a best selling author and an up and coming designer. For fun Chris enjoys designing SVG Files, hanging out with her family (preferably at the lake), traveling, and volunteering at her church. She is a wife and mom of two crazy fun kids.
How did you get the “e” to continue on like that?
With glyphs or special characters. I explain how to do that in my post here https://dailydoseofdiy.com/how-to-edit-text-cricut-design-space/
I also have a guidebook full of Cricut Cheat sheets that has special characters in it for PC and iPhone/iPad that you can get here https://dailydoseofdiy.com/cricut-guide/
I was told you have to slice letters like a, b, p, o, in order for them to come out right on a stencil, but i noticed you don’t do that. How do you get them to come out right ?
Debbie – a newbie
Hi Debbie! Nope you don’t have to slice. I think that just makes more steps to do. Once you place your design over the square/rectangle select everything and attach, that will keep everything in place and they will cut correctly
Hi,
How do you keep the center of letters in place while painting? TIA
Kristi
Hi Kristi! The vinyl is sticky so they stick in place pretty well.
Thank you so very much, that was the most well written tutorial I have read on all the sites I have been too
I, too, am a Jesus lover. Lord bless you and please keep teaching us newbies out here.
Thanks Vicki!
Hi which cricut machine should I use to make stencils?
You can use any of the Cricut machines to make stencils. I primarily use my Explore, but they will all work.
Hi chris , what about transfer tape do I need it ?
Tia
Yes, you will need transfer tape when you apply the stencil. I talk about that in this post https://dailydoseofdiy.com/vinyl-stencil-on-wood-secrets-to-a-perfect-hand-painted-sign/
I’ve made four failed attempts at my first stencil using my Cricut Explore Air. The package for the Dritz no-melt mylar template plastic sheets doesn’t tell me how thick the sheets are. I’ve tried using a 1 mil setting, a .6 mil setting, the posterboard setting on the dial, the stencil setting, and none of the cuts go through all the way through the sheet. Chris, do you or anyone else have a suggestion as to a setting I can use that will make a cut deeper than the 1 mil sitting?
My stencil sheets had to be cut on a certain side. There’s a thIn film on one side you place that side up and cut on that side
When making reusable stencils how do I keep the center of e intact?
Hi Elizabeth! I talk about that in my reusable stencils post here. https://dailydoseofdiy.com/diy-reusable-stencil-cricut-explore/
Basically you’ll need to make a line to attach the centers or use a stencil font so it’s already attached for you.
I thought I did every step but my option does not light up to move the black square to the back!!
I’m trying to make a vinyl stencil for etching purposes but I can’t get the dots in a e d and g to stay with the stencil. What am I doing wrong?
I’m assuming your using transfer tape. Are you burnishing those areas really well? (rubbing really hard) . If all else fails you can use your pik to place them where needed.
Help! I believe I have ordered your buffalo plaid stencil…Sweeney I cut it out, I have no attaching lines on it anywhere, so it is impossible to transfer to a project without losing halfway of the design…what am I doing wrong??!!!
Hi PAm! I don’t sell a buffalo plaid stencil, but if you link me to it I’ll take a look and see if I can find the problem.
Is it possible to have “bridges” on a stencil so that the center of round letters remain attached?
Yes it is, I talk about this in my post on making reusable stencils here. https://dailydoseofdiy.com/diy-reusable-stencil-cricut-explore/
With vinyl stencils though, it’s really not necessary.
I want to make 6 inch letter stencils out of cricut stencil vinyl that I can reuse. Is this possible?
Hi Allison! Stencil Vinyl is not reusable, it stretches and tears when you pull it off. You can use mylar though, I have a post on it here . –> https://dailydoseofdiy.com/diy-reusable-stencil-cricut-explore/
hello! what transfer paper do you use?
Hi Natalie! I use clear contact paper
Are you using the Cricut Explorer 2 or Maker?
I use both
Hi! I’m absolutely in love with your blog and all your helpful tips!
I have a quick question. What is your favorite vinyl to use for both removable stencils and “stay on vinyl” ? I have bought several kinds of vinyl, and would love your opinion. Thank you for your time
Hi what is the best vinyl to use for this? I used my cricut stencil vinyl and it bothers me that its clear and very thin. Any recommendations on brand or type of stencil vinyl to use? Thank you! God bless.
I love Oracle brand stencil film.
Hello There, I am thinking about purchasing a Cricut to make wood signs and other projects to possibly sell and give as gifts. I am not very computer savvy but you seem to share very good instructions. Which Cricut model do you recommend? I have slot of old windows that I wood like to use vinyl lettering on as well. Your expertise would be very much appreciated. Oh do you happen to sell word art on vinyl or the stencils?
Hi, When painting a stencil onto wood does it matter what kind of paint you use? or what’s the best. First attempt to doing this project.
Thanks,
Cindy
Ok I tried stenciling on a wood board that we painted. It was all dry when i pulled the stencil off the paint came with it. So I am not sure what i need to do.
Hi Cindy! That could be a few reasonsfor the base coat… either the board wasn’t clean before you painted, you used a poly or protectant that wasn’t cured yet, or the vinyl that you stenciled with wasn’t right for stenciling.
It also helps to pull the stencil off against the grain of wood.
If the letters you stenciled came up that usually happens when the base coat is a gloss or was covered in poly or too much paint was used on the stencil.
how do I turn a poem into a stencil. I have the poem as an svg. It is very large file.
I have a picture of 4 birds. They are very simple, but I only want to use one of them as a stencil to paint on a flower pot. I can’t figure out how to just use one and how to make it a stencil I can paint. Do you have a video on how to make a stencil after you upload a file? How to crop it or whatever you have to do to make it ready to cut? Thank you. Mary
Hi Chris
I make stencils out of 6 mil plastic. They vary in size from 11×11 to 22×22. What is the best Cricut for the job? Do I need a special blade?
Thanks, Page
I found it on Pinterest. But it was link for a graduation centerpiece for a file. I noticed you updated it from 2021 to 2022. Would you be able and willing to update it to 2023?
Thank you!