This post may contain affiliate links for your convenience. If you make a purchase through one of my links I will earn a small commission at no additional cost to you.
Last Updated on April 9, 2019 by Chris Butler
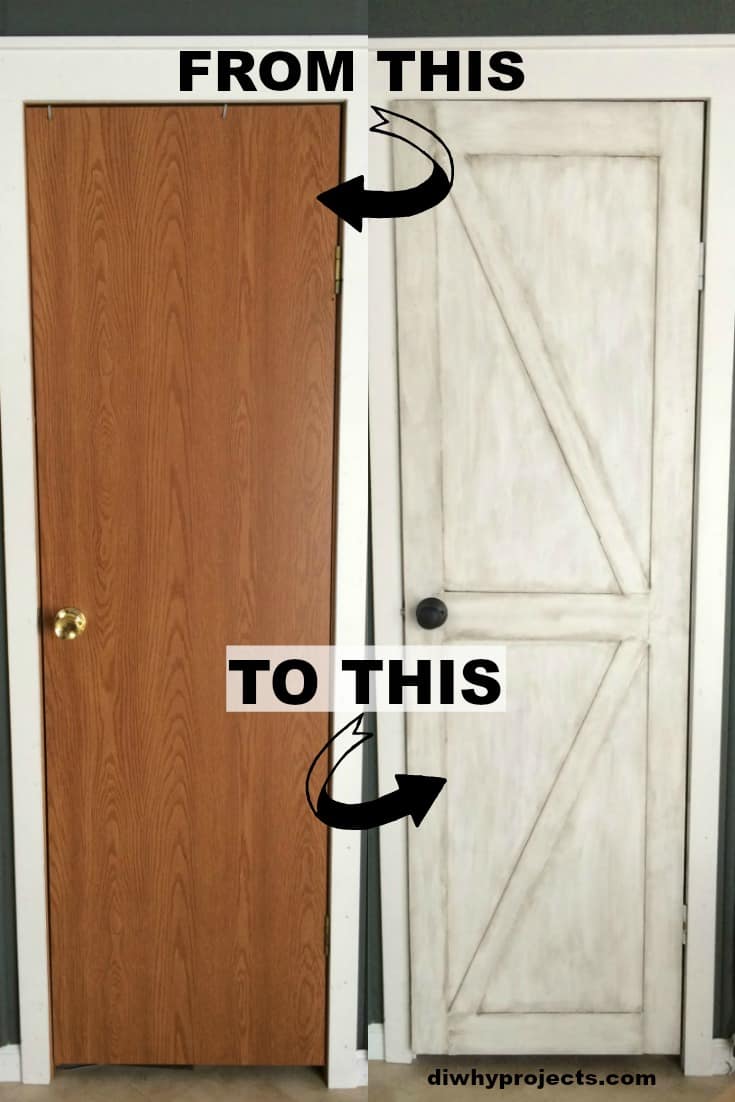
I love how paint can transform things from drab to beautiful. Our house has what I would call builder grade hollow core doors. They are completely flat, laminate and without character.
But all of that can change with some paint, wood and a few hours to kill. First on my list to redo is my pantry door. The original plan was to do a shaker style. But at the last minute, I changed my mind to a barn door. And I am so glad I did. So so glad.
PIN IT
Quick Links to Information in This Post
Hollow Core to Barn Door Supplies
- Paint and Primer in One (I used Valspar from Lowes)
- 1/4″ plywood
- Wood Glue
- TSP Cleaner
- 1″ Finishing Nails
- Wood Filler
- Paint Brush
- Saw
- Drill
- Screwdriver
- Antique Glaze (optional)
- New Door Knob (optional) -I ordered this one for a pretty good price
How To Turn Your Hollow Core Door into a Barn Door
Let’s start with our plywood. You will need 1/4″ thick. You can find this at Lowes or Home Depot and they will cut it for you too, which is super handy. Make sure you have your measurements ready.
My pantry door is pretty narrow at 24″, so I didn’t cut my plywood very wide. The sides are 3″ and the three horizontal pieces are 4″. The cross sections are 2″.
Grab a tape measure and some chalk and mark out some measurements on your door to see what widths will look best. Standard doors are 36″ so I would start at around 4″ for the sides and see how that will look. While you are there, grab a marker and mark the position of your hinges on the door. Be sure to mark the top and bottom of each hinge.
Notch the Hinges
Once you have your wood and the rest of your supplies gathered, remove the door from the hinges. Remove the doorknob also. The first thing you want to do is grab one of the pieces of plywood that will go on the sides. We need to transfer the hinge marks to this piece.
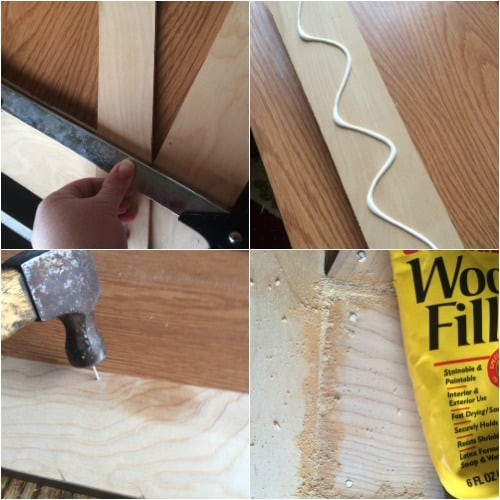
So line it up with your hinge marks, be sure it’s also lined up to the top and bottom of the door. Mark on the plywood where the hinges are. Measure in 1/4″ and use a jigsaw to cut out that little notch for the hinges. You need to do this so your door will close properly.
I didn’t do that step and my door didn’t close, so you will get to see what I had to do instead at the end.
Clean and attach the plywood
Now we need to give the door a good cleaning with TSP cleaner. This will remove all the grime so our paint sticks good.
After the door is clean arrange all the plywood pieces on top how you want them to go. Make sure the notched piece is where the hinges will be. Apply wood glue to the back of the plywood and stick it to the door. Make sure your tops and bottoms are lined up perfectly and the plywood is flush with the door all down the side.
You’ll notice 1/4″ plywood is pretty flimsy, and may be curled on the ends. I also hammered in some finishing nails to make it stay down, and to make it look more authentic to a barn door.
After your sides and top and bottom are in place, you can measure to find the center for your middle horizontal piece and glue that down. Now for the cross pieces…. I’m sure there are some tools and geometric method to find the correct angle to cut these boards, but here’s what I did…..
You can see in the top right picture, I lined the board up how I wanted it and then using a straight edge, I marked where it needed cut. Then set your miter saw to whatever angle your line is at. Easy peasy.
Cut and glue and nail your cross pieces of plywood on. Finally, you may have some gaps you want to fill with wood filler. I had a pretty big gap (bottom left picture) that I needed to fill, so I went ahead and filled all of the joints.
While I was waiting for the wood filler to dry, I flipped the door over and painted that side. Since it’s the inside I just kept it plain white.
Sand and Cut out Door Knob.
If you used wood filler, you will need to sand it smooth after it dries. Your doorknob hole is also probably covered with plywood. Mine was completely covered so I used a drill bit bigger than the saw blade to drill a hole in the center. Place the jigsaw blade into the hole and cut out the rest of the doorknob hole.
After all of your sanding and sawing is done, clean off the door again, being sure to remove all of the sawdust.
Paint and Glazing
I used Valspar Paint and Primer in one with satin finish. The key is to use thin coats of paint. The first coat should be very thin. So thin that it will look bad and you will wonder what you were thinking. Don’t worry the next coat will look better!
While you are in between coats of paint you can stick your paint brush in a sandwich bag and place it in the refrigerator. That will keep it from drying out, and you won’t have to clean up after every coat of paint.
And the good thing about keeping thin layers, it dries super fast.
After the first coat is completely dry add your second coat of paint. You still want a thin layer, but you don’t have to go quite as thin as your first coat.
You will now see it all coming together. Many doors will only need two coats, some areas might need three coats of paint. After you are happy with the paint coverage and everything is completely dry, we are ready for some antique glaze.
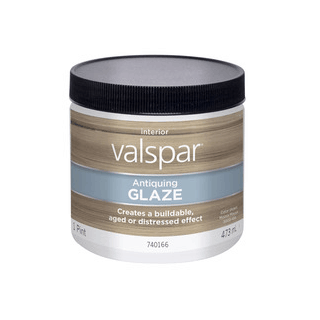
I used Valspar from Lowes. A little of this stuff goes a long way. I only used what was in the cap and still had some left over.
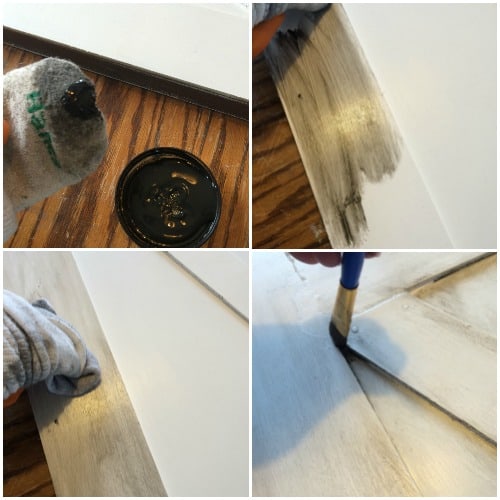
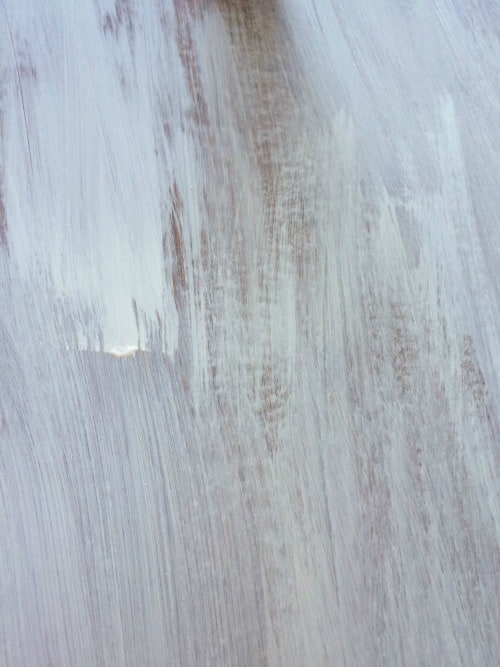
I use the dry method to apply the glaze. So I put on a rubber glove and put an old clean sock on over the glove. Get a small dab of the glaze onto the sock and rub it in. Be sure to work in small sections for this part.
Before the glaze is completely dry take another old sock or clean dry rag and start wiping the excess glaze off. Rub harder on the areas where you want it to be lighter. I did this down the centers of most of the boards.
If the glaze gets too dry before you can wipe it off just apply another dab of glaze over the top of the dry section and it will all wipe away. You really can’t screw this up, that’s why it’s so fun to work with.
Repeat this process until your door is finished. I used a dry brush to get in those small spaces I couldn’t get my sock.
If you want to protect your door with a poly coat wait a good three days before you poly over the glaze. Otherwise the glaze with just smear around and come off.
Notching the Hinges Second Method
As I said earlier, I didn’t cut out notches for the hinges before I glued down my plywood. I got the door back on and it would not close! So frustrating. So I had to mark the hinges and take the door back off.
Next I took a flathead screwdriver and a hammer to notch out the space for the hinge. 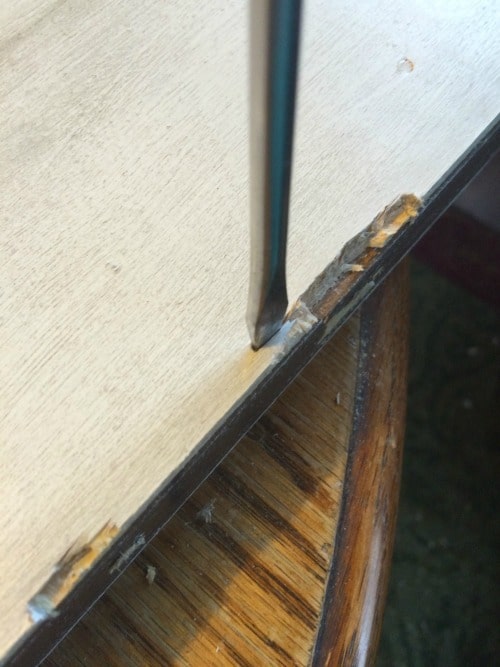
Not as easy as just cutting it, but it still works and I am happy to report my door closed perfectly afterward.
It’s quite the transformation for an afternoon project!
This is the beginning of my kitchen remodel. Coming up I plan to paint my kitchen cabinets in a day, shiplap my kitchen island and build a butcher block top for it too!


Chris Butler has helped thousands of crafters learn how to use their Cricut machine without feeling overwhelmed. She is a best selling author and an up and coming designer. For fun Chris enjoys designing SVG Files, hanging out with her family (preferably at the lake), traveling, and volunteering at her church. She is a wife and mom of two crazy fun kids.
I love it! Looks do awesome!
Thank you!
L❤️VE this!
It goes from BORING to HELLO BEAUTIFUL
I would use the antiquing glaze to paint thin lines down the door to mimic wooden slats.
Thanks Kristy! That’s a great idea!
The door looks amazing
What paint colour did you use?
Thank you! The color is Bistro White by Valspar.
Would really like to try this, just outside of door?
Hmmm, I’d like inside & outside barn door.
Any needed modifications come to mind?
Thanks so much!!!
Hi Theresa, thanks for stopping by!
You can do the inside of the door also. You probably have a door stop in the center of the frame, it goes down at least one side and possibly all three sides of the door. You will need to take the stop off and move it back 1/4′ to allow for the plywood. That way your door will still close. Here is an article that explains how to do it. http://www.home-repair-central.com/adjusting-the-door-stop.html
I love this idea I am goin go costa rico and am going to try it on a door there.
thanks so much for the idea. you are amazing.
I will let you know how it turns out.
This will be my first project I have ever done.
thanks lori
I absolutely love this idea.
Thanks Vicki!
Love this! I too, wanted to do the shaker style door but really thinking about a barn style now!
My husband has enough honey-do’s….is it easy enough that I could attempt it all myself??? I’m pretty crafty, but not sure about the miter saw. He would help with the removing the door, but not so sure he’d want to be a part of the project of transforming it into a barn looking door! I so want to do this…it’s a wonderful idea and would make such an amazing difference in our home! Blessings!
Miter saws are really easy, just pull down and it cuts. I bet he would be happy to show you how to do it, and then there will be so much you can do!
Absolutely Beautiful!!! I cant wait to attempt this look!! Have a good day Chris
THANK YOU, THANK YOU!!!!
I was not able to afford to purchase a barn door.
You’re a genius and a blessing!!! This will be my summer project 👍👍👍👍
I typed of plywood did you use?
Did you have any problem with the door knob not fitting through the thickness of the door and the added plywood?
Thanks!
Christina
No I did not have a problem with the door knob.
I would like to see some additional photos to be more convincing to my hubby. Please!
How did the door handle work with the added width of the wood?
No problems, Most after market door handles can fit different thicknesses of doors.
Hello,
I would like to DIY my doors but I am wondering if we do both sides. Sounds like a silly question but everyone’s tutorials seem to only show one side done.