This post may contain affiliate links for your convenience. If you make a purchase through one of my links I will earn a small commission at no additional cost to you.
Last Updated on December 19, 2023 by Chris Butler
Using Cricut Print then Cut will open up a whole new set of fun crafts you can make. In this Cricut tutorial, you will learn how to use print then cut to make cards for any occasion.
You’ll also learn the max size you can design with print then cut, how to print and cut your own image, plus much more, including some troubleshooting tips.
And once you learn how to make print then cut cards you’ll save a ton of money giving cards to friends and family. I’ve seen cards priced $5 and up at the stores! Plus you can personalize them which is also fun and makes them extra special for the recipient.
Let’s get started!
Related: How to use Print Then Cut to Re-Create Hand Written Recipes

Quick Links to Information in This Post
Print then Cut Cards Supplies Needed
Cardstock – White will work best, but you can use any light color – https://amzn.to/35JjAvT
Glue Stick or Tacky Glue – https://amzn.to/3HspEHm
Home Printer with Colored Ink
Cricut Cutting Machine
Card Template – This is available in my free SVG library
Images and Clip Art – For this project I’m using these images from Design Bundles
Scoring Wheel or Scoring Stylus (optional)
I have a free SVG library available for you. It’s where I keep all of the designs for my projects. All SVG files are listed in alphabetical order, so for the card template, you’ll scroll down to ‘C’ for CARD TEMPLATE. There are images in there to make them easier to find, and links back to the original tutorials in case you see something else fun you want to make!
All of our free SVGs and Designs are kept in a library for your convenience. Fill out the simple form and we’ll send you the link and password to access the SVG files right away.
Already have the password? Enter the Library HERE
Cricut Print Then Cut Video
Step One: Print then Cut Template and Images
After you’ve gathered all your supplies, you’ll need to download all the digital resources that you’ll need for making your cards. That will include my free Card Template SVG File from my library and some cute graphic clip art images that you can find in lots of different places, including Design Bundles or Cricut Access.
To grab the free template fill out the simple form below.
All of our free SVGs and Designs are kept in a library for your convenience. Fill out the simple form and we’ll send you the link and password to access the SVG files right away.
Already have the password? Enter the Library HERE
Downloading the Card Template SVG
Once you’ve accessed my free SVG library you’ll scroll down to find the file named “Card Making Template” and click the link to download. Then upload that file into Cricut Design Space. If you need more help on downloading and uploading SVG files, check out this post!
The first thing you’ll need to do with the card template once you’ve got it in Design Space is to select the design and use the ‘ungroup’ command from the layers menu.
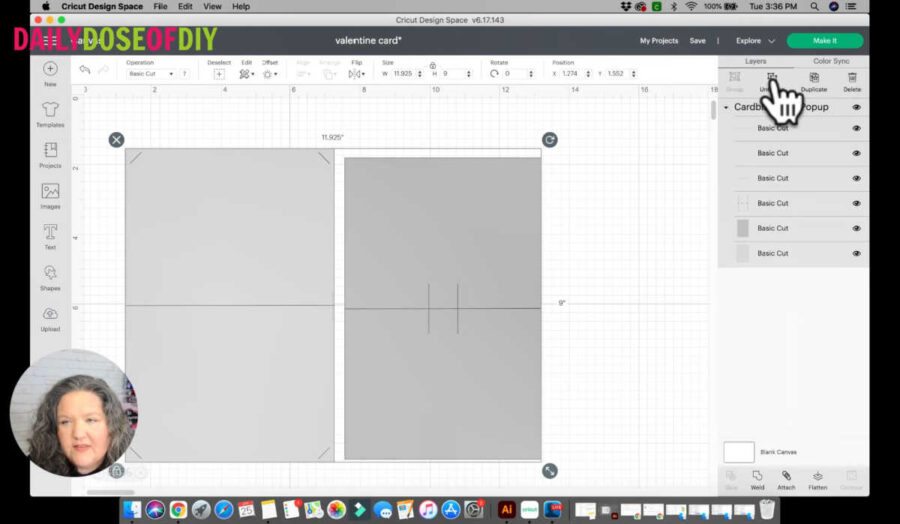
Once you’ve ungrouped your layers, you’ll need to select the card squares and change the color of them to white. I made the design gray so it would be easier to see in Design Space, but since this design is a print then cut, if we leave it gray that is the color it will print as.
The next thing you’ll need to change on the template is the lines that run through the center of both cards. That line will be where you fold your card, but the line is currently set to ‘basic cut’. If we don’t change it our card will get cut in half. So, you’ll need to select the line and from the top menu change the operation to ‘score’.
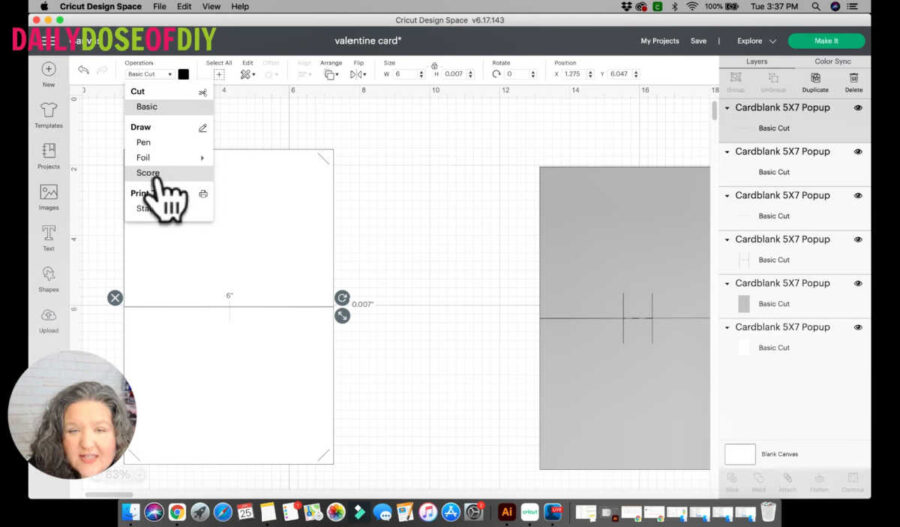
Tip: If you don’t have a scoring wheel for your Cricut Maker or a scoring stylus for your Cricut Explore, then you can just delete the center line and fold your card by hand.
Finding & Downloading Graphics for Your Card
The next thing you’ll need for your card is some cute graphic clip art. If you have Cricut Access, you may be able to find something fun under the images tab. However, I like to find my graphics at designbundles.net.
In the search bar on the Design Bundles website, you can type in whatever occasion you’d like to make a card for, such as ‘birthdays’. When your search results come up you can narrow them from a list on the left side of the screen to only show graphics.
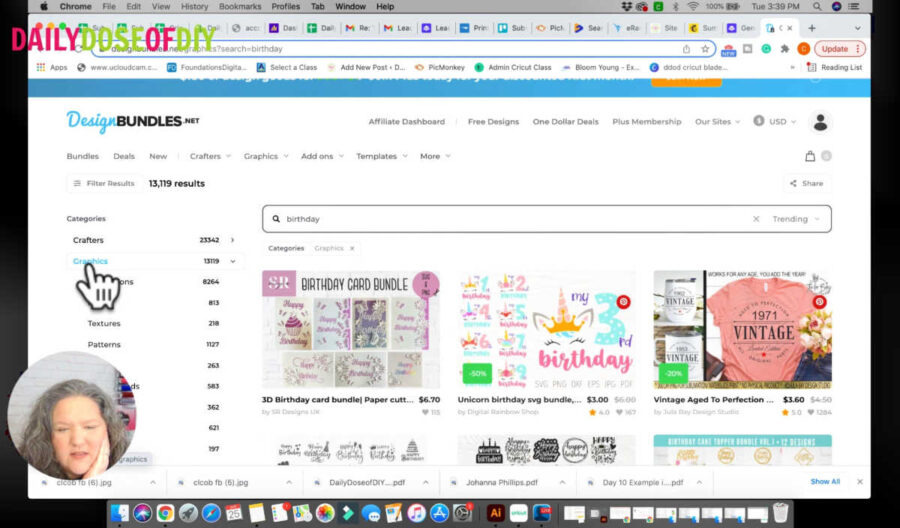
Once you find the images you like you can purchase and download them (don’t forget to check out their free section!). Typically, graphics are .png files rather than .svg files like you may be used to. The download process will be the same, however, uploading into Design Space is slightly different.
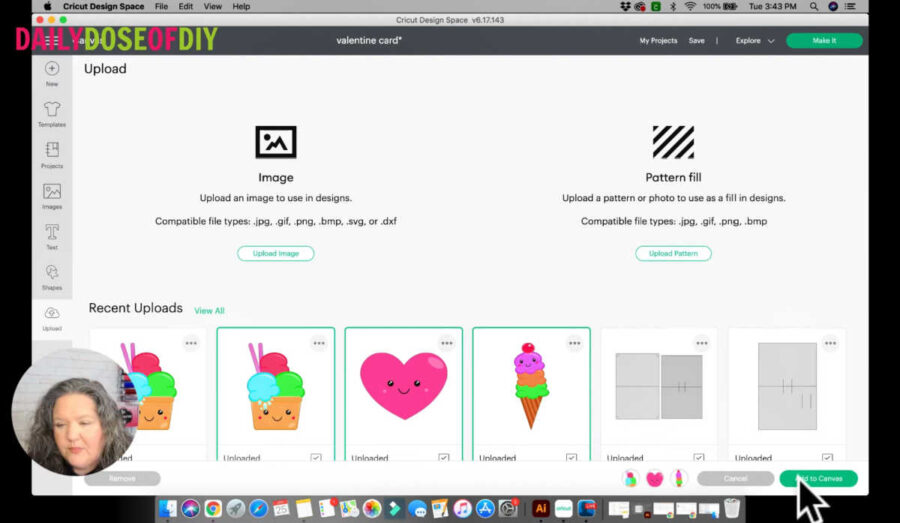
To upload your graphic files, you’ll go to the upload screen and select ‘upload image’. From here you can either drag and drop the file you want to use, or you can browse for the file and select it from your folders. The next screen will ask you to select an image type. For print then cut graphics, I would recommend choosing ‘complex’. Then click ‘continue’.

Since you’re using a .png file, your image should have no background, so on the next screen you can select ‘apply & continue’. On the last screen of the upload process, you’ll be given the option to select ‘cut image’ or ‘print then cut image’. Select ‘print then cut image’ and then ‘upload’.
Complete that process for as many image uploads as you need for your design. Then, select the images while holding the shift key and click ‘add to canvas’.
Step Two: Design Your Card
Now that you’ve got your graphics in Design Space you can start to design your card. Keep in mind that you need to keep all of your text and graphics below your score line on both halves of the card.
To start, you’ll need to decide if you want your card to be a pop-up card or not. The 2 vertical lines on the smaller half of the card will create the pop-up effect. If you don’t want that in your card you can just delete those lines.
If your card will be a pop-up card, you’ll need to decide which graphic will be on the pop-up. After you decide you can size the graphic accordingly, then move it to the side of your card template.
Design the Front of the Card
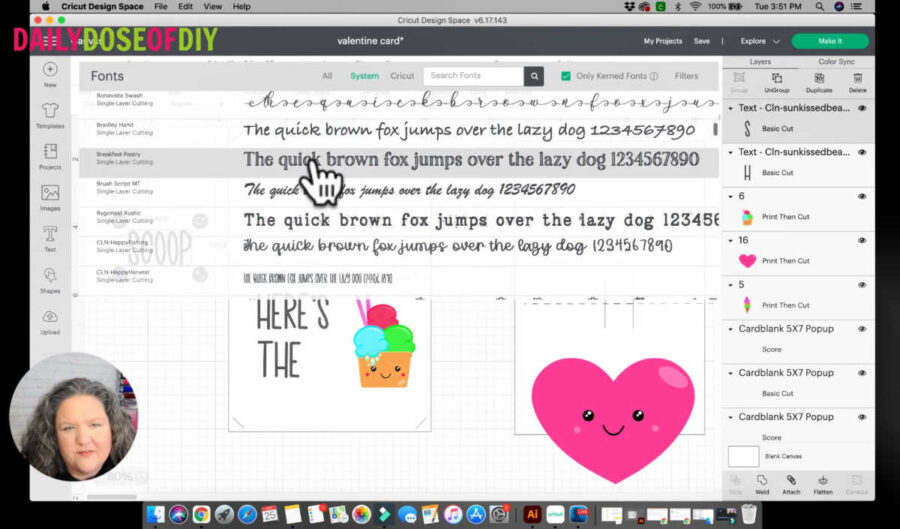
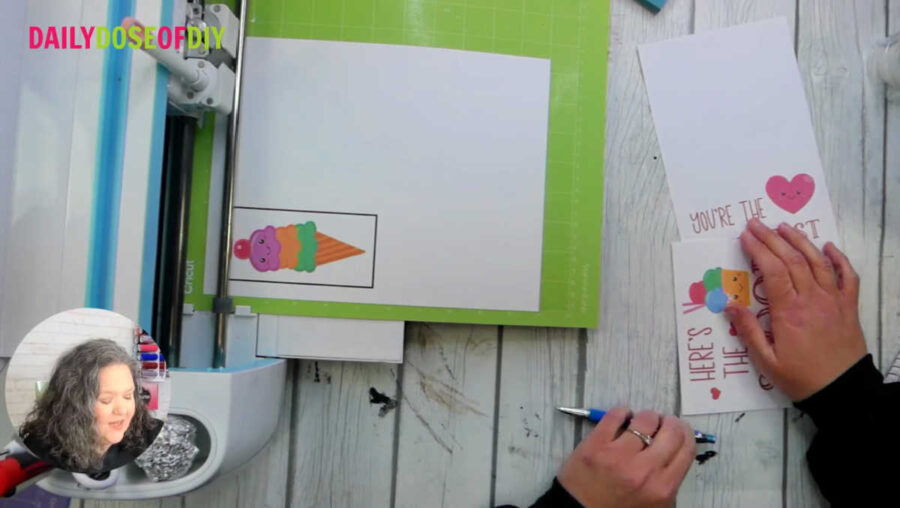
Next, you’ll need a saying for your card. If you don’t know what to say, just do a quick Google search for cute or funny card sayings. For my Valentine’s Day card, I want to use the ice cream graphic, so the front of my card will say, “Here’s the scoop”.
After typing in the text, you can change the font from the top drop-down menu. The two fonts I used for this card were CLN-Sunkissed Beach and Breakfast Pastry.
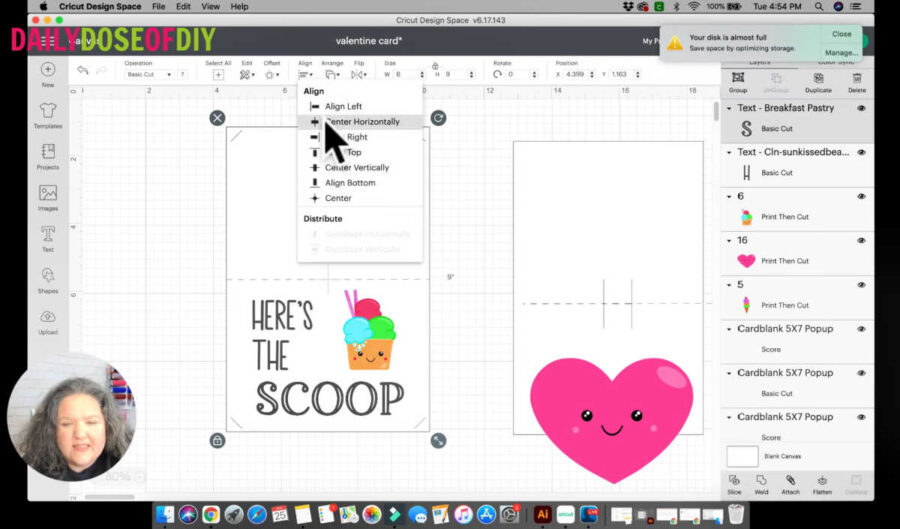
Now that all of the elements are on the front of the card, we can start moving the graphics around and sizing them to fit in a way that looks good. For my card I wanted the word scoop to be centered on the card. To do this, I selected the outside line of the card and the word scoop.
With both elements selected I used the ‘center horizontally’ command from the ‘align’ drop-down menu.
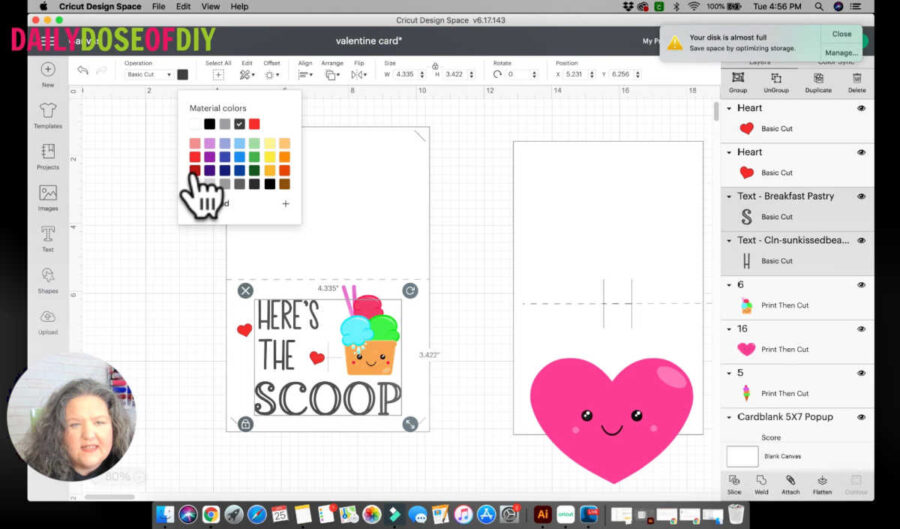
Just to add a few finishing touches to the front of my card I decided to add a couple of little hearts from the ‘shapes’ menu of the left side of Design Space and change the color of my hearts and text.
To change the color of different parts of your design, select the image or text and click the color swatch from the top menu. From there you can select a new color for your design.
Step Three: Prepare To Print Then Cut
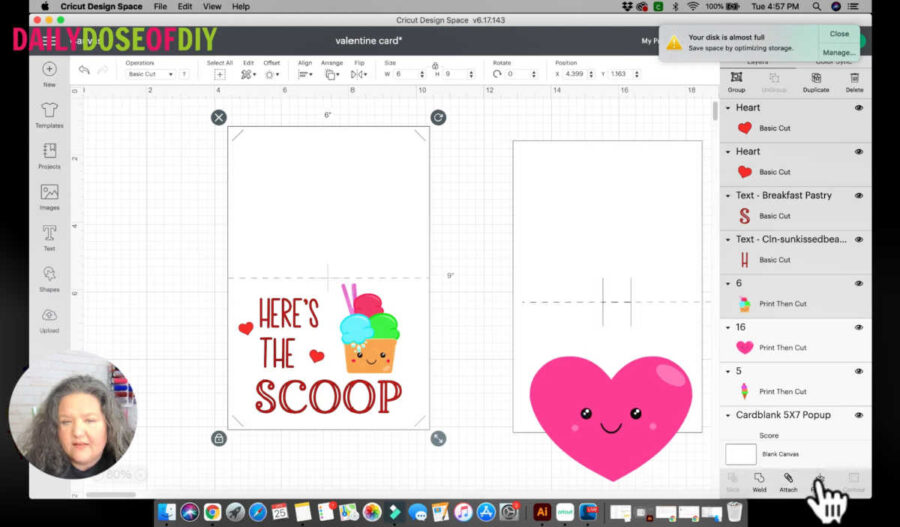
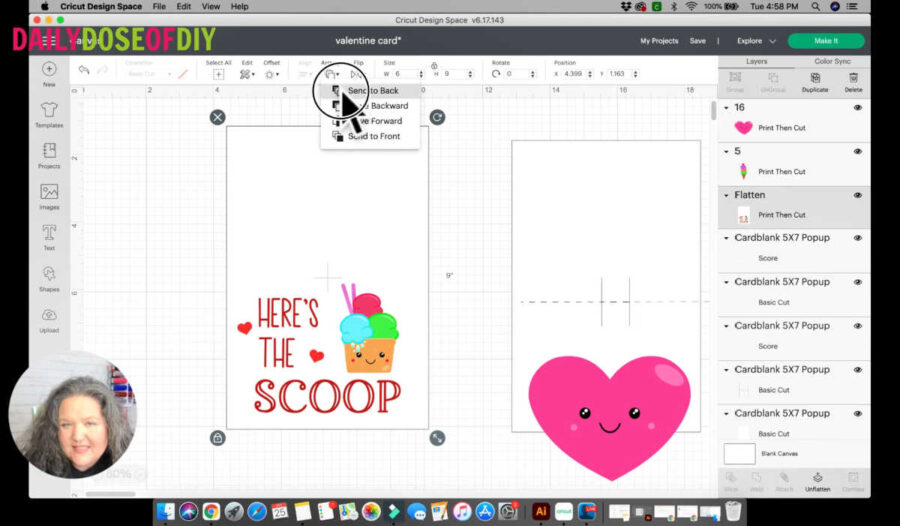
After you’ve got the front of your card designed exactly the way you want it, the next step is to ‘flatten’ it. Flattening your design is a very important step when you’re using Cricut print then cut. This step keeps your Cricut from cutting your graphics and text out of your card.
To flatten your design, select every part of the card that needs to be printed. This includes the outline of the card, all of the graphics, and all of the text. Do NOT select the diagonal cut marks in the corners or the score line in the center of the card.
Tip: If it’s hard to select each part of the design you need to flatten from the canvas, you can also select multiple images from the layers menu on the right by holding down the shift key and clicking them.
After flattening your design, you may notice that you can no longer see the cut marks or score line on your card. To fix that, select your flattened design, click the drop-down on the ‘arrange’ menu, and select ‘send to back’.
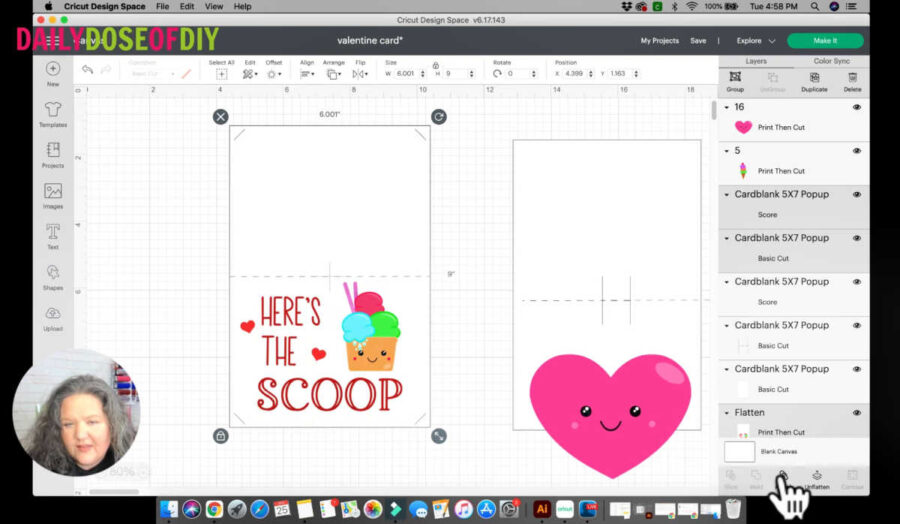
The last thing you’ll need to do to get the front of your card ready to print then cut is to attach the cut and score lines to your flattened design. Simply select the entire card and click ‘attach’ from the bottom of the layers menu.
Repeat the Process
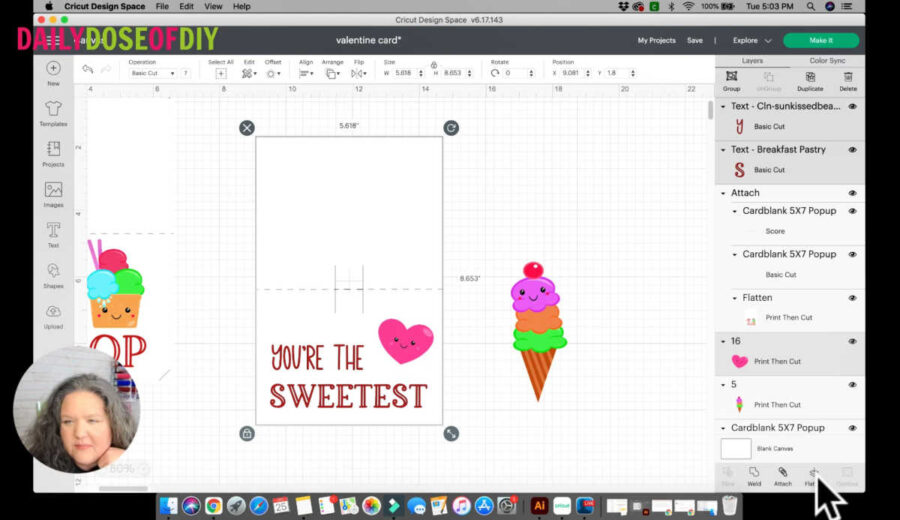
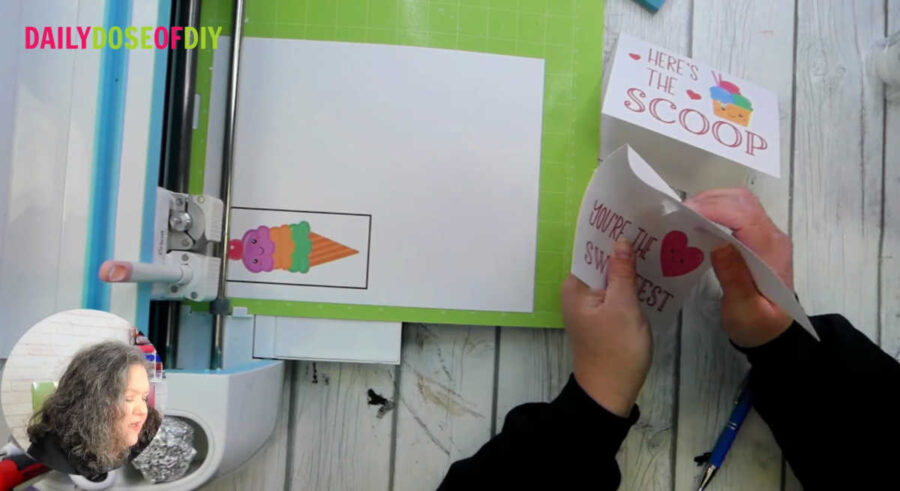
Now that the front of the card has been designed, you’ll have to repeat the entire process with the inside of the card. The front of my card says, “Here’s the scoop,” and I finished the inside of the card saying, “you’re the sweetest” with a cute smiling graphic heart.
After placing the text and graphics, finish the inside of the card by flattening your text and graphics to the card and attaching the score line and pop-out cut lines to the flattened design.
Once the inside and outside of your card is ready, click ‘Make It’.
Step Four: Print Your Cards
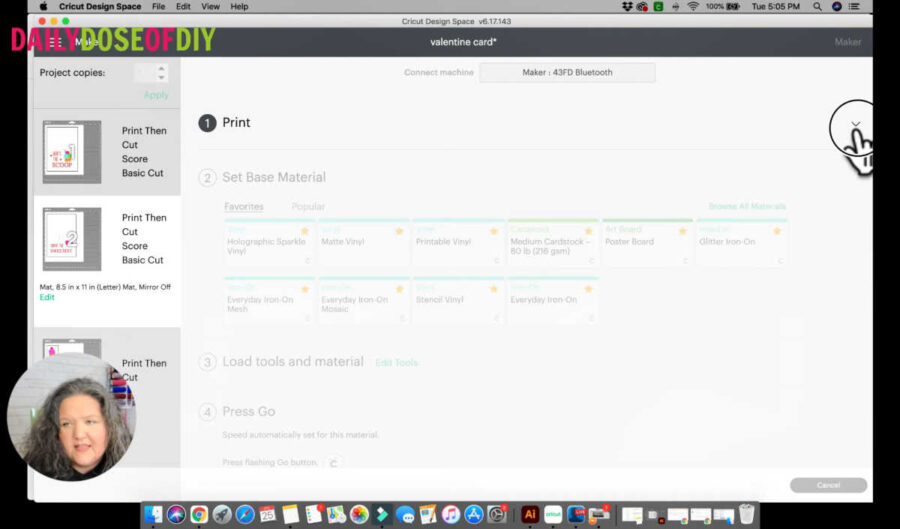
After clicking ‘make it’, the first screen will show you a preview of the mats that will be printed and cut out. Take a moment to check your mats to make sure they look correct. If so, click ‘continue’.
If this is your first time using print then cut you may be wondering what the thick black line around your design is. This is your Cricut’s way of calibrating your machine to cut in the correct spot.
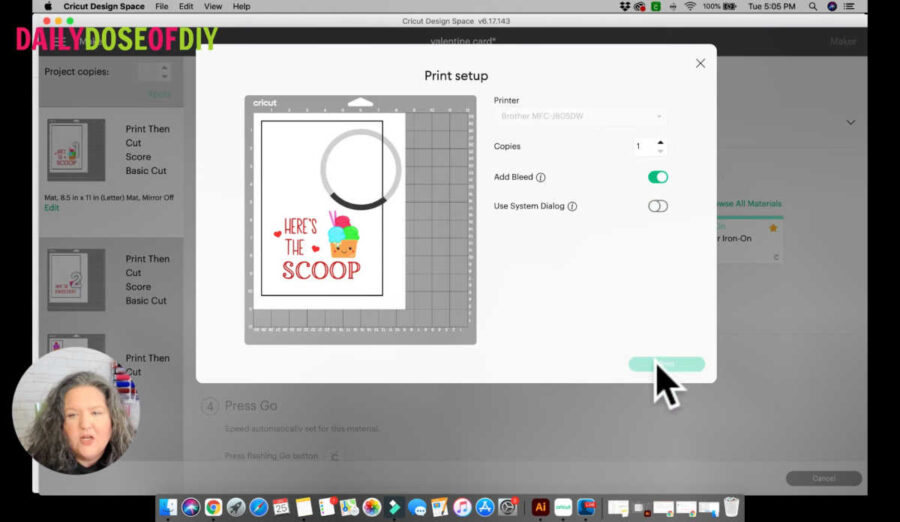
On the next screen, you’ll be able to send your design to a printer. Starting with the first mat, click ‘send to printer’. This will open a print setup window that will allow you to select which printer you’ll be using. On this screen you’ll also be able to choose to print multiple copies or turn on bleed, which I would recommend.
Another thing you can do from the print setup screen is to use your system dialog to print. You may want to use this function if you’d like to change the quality of your print settings or to make sure that your design will print in color. Once you’ve got your print setup the way you’d like it, click ‘print’.
It’s important to note that you will have to repeat the printing process for each mat by clicking the mat and then selecting ‘send to printer’. If you don’t see the option to send it to the printer you may have to manually select the drop-down under step 1 – Print.
After you’ve printed all of your mats, make sure you select mat 1 again before continuing to cut!
Step Five: Cut Your Cards
After you’ve printed your cards, the next step in Design Space is to select what material your Cricut will be cutting. If you have an Explore you can set your dial to cardstock, or if you have a Maker, select your material from the list.
Another step you may want to do if you have a Cricut Maker is to choose between your scoring wheel or scoring stylus. On step 3 – Load tools and material, you will have the option to edit your tools.
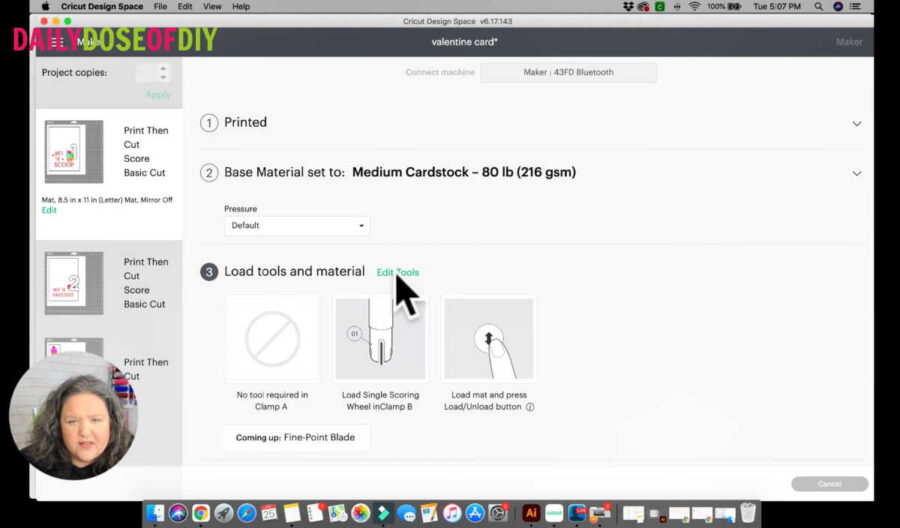
I chose to use the scoring stylus so that I could have my scoring tool and cutting blade loaded at the same time. If you choose to use the scoring wheel, just know that you’ll have to remove it to load your cutting blade.
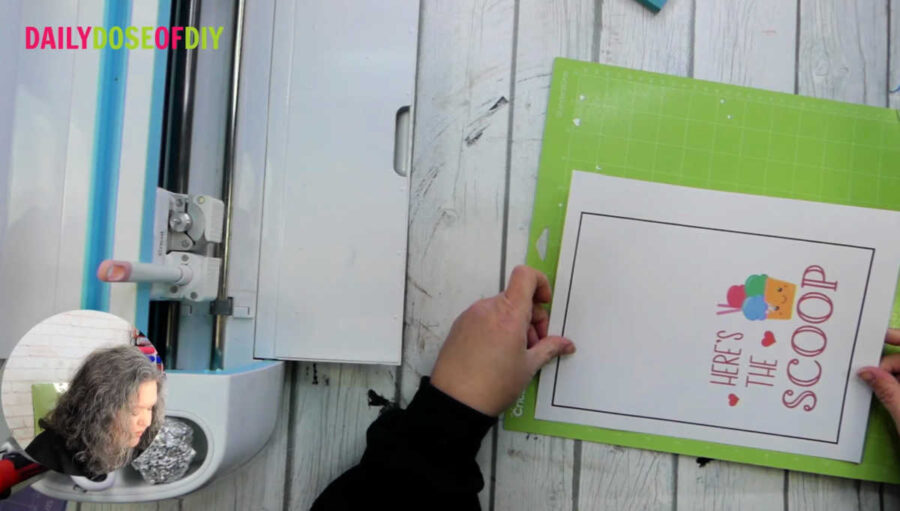
When you load your paper onto your mat, make sure it matches the way it’s shown in Design Space. Once you’ve done that, load your mat into your machine and click the flashing light to make it cut.
Step Six: Assemble Your Card
Fold your Card
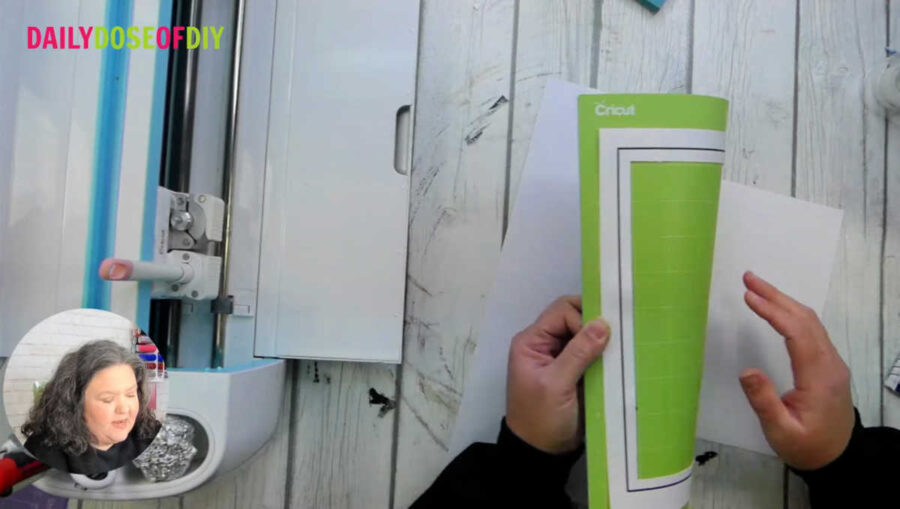
After all of your mats have been cut, flip the mat over and peel the mat away from your card. By peeling the mat away from the card, it will keep your cardstock from curling.
Once you’ve gotten all of the pieces of your card off of the mat, you can start to put it together. Start by folding each half of your card along the score line. The outside of the card will be folded with the text facing out, while the inside of the card will be folded with the text facing in. To make a sharper fold, you can use a scraper tool or even a pen will work in a pinch.
Another thing you’ll need to pay attention to while folding your card is the pop-out cut. The pop-out section of your card will need to be folded the opposite direction of the center crease.
Attach the Inside of the Card
The next step will be attaching the outside and the inside of the card together. You can use glue if you’d like to for this step, but the small diagonal cuts in the corner of the outer card should hold the inside of the card in place just fine. Simply stick each corner of the inner card through the cut and you’re good to go!

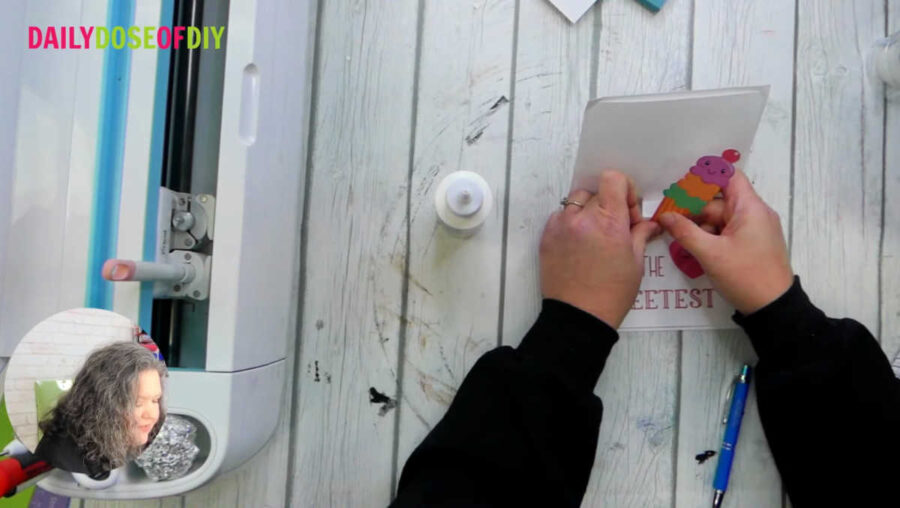
Glue your Pop-up into Your Card
Next, when your pop-out is folded you’ll have a small square to glue your graphic to. Place a dot of glue onto the front of the pop-out square and hold your graphic there for a moment. It’s important to be sure you can still close your card once you’ve attached your graphic to the pop-out. However, make sure the glue dries with the card open, so your card doesn’t accidentally get glued shut.
And that’s it! Now you’ve got a gorgeous card to share with someone you love. Stay tuned for some FAQs about Cricut print then cut below.
Print Then Cut Troubleshooting and Tips
Use PNG Images for Print then Cut
For the best results, when you do Print then Cut you should use clip art or graphics that are .png files. The reason for this is because typically .svg files are designed specifically for cutting and are not very colorful. You may wonder why you can’t use .jpg files, and the reason is that when you bring a .jpg file into Design Space, there will be a background behind your image and the only cut will be the outside square around that background, while .png files should have no background.
Make Sure Any White on your Images is Actually White
As I mentioned PNG images don’t have a background. So the white background you see on your screen disappears when you bring it into design space. I’ve run into some designs that look like they have white in the design, but once you bring it into design space the white part of the design is really not there, you just have the blank background.
This is an error on the designer’s part and is pretty rare, though I’ve had it happen to me more than once. Cricut will cut those areas that were supposed to be white and your design will end up in bits and pieces. A work around is to add a white square to the back of the design and then attach the two together.
Use Shapes Behind Text
When you put text onto a print then cut project you should always flatten your text onto a shape. If you don’t flatten your text onto another shape, then your Cricut will try to cut each individual letter in your text rather than just cutting out the shape around your text.
Don’t forget to Flatten
Maybe you’re trying to make a print then cut project and you’ve got cuts in places you weren’t expecting. Make sure to go back and check that every printed element has been selected and flattened together.
Cricut Print then Cut FAQs
What is Cricut Print then Cut?
Print then cut allows you to print multi-colored designs on your home printer. Then your Cricut will cut out the outline of the image with a single cut.
What Projects Can I make Using Cricut Print then Cut?
There are so many fun projects you can do with Cricut Print then Cut. See a few of them below!
- Cards & Pop-up cards for every occasion
- Mini cutting board recipes – see the full tutorial here!
- Labels
- Planner stickers
- Gift tags
- Party decor & banners
- Nametags
- Photo booth props
- SO much more!
What is the max size for Cricut Print then Cut?
The maximum size for Print then Cut is 6.75″ x 9.25″.
How do you Print Text then Cut on Cricut?
To use text in a print then cut project you need to place a shape behind it and then ‘flatten’ the design.
What’s the Difference Between Print then Cut and a Cut Image on Cricut?
Cricut Print then Cut images are typically multi-colored images that you print. Then your Cricut will cut an outline around a single-layer design. However, cut images cut each individual color of a design out of multiple layers of a material.
Why Do I have to Print then Cut on Cricut?
You do not have to use the print then cut feature. Cricut will cut hundreds of materials on it’s own. However using print then cut allows you to use colorful mages, even photographs to make crafts with
Can I Print then Cut my own Image?
The simple answer is YES. You can use the print then cut feature with almost any image you want. However, for the best results you should use a .png file with no background whenever possible. If you’d like to see an example of the challenges you may encounter with using your own image on a project, check out this post I did using photographs in Letters to create a nameplate.
Does my printer need to be connected to my Cricut?
No. If your printer is connected to your computer you will be able to use it with the Cricut Print then Cut feature.
How does Cricut Know What to Cut When Using Print then Cut?
You may notice when your print then cut design prints out that there is a dark black line around it. This line will be read by a light on your Cricut to calibrate the cut. The cut may not be perfect but toggling on the ‘bleed’ feature in the print setup can help ensure that there is no white space around your design.
Also Cricut will cut the outermost layer of your design. That’s why it’s important to add shapes behind letters.
Can I use an SVG file for Print then Cut?
Yes. It is possible to use .svg files for Print then Cut. This will be like using text on print then cut. Each line of your design will be cut separately unless you place it over another shape and flatten the design.

Thanks for crafting with me today friends! You’re the sweetest!

Chris Butler has helped thousands of crafters learn how to use their Cricut machine without feeling overwhelmed. She is a best selling author and an up and coming designer. For fun Chris enjoys designing SVG Files, hanging out with her family (preferably at the lake), traveling, and volunteering at her church. She is a wife and mom of two crazy fun kids.
Thank you so much. I’m wondering if you can add (to your website/blog posts with your excellent instructions) an option to print out all your instructions (I can print to pdf)? I already pin them, but it would be handy to have quick reference pages too. Thank you.
Thank you so much Chris! This is the first time all of this overwhelming info has finally “clicked” for me. I’ve had my Cricut for a year now and every time I try to ‘step things up’ a bit, I get confused and discouraged. I didn’t want to reach the point where I’d give up forever, but with each attempt came more subscriptions, and mailing lists, and oh the SPAM! I can’t thank you enough for for clear, easy to follow instructions and for not making me watch hours of videos (I’m a late night crafter so I try to keep things quiet and my time is limited). I’m very excited to explore a that you have to offer. Thank you again for getting me past this hurdle!